It all started with the windows. You know, the old double-paned ones where the seal has broken and you can no longer see out of them because they’re all foggy? When you live in a very old house, there is always a longgggg to-do list and never enough time or resources. When we finally had them replaced, we discovered…we actually have sunlight-and a view! Who knew we had a water view from our master bedroom-it had been so long since I actually looked out that window…
  … and spotted a tiny sliver of the lake, but a realtor would list it as a water view, am I right? So…new sparkly windows means its time for a refresh of the entire room from the (seafoam green) ceiling down. Whenever I mention the ceiling, people look at me quizzically and ask “was that a thing?” I don’t know, but at the time, many moons ago, I thought it was…
 When there isn’t much in the way of architectural detail in a room, you have to create some interest in other ways. I guess that was my thinking at the time…soooo, on to the refresh! I started by painting the ceiling with two coats of Benjamin Moore Ceiling White-my go-to for any ceiling painting. Once that was completed, I tackled the walls. I painted three of them in Benjamin Moore Wedding Veil, the same color we used in the Black & White Woodland Nursery.
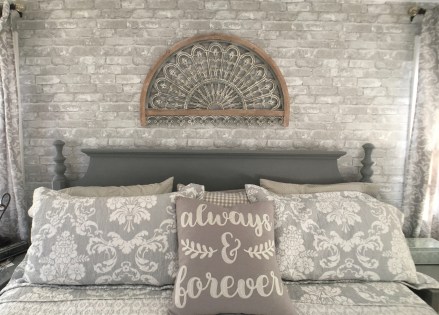
 It is a very soft, subtle gray, (almost white), color that works well with the new brick wallpaper that was applied to the accent wall. Wait, what?! Bricks are made from wallpaper?? Well, these bricks are! Can you tell they’re not real…well, at least online?
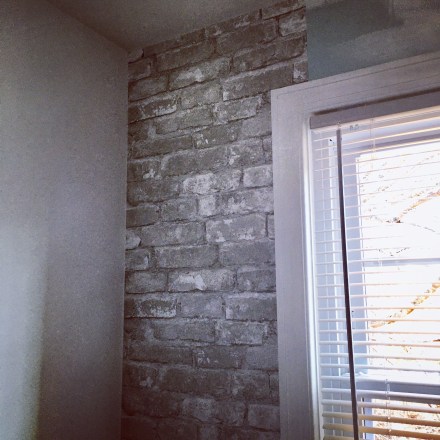 And I can tell you that they are a heck of a lot easier to lay than real bricks, or even faux bricks. No mortar involved- just the paper, a level and a pair of sharp scissors.
 The paper is very forgiving with cuts and corners-it already has the appearance of old brick so a couple of wrinkles or slices cannot do anything but enhance the look. Last fall, I had decorated the “log room” in our Maine cottage with birch tree paper-also peel and stick.
 That was pretty easy, but this peel-and-stick paper by NuWallpaper is truly mistake-proof. Super easy to cut, peel off and reposition if needed (and yes, it was needed) and looks soooo realistic. Can’t even see the seams (well, barely…if you stand back and squint…)
 For each row, I positioned and leveled the top, then pulled back about 12 inches of the paper backing, allowing the paper to stick to the wall. From there, it was just a matter of peeling and sticking and smoothing all the way to the bottom.
 You know the wise, old adage, “measure twice, cut once”? Well, I measured three times, then ordered it online, got started and promptly ran out of paper before the last window. With wallpaper, you typically start on the far left and work your way across, matching the seams and pattern as you go…until you run out : (
 You see, I hadn’t accounted for the waste while matching the repeat pattern of the bricks. A rookie mistake, but trust me, I am no rookie at paper-hanging. So, what to do? I went back online to the original website to order another roll, but with the shipping costs (I had avoided that the first time because of the amount I had ordered) it was almost the cost of 2 rolls! So I decided to check Amazon because, well, you know, PRIME. And there was the same paper, same manufacturer-NuWallpaper- and code numbers-a bit cheaper and no shipping costs- except it had a different company name on each website-but it was the exact same paper from NuWallpaper. Go figure. It was on my doorstep the next day. Perfect match, perfect accent wall! Still adding some finishing touches to the room, but now we have these gorgeous, super soft curtains! From HomeSense, of course : )
 And an architectural accent piece for over our bed from Hobby Lobby. That “Always & Forever” pillow, also from HomeSense.
 Still have loads to do, and the clock is ticking before we head back to Maine, but one step at a time…Next up, furniture painting. Have an immeasurably great weekend, everyone!
xoxoxo Susan


 were the perfect “woodsy” theme frame- and a perfect graphic backdrop when re-painted black.
 For the average DIY-er it is incredibly versatile-cutting anything from paper to poster board to vinyl-even thin layers of wood! whatever your imagination can dream up, it can cut. In this case, I used a white glossy vinyl, cutting each design to fit the wood slices, then transferring them to the wood. Look how intricate these cuts are-that would have taken me hours by hand! (No, actually, I never would have attempted this by hand…) The wood piece for the bear was an odd shape and didn’t seem complete until we had added an extra star from the moon and the stars decals (on hand from the wall mural).
 Once completed, I sealed them all with a satin poly coating.

 I put together this flannel quilt with fabrics I chose from the vast selection at
  There were so many to choose from, I had a difficult time deciding.
 trees and mountains and leaves and baby animals-along with a few inspirational quotes for the baby-to-be.
 All in black and white and framed in graphic black and gray buffalo check.
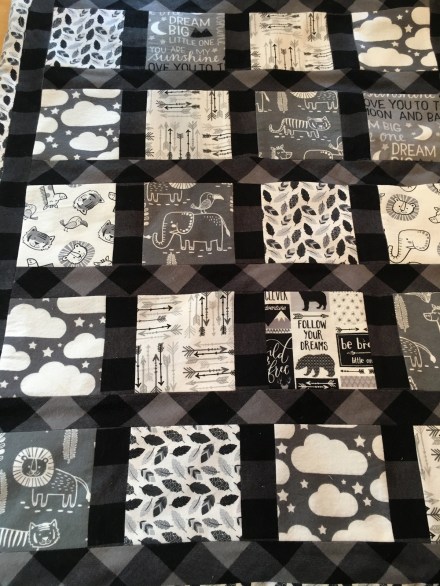 This soft flannel quilt is not hand stitched-at this point in my life I have neither the patience nor the inclination to produce that type of quilting masterpiece. Instead, it is machine stitched and machine washable-perfect for a typical messy baby : )
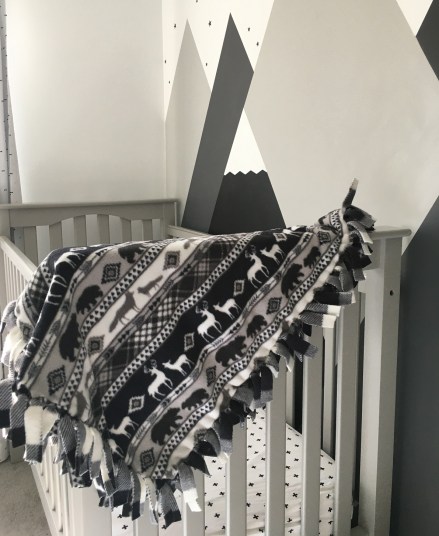 Two pieces of fleece, any size, back to back. Cut squares into the corners, cut along the edge in 1-2 inch increments all the way around. The wider the cut, the fatter the fringe. The deeper the cut, the longer the fringe. Then you just tie knots to attach front to back. Warm and soft and very cute-and also machine washable!
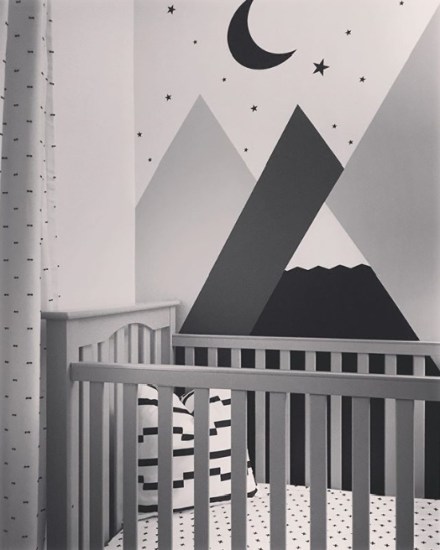 Even though they are white, they do a nice job of blocking out the late afternoon sun that beams into the nursery. Pillows-the graphic one from

 When you’re searching for a simple technique that creates a worn, chippy finish on a piece of wood or furniture! Recently, Coach presented me with a reclaimed primitive pine bench that he thought would “look great with a whale on it!” It had most definitely seen better days…the top was scratched and gouged and the finish was non-existent, but it was solid and had no musty odors, which is always a plus. (Sorry, I hadn’t planned on writing about this project until I tried the brilliant block painting trial, so no before pics) Wanting to hurry along the transformation process, he sanded it down for me and painted the base black. Typically, his next line will be “OK, I’ll paint a whale on it”…which he knows will then trigger my response “Don’t touch it, I’ll do it.” OK, so I stained, then painted the bench, first with blue, then white chalk paint, then sanded it for a distressed look.
 Usually, when I do that, the top coat will sand down and expose the under color- but this time it didn’t work very well and the bench was primarily white and black. So, I thought, hmmm, what can I use to create the multi-layer effect I want…wait for it…a block of wood?! Recently, I had been binge-watching old episodes of
  I was grabbing a block of wood and dipping it into paint and scraping it across the bench and voila! Chippy, distressed look in about 5 minutes time! (OK, well that noise is pretty annoying and grating, but the results are worth it, I promise!) The reason this technique works so well is that, unlike a paint brush, which smooths paint into the contours and ridges, the wood block scrapes over those and only leaves paint on the textured areas.
 Now its time for the whale : ) Stay tuned… Susan
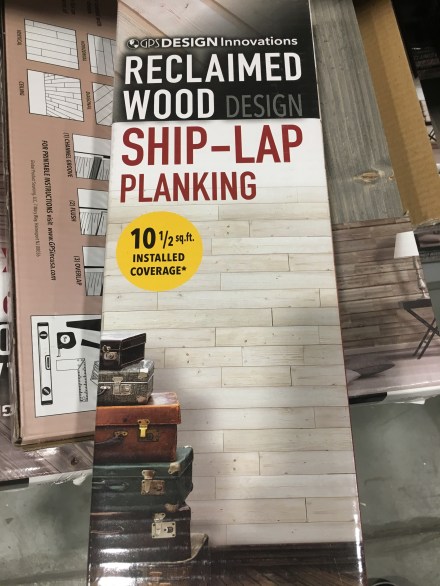
 This is important! Visually, shiplap is long lengths of boards attached to the wall in a straight row. Leveling as you go will ensure a clean, unwavy (is that a word??) sight line.
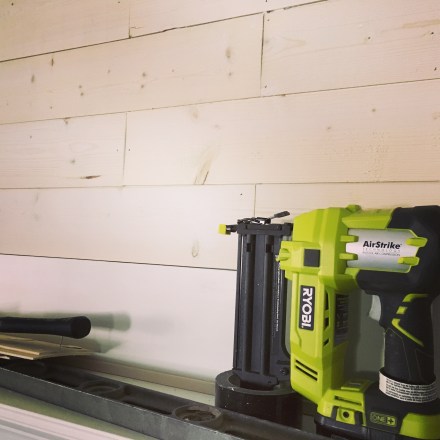 (I would not have attempted to do this installation without one.)
 I used
  This particular brand of shiplap had an assortment of lengths in each box, so it was important for me to decided which pieces would go in which order for each row. I was working around a fireplace and ceiling and baseboard moldings, so I had to figure those into the equation. It would have been so much easier if I was working on a simple blank wall, but that wasn’t the case. I taped these on to the wall to visualize how it was going to work before I started the actual nailing and gluing.
 you push it into an area and it forms into the shape that you need to cut around.
  Otherwise you’ll need some paper and tape to create a pattern to cut around.
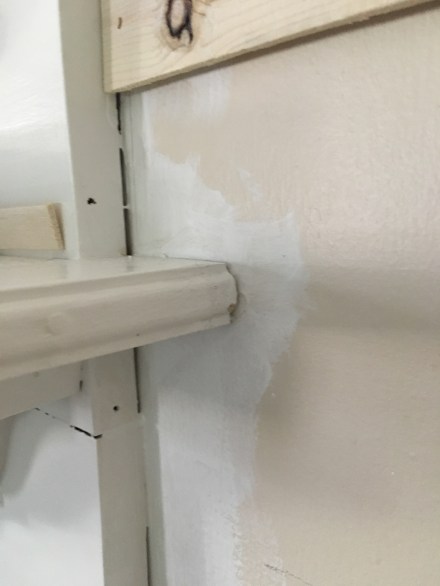
 It just doesn’t end up well. Fortunately for me, this particular brand is pretty rustic, so a few cracks and holes blends in quite well!
 It made it so much more tedious than if I had just kept using the larger pieces instead of trying to save them…for what, I have no idea….but I’ll figure something out.
 For now, I am leaving it as is and enjoying the fruits of my labor.
 Each time I returned to the store to purchase more, it had to be seasoned in the house for 36 hours before I could install it. Which meant more messy days in our family room.
 As an aside, I have a much deeper appreciation and newfound admiration for carpenters and contractors-actually, anyone who labors for a living-especially older folks, like me. The work is fulfilling, but it is not easy-the difference is, I did this for fun, they do it for a living. So my work here is done…for now…and I am shiplapped out… until my next project comes along. Have a terrific Thursday, everyone! And if you decide you need some shiplap in your life, I know the name of a great contractor I can share with you…and its not me : ) xoxo Susan


 Finally,
  So, if skipping the mall is your thing and you’d like to find the perfect gift for under your Christmas tree (like a rustic, hand-painted sign, perhaps!?!?), take a ride and check out these lovely shops. And tell them that Sue from Country Design Home sent you!! Hope you have a shop-a-rific Saturday everyone!! Susan xoxo
 and were asking permission to use it in an article they were featuring on their website! Well, that’s pretty exciting, but what do you suppose
  Did you know that mattresses are completely recyclable-well, I had no idea!! According to the