Search Results for: plate rack

Treasures and Trash-The Reveal!

The big reveal… how’d I do?

After…

So after a couple of weeks of treasure hunting, bargain shopping and using what I already had on hand, here is the finished product! I just love it : ) Hanging cozily in the corner of my dining room, the colorful pieces create a bright mosaic that is soooo eye-catching and country pretty! Although it looks similar in style to my inspiration piece from Country Living Magazine, it has my unique color stamp on it. And isn’t that what decorating your life is all about? Let me know if you like it! (and if you happen to come across and red and white teapot in your treasure hunt, I’m your girl)

Before…Blue Botanicals…my inspiration from Country Living.

(Previous post below)

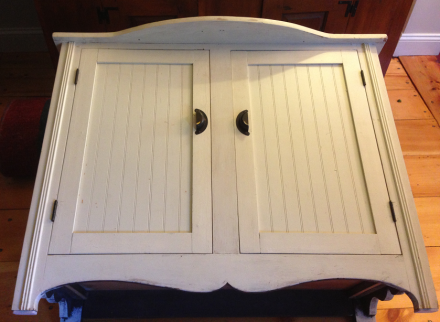
My first thought was “Ooh, that’s so country pretty!”. My second thought was “Wait, I have one of those plate racks in the barn!”. (I know, I know, who has a barn, anyway?!? And where did I get all this stuff that’s in the barn? Yard sales!!) Time for a recycling project. So I dug out this dusty old black painted rack from the loft, cleaned it off, and then painted it with several coats of Benjamin Moore Atrium White  Regal Aqual Pearl.

Now, realizing that the dining room where the rack will be hanging is red and white, I decided to hit the road in seach of yard sales to find some pretty red platters, plates and cups for my as-yet-to-be-hung plate rack. And since today was Small Business Saturday, I checked out some of our local downtown antique shops as well. First up, the Craigslist resale store. Didn’t know these existed! Apparently you give them your stuff on commission and they sell them on CL. You get rid of stuff, they make money-brilliant! The place was packed with stuff and shoppers, but no luck there, unless I happened to be in the market for a pink car. So, off to check out an estate sale.  Sadly, these typically hold the belongings of a deceased love one, whose life will be measured in the profits gained from the sale of their treasures. I found these pretty little scalloped plates-and I will give them a good home and pass them on to the next generation, who will most likely sell them at my estate sale-hopefully for a profit…

Then on to The Queen’s Vault Antique Shop. Loads of victorian furniture, silver, crystal and blue and white dishes galore! Discovered that although blue and white is quite common for porcelain and pottery, red and white is much rarer and difficult to come across. But I did find a pretty red cup and saucer, and left my “wish list” in case he comes across anything else.  Next up was Wakefield Uncommon Antiques.

(We have a beautiful lake in Wakefield, and at one end is a large common with a gazebo. Hence the clever name…) Score! Loads of red and white to choose from. Didn’t buy anything because the prices weren’t marked and the young lad manning the register had no idea what to charge. Will have to return when the owner is present. I need those dishes! After that, a drive around town to admire the gloriously blooming trees and tulips, a few more yard sales and then all of a sudden I was at HomeGoods! Now I don’t know about your car, but it appears that my new CRV has a Blue-tooth enabled homing device that guides me directly to the nearest HomeGoods. Scored again with two plates in the clearance racks that will add a bit more color to my collection. Tomorrow’s task will be to hang the shelf securely so that it won’t come crashing down with all of my new-found treasures. When you have a home that was built during the James Buchanan Administration, chances are you have walls made of horsehair and lathing. This lathing is small skinny strips of wood, held together with plaster mixed with the hair of a horses mane or tail. Seriously? Every time I hammer anything, all I hear is chunks of the stuff falling out of the wall. This ought to be good…pics to follow.

Hall of Shame-Color Splash!

Saw this poster on Pinterest and LOL. It should say Attention Decorating Disorder! When I am in “home improvement” mode, I move from room to room making mental notes of everything that needs to get done immediately. So I wonder why projects never really get done?!? During the plate rack project this weekend, as I was flitting around town rummaging through antique shops and junk sales, I figured I should stop and get the paint for the hall of shame project at my local Benjamin Moore store. I had definitely decided on the trim color: Snowfall White.

For years I have been mixing  White Dove and Linen White together to create what I thought was the perfect white-creamy white with slightly gray undertones. But, mixing two quarts is quite a bit pricier than purchasing pre-mixed by the gallon. And, who was I to mess with the Benjamin Moore’s color gods?!? So I finally went through all the white chips and found Snowfall White. I believe it is the closest in tone and shade to my self-blended color. 1 gallon please. Smoke was the color I chose for the walls. The description is: “A subtle, sophisticated grey that infuses a space with a sense of comfort and contemporary style.” And, it is part of Candace Olson’s Designer Picks Collection! Loving that! But just not 100% sure, so I only got a quart. In a moment of inspiration, (while I was putting off hanging the plate rack) I decided to just “try a little on a wall to make sure I like it before I do the whole thing and then regret it”. No prep, no drop cloths, no painting clothes. You can guess the rest. I was happily painting away, got distracted (I don’t know, something sparkly?) and dropped the whole freaking can!

Not only did it splatter all over the hall- and me, it made its way into the living and the dining room- thankfully my new beautiful rug was spared! Unfortunately, I didn’t have time to grab the camera- had to work fast! The next 1/2 hour was spent scrubbing and cleaning (almost all) the paint out of all the cracks and crevices, off the floor and trim,all the while keeping Daisy out of the way. Don’t need “Smoke” pawprints running through the house.

Rugs were hosed down in the yard, clothing discarded and paint scooped back into the can. At $18 per quart, I wanted to salvage what I could! So the end result is: 1. I do like the paint color and will go back and get a gallon. 2. Now I have to sand and restain the two thresholds leading into the hallway-more work for the weary 3. Time to go hang the plate rack!!!

Happy Painting! Susan 

Everything AND The Kitchen Sink!

As you all know by now, we have now opened our vintage shop in the Barn at Todd Farm,

Barn Postcard no emailsand so far things are going very, very well! Lots of our rescued, re-cycled and re-furbished pieces have been sold, and shoppers appear to be very excited about the variety of vintage goods we are offering.

Todd Farm Display PMFollowing our first Sunday (which seems like a lifetime ago, but was actually just a mere three weeks ago!) I realized we needed to make a change in our displays. When we set everything up and stepped back to admire our work that first day, we all said “this is great, as long as nobody buys these big pieces that have all of our dishes and pottery on them”.

Todd Farm Kitchen Display Area BeforeBUT, that is exactly what happened, leaving us scrambling to find new spots for pie plates and Pyrex and pots and pans. So, I decided that we needed a permanent, dedicated spot to safely and attractively display our kitchen wares. The perfect solution, in my mind, was an old kitchen sink and countertop with shelves above it, so off to Craigslist land I ventured and found this awesome old General Electric porcelain sink for $40!!! A steal!!!

Vintage Kitchen Sink BeforeOnce I had acquired the sink, it really was just a matter of building a solid base that would be sturdy enough to hold the weight of the sink and anything else we put on it. I started with a plywood top, cut with an extra 1/2 inch around the perimeter, and a hole cutout for the sink. Which turned into several cuts, which in turn created a nice new Mustachio for Coach.

Vintage Sink Coach's MustachioWho, by the way, was really not on board with this whole sink thing. He did help me, but reluctantly, not seeing my vision and thinking that I was wasting valuable time that could have been spent working on other “saleable” projects.

The legs were built from 4×4 scraps Coach had hanging around somewhere behind the barn, cut to standard countertop height of 35 inches.

Vintage Sink Plywood Base for SinkI simply attached those with large L brackets and some screws, then created some cross-pieces for stability, attaching those with smaller L brackets as well.

Vintage Sink on BaseI would show you the rough-cut details, but they are really not very pretty and you can’t see them anyway : ) Once that was completed, I added an old, chippy shutter for the front panel,

Vintage Sink on Base with Blue Shutterand then I added some of these little metal strips (I have a big bin of these I grabbed at a yard sale. Have no idea what they are for, but they make a nice 1 inch decorative edge. Got plenty more if you need any…)

Vintage Sink Metal Bracketsfor the decorative edge trim. Conveniently, there are holes already drilled in the strips, so I just used some brass tacks to attach them to the plywood edge.

Vintage Sink Metal Bracket TrimFor the sides, I affixed some burlap panels with a dowel and some tacks. Nothing fancy. We don’t really have any kind of a storage area in the barn shop, so the burlap panels allow us to use the under-sink for keeping bags and tools, etc.  The sides are simple blue burlap panels, but the front panels are actually made from old burlap potato sacks (which we have plenty of for sale in the shop : ).

Vintage Sink Burlap Potato SacksNot crazy about how those look, so I’ll be changing those this upcoming weekend. Once we brought the sink to the shop, it was simply a matter of finding the perfect spot to build it in, then adding the shutter shelving and filling it up with our kitchenware and painted mason jars.

Vintage Sink adding Shutter ShelvesWe even added an old window because everyone loves to look out the window when they are at the kitchen sink, right??

Todd Farm Kitchen Display AfterSo, what happened when we opened up the shop 6 am Sunday morning?? Every person walking by and into the shop went right to my sink display and admired it, inspected it, asked how much it was. Initially shocked that folks were interested in buying my old sink, Coach quickly recovered and started asking $650. Wait, what?!?!?! THE SINK IS NOT FOR SALE. REPEAT. THE SINK IS NOT FOR SALE!

Todd Farm Vintage Sink Side Profile PMBut both Coach and Lisa (his partner in crime this week) were hell-bent on selling that sink out from under me. Soooo, I compromised and used the old “if I really don’t want to sell it, then ask a ridiculously high price and if someone really wants it, they can have it trick”. $1000. FIRM. In the meantime, I am off to paint the pieces that I didn’t get a chance to paint because I was building the kitchen sink. Have an unsinkable Wednesday, everyone!! Susan


Colonial Country Cupboard

Last summer, Coach and I took a long weekend trip to Bethel, Maine for a bit of golf and R & R.

Two Beers Please Bethel Maine PMWell, I should say R & S (Rest and Shopping) as we did quite a bit of antique shopping up and down the Maine coast. My heart skipped a beat when we turned a corner while wandering through the many aisles of Pa’s Tradin’ Post in Oxford, Maine.

Pa's Tradin Company Signand discovered this gorgeous old country cupboard!

Pa's Tradin Company MaineAnd, I was even more excited that it actually fit in our CRV, even with all the luggage, coolers and golf clubs! (Truth be told, I would have tossed those clubs to get this piece in my car…)

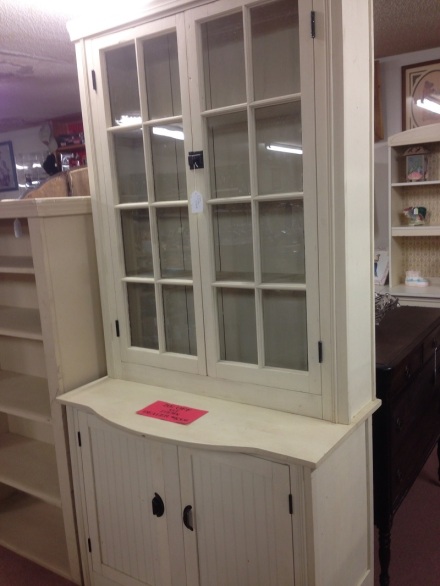
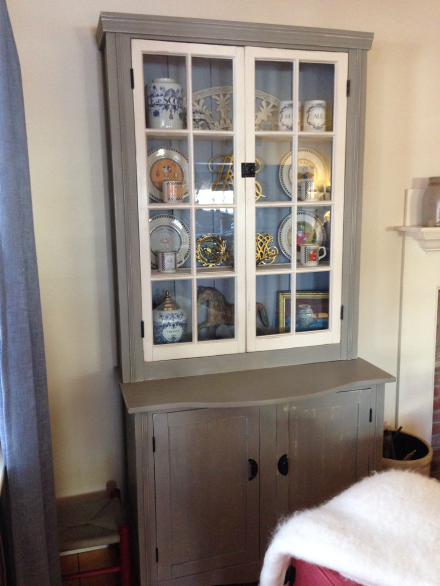
Country Cupboard in CRVIt was newer, but completely hand-crafted using old lumber and pieces from antique windows and dressers. It needed quite a bit of work, so I took my time refurbishing it, in between quicker, easier projects. Well, I am happy to say that it is finally finished, and styled, and sitting proudly next to the fireplace in my family room. So, what once looked like that, now looks like this!

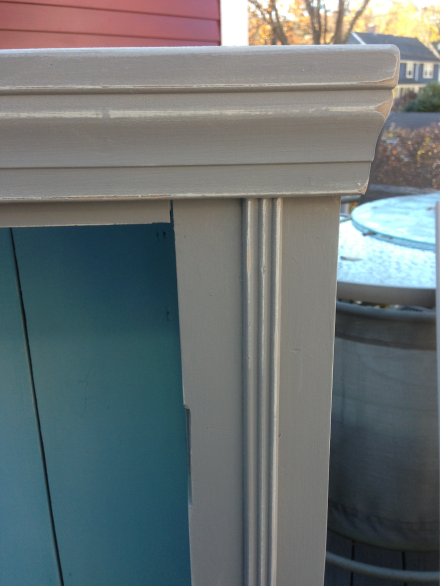
Painted Country CupboardThe exterior body was painted with Annie Sloan French Linen Chalk Paint. I then sanded the edges and raised detail to give it the distressed look we like.

Country Cupboard Sanded Corner DetailThe shelves and doors I painted (after replacing and re-glazing many of the old panes-these were actually old windows that were repurposed-I LOVE that!)

Reglazing and painting window panesin Glidden Antique Beige “chalk-like” paint that I mixed myself. Here’s the recipe from “In My Own Style”

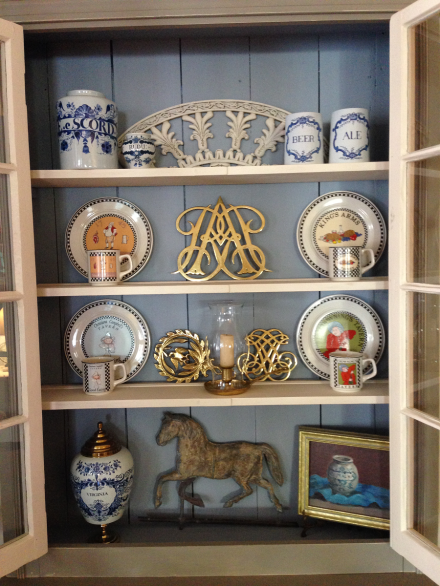
In My Own Style Chalk Paint RecipeThe back planked wall of the cupboard was painted with a custom color that I created-kind of a soft, denim blue.

Country Cupboard Custom PaintI had originally painted it with Miss Mustard Seed Eulalie’s Sky Milk Paint (you can read about that fiasco here),

Miss Mustard Seed Milk Paint Eulalie's Skybut once I decided where it was going to be in our home, that needed changing. Oftentimes, I paint a piece with the colors I would like, only to realize that it just doesn’t work in the intended space. That’s the beauty of paint-one quick coat and you have a whole new look! I wanted it to be a close match, but a lighter blue tone to the drapes in the room, since it would be in proximity to the window where they hang. Finally, I waxed the entire piece with Fidde’s Supreme Wax to give it a nice, warm, glowing finish. The hardware remained the same. Chipped, rusted black? Perfect!

Fiddes and Son Supreme WaxThis is the before, dingy white, cracked windows, unpainted interior.

Country Cupboard Base Interior

Country Cupboard Base BeforeThis is now. A pretty painted piece that shows off many of the pieces that Coach and I have collected over the years.
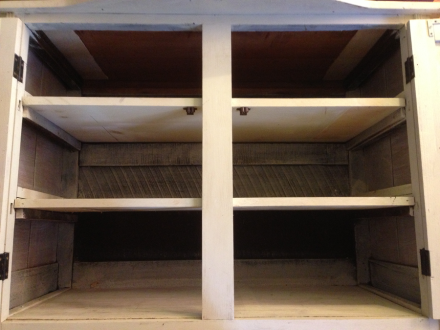
Country Cupboard Design HomeThe showcased pieces are primarily from Colonial Williamsburg in Virginia, The custom color blue I chose for the background enhances the blues in the pottery and plates and brightens the brass trivets and pieces.

Country Cupboard StyledColonial Williamsburg is an historic site that Coach and I love and have visited many, many times. This is the William and Mary crest trivet-one of our very first mementos we purchased over thirty years ago.

William and Mary TrivetThe re-painted and re-loved cupboard now reminds me of the shop front windows and taverns on the Duke of Gloucester Street, filled with old glass and pottery pieces, brass trivets, plates and mugs.

Williamsburg Virgina JugNow, when I step back to admire my transformed country cupboard,

Country Cupboard Doors Opened Styled

I am transported back in time to our many wonderful trips to Williamsburg. And isn’t that why we save our souvenirs and mementos-to remind us of happy times and fun trips? I hope you all have mementos you keep to tell your story, and a beautiful cupboard in which to display them. Have a “think spring” Tuesday, everyone! Susan 

Wax On, Wax Off

Winter. Cold outside. Cold inside. (with oil at $3.99 per gallon, our home doesn’t reach much higher than 62 degrees-EVER). Forced hot air furnace. Dry. Dusty. Dry. I am continually washing my hands, both at work (in the medical field, sterile is key) and at home. All of the painting, sanding, cleaning and woodworking I am doing has left my hands incredibly cracked and painful and bloody.

Cracked, Dy and Bleeding HandThe other day I looked down and saw the hands of a longshoreman, not a creative DIY blogger! I have tried all kinds of creams and potions and lotions and goops, but nothing has any lasting effects that have soothed my aching and crackling digits. So, I went on Amazon.com and ordered a Dr. Scholl’s for Her (I am not sure why guys can’t use this…) Quick Heat Thermal Therapy Paraffin Bath.

Dr. Scholls Bath and Supplies

Only took a couple of days to get here, and I was anxious to give it a try. The kit, for $29.95 came complete with the unit that has adjustable heat settings, 3 pounds of scented paraffin wax, 2 thermal mitts & 30 plastic glove liners. Now, one word of caution: the included paraffin was very heavily scented. so if you have allergies, this may not be the one for you! Once it was plugged in and warming up, the entire upstairs of our home had the strong scent of orchids. Which kind of made me feel like I was in Hawaii…OK, well, maybe not. But be forewarned. Unpacked the unit, followed the basic instructions.

Dr. Scholls Instructions

Placed it on a flat surface. I would also say that you need to place it somewhere where a little splattering wax won’t harm the surface. The three pounds of wax were packaged in three separately sealed bags.

Dr. Scholls Paraffin in Bag

The instructions were to open each one, then break the wax brick into quarters. Really?! Unless you are the Incredible Hulk

The Incredible Hulk Mitts(and he wouldn’t be using this anyway because it’s for HER), I don’t see how this is possible without some sort of large, sharp implement. In this case, some old, heavy Fiskar shears did the trick-don’t use your good scissors unless you want them to be waxed and slippery!

Waxed ScissorsI used the stab and split method.

Paraffin Bath Wax CuttingPlaced the wax pieces into the unit and turned it to high. The red light indicates it is heating.

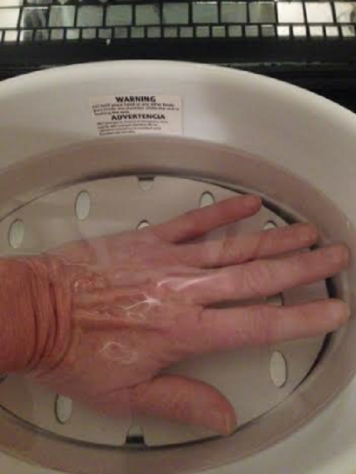
Dr. Scholls Paraffin Bath LightsThere is also a flat plastic plate with holes in it that is to rest inside on the bottom of the unit once the wax is melted. This is clearly to keep you from resting your hands on the hot elements. Smart move, Dr. Scholl.

Bottom Surface PlateNow, I realize that the name on the box says “Quick Heat Paraffin Bath“, but if you were in a hurry to smooth your rough edges before a night on the town, I’m afraid you would be sorely disappointed. The warming time is 2 hours! (the instructions say 120 minutes, I think to throw you off, but I can do the math…) So I plugged it in and went off to do more stuff in my workshop and get ready for the football game, which I determined would coincide with the precise melting point time. Fast forward…green light on…dipping time! You place your hand into the warm pretty hot wax, fingers slightly apart, dipping for just a couple of seconds, then pulling your hand out.

Dipping hand in wax bathWait a few seconds until the wax starts to harden, then dip again, each time adding another coat of wax to your hand. They recommended 5 coats, and that was just about right to create a waxy, sealed glove.

Re-dipping to for wax glove

Placed my hand in one of the baggies,

Plastic bag covering wax

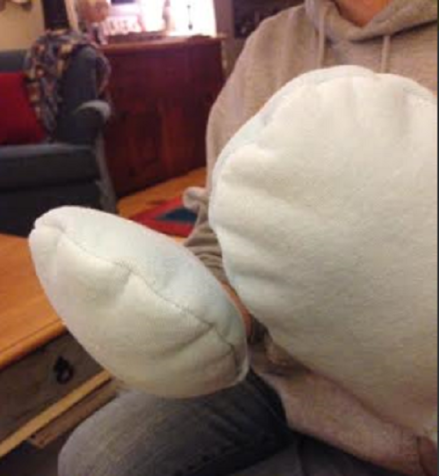
then donned the terry mitt.

One Mitt OnClearly, at this point, I could not longer take pics, so I came downstairs at the start of the game and asked Coach to help me out. He had no clue why I was wearing pastel blue oven mitts, nor why I was asking him to take my photo-lol!

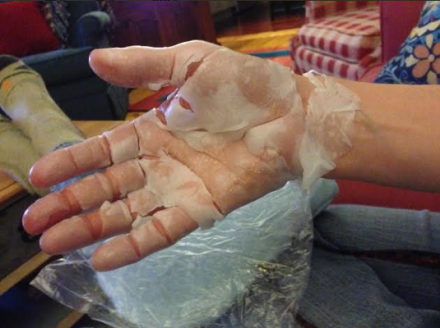
Mitts onDuring the first quarter, the wax slowly cooled off (as did the Colts), so after approx. 15 minutes I removed the mitts and the plastic baggies to uncover this-

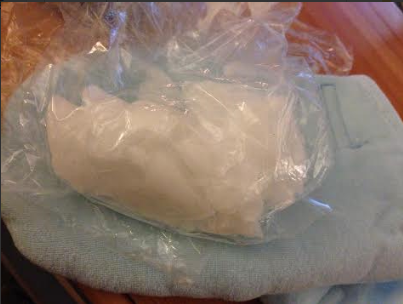
Waxed hand afterthe wax had cooled but stayed somewhat soft, so I pulled that off too and I was left with a baggie full of cooled wax.

Remainder Wax After The instructions recommend discarding the wax, (you know, germs and all) but I figured, since I am the only one using it, why not recycle? What was left on my hands was a layer of lotion that I then massaged into my hands, per the instructions. Which felt great, but the scent was still quite heavy, so I ended up washing them a couple of times and then creaming them up.

Hand after wax bath

The verdict? Overall, I love this Dr. Scholl’s paraffin bath! My hands felt instantly smoother and less cracked and my knuckles were less achy too! For the time being, I am planning on making this a nightly ritual until my hands start looking less like a lumberjack’s, or until the warm weather arrives, whichever comes first. However, I am planning on purchasing some new, unscented wax to replace the orchids-if I can’t be in Hawaii, then I don’t want to be reminded of tropical breezes while the wind is howling outside here in New England.

Holiday Palm Trees

Hopefully it’s warm where you are, and just remember to do a bit of pampering for yourself today…Susan

The Crompton Collective

A few blogs ago, I wrote about a road trip out to Signature Finishes in No. Grafton to pick up some Miss Mustard Seed Milk Paint. While there, I also traveled into Worcester (pronounced “Woos’tah, for those of you not from the Boston area) to visit the Crompton Collective,

Crompton Placea collection of local artisans and vintage vendors housed in a beautifully renovated brick mill building in the canal district. The Collective is the brainchild of Amy Chase,

Amy Chasewho also owns Haberdash Vintage, America’s very first mobile vintage shop and she is a co-founder of The Swapaholics-quite a resume! You enter the Crompton Collective store through the pretty fancy lobby of Crompton Place, go down the stairs (just follow the antique signs), but once inside the Collective you feel as if you have stepped into someone’s vintage home

Fire King China Set

and an antique parlor wrapped in the warm glow of lace and lamplight.

Lace Window Vignette

The store is separated into 70+ loosely defined vendor spaces,

Vintage China Cupboardeach one offering unique,

vintage

Transformational Divas Dressersrepurposed

Simple Home Life

re-loved

Scrabble Cupboard

items for sale.

Reclaimed and Resalvaged

At every turn, I spotted lovingly repainted,

Painted Pine Commode

refurbished furniture

Antique Therapy

and home decor accessories,

Antler Table

as well as one-of-a-kind pieces (cocktail table from an old drum? Brilliant!)

Drum Cocktail Table

and this bit of Americana created from old license plates.

Reclaimed and Resalvaged Flag

One of my absolute favorite spaces was The Junk Drawer

The Junk Drawer

The owner created this cozy, welcoming booth that was completely packed with inspired goods.

The Junk Drawer Sign

Have you ever seen a vintage lamp with a shade made of crumpled old sewing patterns?! Perfectly poufy Beehive ‘do!

Junk Drawer Sewing Pattern Lampshade

How about a hot pink deer head? (Had I seen that first, I might have altered my color palette for the bathroom reno…)

Junk Drawer Pink Deer

From there, I ventured into the Haberdash space,

Haberdash Vintage

chock full of fabulous vintage clothing and accessories.

Haberdash Faux Fur

Of course, this was back in October, so the fur coat seemed unnecessary, but after those snow flurries yesterday, I may need to return to grab it! This is a co-operative shop that you need to walk through at least a few times, Transformational Divas Cupboard

there is so much to take in! Stopped short in my tracks when I spotted these letters in the window.
LOVE sign Flea Circus

Offered for rent for weddings and showers and happy occasions, I can imagine that they are well-used and LOVED in each venue they are featured. No gift purchases made today, it was Halloween season, but I did grab my Eulalie’s Sky Milk Paint from the Signature Finishes booth.

Signature Finishes Milk Paint

But now that the holiday shopping season is upon us, it is definitely worth a trip back to the Crompton Collective to see the shops decked out in their holiday finery.

Antique Mason Jar Candle Holder

They are at 138 Green Street, Worcester, MA. Have a wander-ful Wednesday everyone, and if you happen into the Crompton Collective, tell Amy that Sue from Country Design Home sent you! Susan