Craftsy. Learn it. Make it. Love it.

This week’s High Five for Friday goes to Craftsy.com!

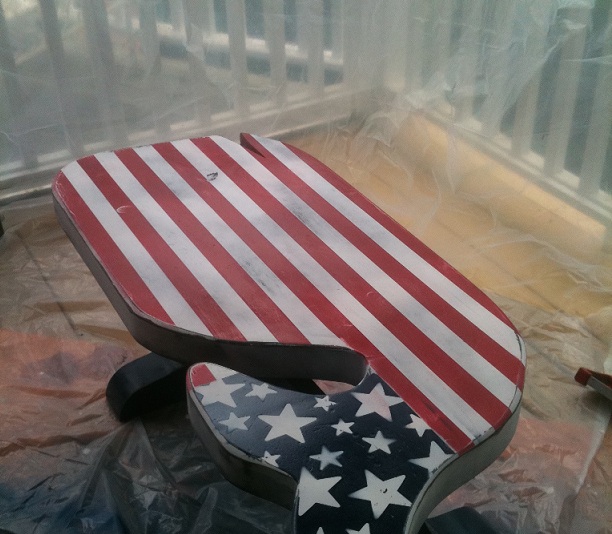
Their mantra: Learn it. Make it. It’s like going to community college night classes in the comfort of your own home-I wish I had thought of this! You know all those awesome hand-crafted items on Pinterest and Esty that you think “gee, how do I make that?!” And you are too busy, too stressed, work full-time, don’t have the tools or the knowledge or someone to show you how to make it happen? Well, this website is for you! It’s a free membership, you sign up and have immediate access to thousands of patterns and professional online how-to videos and information for everything from cake creations and crocheted clothing to decorating your nest. You learn at your pace, on your time, whether you are burning the midnight oil in your PJ’s or hanging out on the back porch on a lazy summer afternoon. They even have an online store where you can purchase the craft items you need for your projects. I have added a couple of my own designs to my Country Pretty page, and will be adding more shortly. (so for any of you out there that want to make a whale table of your very own, check my link soon). So whether you want to create a very special cake…

or crochet a hat (this one’s from Color My World Crochet– so pretty!)

Create a chalkboard sign 

Or antique a table…

…click on the Craftsy logo link above and get crafting!  TGIF everyone!!! Susan

Brushing It All Aside

This weekend, in preparation for the upcoming holidays, I have been working on the Hall of Shame (yes, we are on the home stretch now!). Basically I am finishing up the painting begun back in April, on that fateful day when I dropped the entire can onto the floor. Yesterday I completed all the trim, then tackled the remaining wall with the 3rd quart of Benjamin Moore Smoke paint- pretty, huh?

All was going well until I reached the very top of our hall stairway, which is very narrow and steep with a high ceiling. (Please don’t judge me because of my burgundy carpet. That was from the 80’s, and I knew not what I was doing!)

With no way to reach the very top far corner, I had two options…

 1. Suspend myself from the top stair to the wall and essentially dangle over the stairwell.

With Coach not being around, and my poor track record with disasters and mishaps in this hall to date, that did not seem like the best alternative. OR 2. Find a way to reach that corner without endangering life and limb. So I give you: Extend-A-Brush! 

With necessity being the mother of invention, I figured out a way to make my arm 6 feet long and reach that top corner!

Supplies required: 1 short handled 3″ angled brush + 1 long-handled mini-roller (minus the roller) +  masking tape (duct tape would do as well, but that was the first one I grabbed from my stick drawer in the HICC- Home Improvement Command Center)

My Extend-A-Brush made short work of that dangerous corner, and now, for the first time since I began this mecca back in the spring, all the walls are smoke blue- yay! And have this awesome invention to use in a tall or tight space! Do you think maybe I should patent this?!?

I could use some really cute zebra striped duct tape and jazz it up.

This may be it…time to hit up the guys at the Shark Tank!

Have a great Sunday everyone! Stay inspired, and enjoy the beautiful fall weather! Susan

A Couch for Coach- Before and After

So, Coach and I have been trying to find a couch for the porch for a couple of months now. He insisted that the wicker love seat was just not long enough for afternoon napping, even using the Wally the Whale table as a foot rest. After many yard sales and curb alerts, we finally found this on one of our trash to treasure hunts at Todd Farm in Rowley.

Although it had clearly had been neglected, was filty and ragged and hosting a family of icky bugs, we decided to take a chance. For $20, the price of two burgers and fries at Five Guys, we had our couch! It was sturdy and well-made, just required some major TLC. We were even more excited when we checked online and discovered the same Benchcraft sofa selling used for $300!

The re-furbishing: We spruced it up with a bleach wash and bug spray, then primed it with Kilz to remove odors and stains. Finished with Rustoleum outdoor glossy white. So clean and pretty!! The original cushions had to be tossed, as they were smelly and moldy and just plain gross. So I created new ones from foam, poly batting and some fabulous European down-filled pillows I got on clearance at-where else-Home Goods for $20 each! (I am saving the pretty ruched satin covers for another project.)

I wanted the couch to have a more casual feel, so I made the covers from solid navy outdoor fabric, using a knife-edge for the pillows rather than formal welted cushions.   

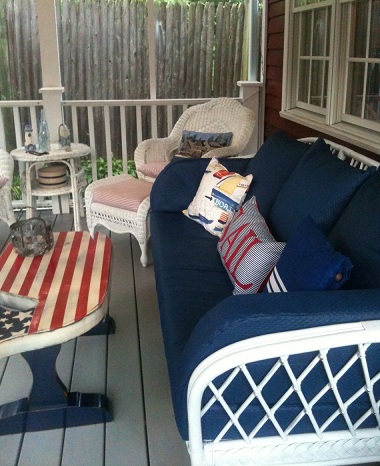
Do you LOVE our new couch!?  It’s stylish and casual and plenty long enough for afternoon naps on the porch and it complements the other refurbished pieces already in place.

The cost breakdown: Sofa $20 Fabric $40 Foam Cushion $40  Poly Batting $5 Pillows $60 Thread $3  Paint: $7 Total Investment: $175

A little more than I usually spend on a re-furbished trash to treasure. But since it is the largest piece on the porch, and is going to be sitting right in front of the ever-stylin’ whale coffee table, I figure it was worth the investment. A whole new life for a down and out couch, saved from the dumpster with my Three R’s Principle: Re-cycle, Re-Furbish, Re-Love. Have a Terrific Tuesday! Susan

Have a Whale of a Fourth!!

Before heading into Boston today to view the Tall Ships via Hestia Cruises (an early birthday gift from our kids : ), I was excited to give Mr. Whale the coffee table a new look. As soon as I saw him at the yard sale this past weekend, I knew he just needed a fresh face to return him to his former maritime glory! Since our back porch is red, white and blue, it only seemed appropriate to make him the patriotic focal point. Mr. Whale before:

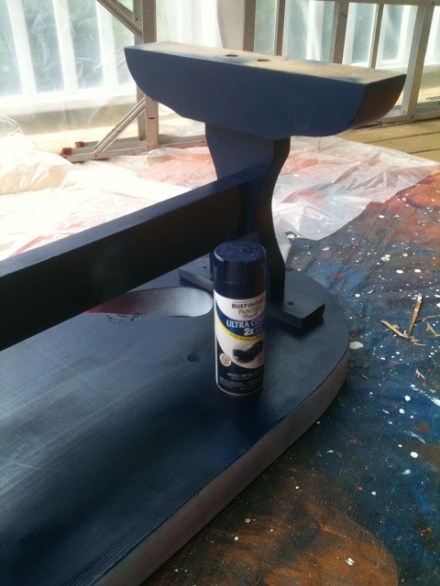
During the transformation process: the whale wash

Sanding off the old shiny varnish

Painting the base (Coach did this while I was at work- one less thing for me!)

Designing the pattern (best not to do this after a long work day and a couple of wine coolers-makes for many mis-measures)

Taping off the design

first coat of red stripes (remember 7red, 6white…7red, 6white) taping makes for perfectly straight rows and sharp, clean edges

Addition of the stars on the blue background these little stickers were perfect as a stencil- stick on, spray over, peel off when dry! Couldn’t fit 50 stars, so decided to go with a random, funky look instead. My apologies to Robert G. Heft, the schoolboy who designed our current 50 star American flag for a school project…for which he received a B-!!!

Unfortunately, today is a damp, rainy one. Not great for Tall Ships viewing, and certainly not great for painting and glazing whales out on our makeshift workshop on the porch. Sooooo, here is Mr. Whale- patiently awaiting his glaze finish. Moby Dick never looked this good : )

Left to do (once the air dries and the sun comes out):

1. Sand one last time for a truly rustic, aged appearance

2. Antique glazing to add a touch of shine and protect Mr. Whale from the elements

3. Enjoy our new coffee table!!!

Have a whale of a Fourth everyone!! Susan

Treasures and Trash-The Reveal!

The big reveal… how’d I do?

After…

So after a couple of weeks of treasure hunting, bargain shopping and using what I already had on hand, here is the finished product! I just love it : ) Hanging cozily in the corner of my dining room, the colorful pieces create a bright mosaic that is soooo eye-catching and country pretty! Although it looks similar in style to my inspiration piece from Country Living Magazine, it has my unique color stamp on it. And isn’t that what decorating your life is all about? Let me know if you like it! (and if you happen to come across and red and white teapot in your treasure hunt, I’m your girl)

Before…Blue Botanicals…my inspiration from Country Living.

(Previous post below)

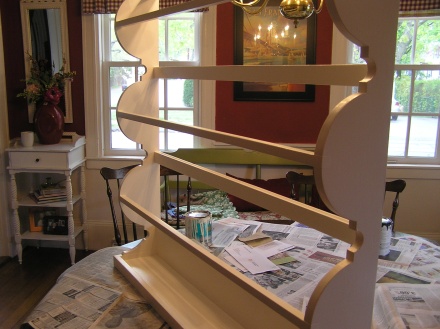
My first thought was “Ooh, that’s so country pretty!”. My second thought was “Wait, I have one of those plate racks in the barn!”. (I know, I know, who has a barn, anyway?!? And where did I get all this stuff that’s in the barn? Yard sales!!) Time for a recycling project. So I dug out this dusty old black painted rack from the loft, cleaned it off, and then painted it with several coats of Benjamin Moore Atrium White  Regal Aqual Pearl.

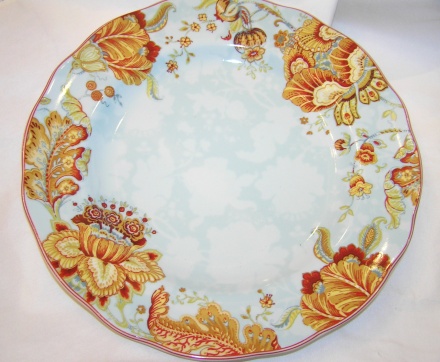
Now, realizing that the dining room where the rack will be hanging is red and white, I decided to hit the road in seach of yard sales to find some pretty red platters, plates and cups for my as-yet-to-be-hung plate rack. And since today was Small Business Saturday, I checked out some of our local downtown antique shops as well. First up, the Craigslist resale store. Didn’t know these existed! Apparently you give them your stuff on commission and they sell them on CL. You get rid of stuff, they make money-brilliant! The place was packed with stuff and shoppers, but no luck there, unless I happened to be in the market for a pink car. So, off to check out an estate sale.  Sadly, these typically hold the belongings of a deceased love one, whose life will be measured in the profits gained from the sale of their treasures. I found these pretty little scalloped plates-and I will give them a good home and pass them on to the next generation, who will most likely sell them at my estate sale-hopefully for a profit…

Then on to The Queen’s Vault Antique Shop. Loads of victorian furniture, silver, crystal and blue and white dishes galore! Discovered that although blue and white is quite common for porcelain and pottery, red and white is much rarer and difficult to come across. But I did find a pretty red cup and saucer, and left my “wish list” in case he comes across anything else.  Next up was Wakefield Uncommon Antiques.

(We have a beautiful lake in Wakefield, and at one end is a large common with a gazebo. Hence the clever name…) Score! Loads of red and white to choose from. Didn’t buy anything because the prices weren’t marked and the young lad manning the register had no idea what to charge. Will have to return when the owner is present. I need those dishes! After that, a drive around town to admire the gloriously blooming trees and tulips, a few more yard sales and then all of a sudden I was at HomeGoods! Now I don’t know about your car, but it appears that my new CRV has a Blue-tooth enabled homing device that guides me directly to the nearest HomeGoods. Scored again with two plates in the clearance racks that will add a bit more color to my collection. Tomorrow’s task will be to hang the shelf securely so that it won’t come crashing down with all of my new-found treasures. When you have a home that was built during the James Buchanan Administration, chances are you have walls made of horsehair and lathing. This lathing is small skinny strips of wood, held together with plaster mixed with the hair of a horses mane or tail. Seriously? Every time I hammer anything, all I hear is chunks of the stuff falling out of the wall. This ought to be good…pics to follow.

Hall of Shame-Color Splash!

Saw this poster on Pinterest and LOL. It should say Attention Decorating Disorder! When I am in “home improvement” mode, I move from room to room making mental notes of everything that needs to get done immediately. So I wonder why projects never really get done?!? During the plate rack project this weekend, as I was flitting around town rummaging through antique shops and junk sales, I figured I should stop and get the paint for the hall of shame project at my local Benjamin Moore store. I had definitely decided on the trim color: Snowfall White.

For years I have been mixing  White Dove and Linen White together to create what I thought was the perfect white-creamy white with slightly gray undertones. But, mixing two quarts is quite a bit pricier than purchasing pre-mixed by the gallon. And, who was I to mess with the Benjamin Moore’s color gods?!? So I finally went through all the white chips and found Snowfall White. I believe it is the closest in tone and shade to my self-blended color. 1 gallon please. Smoke was the color I chose for the walls. The description is: “A subtle, sophisticated grey that infuses a space with a sense of comfort and contemporary style.” And, it is part of Candace Olson’s Designer Picks Collection! Loving that! But just not 100% sure, so I only got a quart. In a moment of inspiration, (while I was putting off hanging the plate rack) I decided to just “try a little on a wall to make sure I like it before I do the whole thing and then regret it”. No prep, no drop cloths, no painting clothes. You can guess the rest. I was happily painting away, got distracted (I don’t know, something sparkly?) and dropped the whole freaking can!

Not only did it splatter all over the hall- and me, it made its way into the living and the dining room- thankfully my new beautiful rug was spared! Unfortunately, I didn’t have time to grab the camera- had to work fast! The next 1/2 hour was spent scrubbing and cleaning (almost all) the paint out of all the cracks and crevices, off the floor and trim,all the while keeping Daisy out of the way. Don’t need “Smoke” pawprints running through the house.

Rugs were hosed down in the yard, clothing discarded and paint scooped back into the can. At $18 per quart, I wanted to salvage what I could! So the end result is: 1. I do like the paint color and will go back and get a gallon. 2. Now I have to sand and restain the two thresholds leading into the hallway-more work for the weary 3. Time to go hang the plate rack!!!

Happy Painting! Susan 

The Hall of Shame Updated!

Since I wrote my last blog “The Hall of Shame” on Sunday, I vowed to focus my energies on my current project, hoping to have it completed by Easter Sunday. Soooo, that hasn’t happened. While working on this project was my top priority, I also had to work, take Daisy to the vet,

walk the lake, make repeated trips to the paint store, Home Depot, the bank, HomeGoods, blah, blah blah. So here it is Wednesday, and although the progress is intermittent and the pace is slow, things are coming along. Of my to-do list that I posted, the accomplishments thus far are:

1. “Make a Menu” Done. Menu created for Easter dinner, shopping list made, email invites sent. Casual attire, bunny ears optional.

2. “Re-paint and wallpaper something” I began the wallpaper stripping, the puttying, the sanding and general prep work to complete the transformation successfully. Can I tell you how much I hate prep work!?! The walls below the chair rail were covered in wallpaper- 3 layers deep, my doing, that I decided to remove to start with a clean slate. Using my handy Wagner 905 Power Steamer made this job a bit easier. It’s an all-purpose steamer that I use everywhere in my house to clean and sterilize without any chemicals! Along with a spray bottle filled with Vinegar, Dove dish soap and hot water, the stripping took approximately 4 exhausting hours. Puttyed and sanded all the holes, dings and scrapes. I typically use these sanding sponges because they fit into small corners and cracks, and you can rinse and re-use them. And this is the putty-Drydex. It is creamy pink before you apply it and turns white when dry. And I love pink!

And then came the bannister and railing. Curvy and dark, very beautiful, with 150 year old varnish that is virtually impossible to remove. The remaining progress has come to a screeching halt as I work my way slowly up the railing. I may hand everyone a sanding sponge on Sunday- do you think they will work for Peeps?

3. “Clean out and mulch the garden”  (No, this isn’t my garden, it’s Monet’s in Giverny, France. A girl can dream, can’t she?

Ok, well I hired someone to do the front part. He only did half and hasn’t come back to finish. Not gonna name names, yet. During the great stretch of weather we had a couple of weeks ago, I started raking down in the “back 40”.  Kept looking at the white picket fence and thought that it needed a nice new coat of paint. So I started painting that, and then I ran out of paint. Where’s Tom Sawyer when you need him? So I haven’t finished raking. Or mulching. Or painting.

4. “Wash all the windows” Haven’t finished yet, but I did make a great head start using this crazy “As Seen On TV” “Streak-Less Microfiber Cloth” that someone just gave me! You wet it and wipe the windows-no cleaners required and guaranteed not to streak! Guess what?!? It works!!! It only takes seconds to wipe each window, even the one’s with Daisy’s nose prints all over them. When the cloth gets dirty you wash it and keep using it. Crazy stuff. Too bad it won’t remove varnish from the railings…

5. “Buy a Ham” Hubby does the shopping. It’s on the list. He just asked me what size ham- the size of a football or a basketball? 

So there’s the update. I have four days left. Wish me luck.

The Hall of Shame

With Easter coming up next week, it’s time to make my “to-do” list, since we will be hosting the family celebration at our home. Typically, prior to most holidays, my lists look something like this:

1. Make a menu (this one’s not mine, but it looks good!)

2. Re-paint and wallpaper “something”- in this case, the front hall.

3. Clean out and mulch the garden. 4. Wash all the windows.

4. Buy a ham.

5. The night before- prepare the side dishes and desserts, clean the house, set the table, create some fabulous decorations for the holiday.

For some reason, it never occurs to me to NOT do a full-on reno project right before a holiday. So many times, with the deadline looming, the projects are not fully completed, or don’t get done properly. New wallpaper slapped over older wallpaper that never gets stripped, paint only gets one coat, the surfaces not properly prepped and sanded.

On several episodes of Modern Family, Phil Dunphy makes a mad dash up his stairs, tripping halfway up on a loose stair tread. As he mutters “I’ve got to fix that thing”, I think of our front hall. We use it 100 times a day, but at some point, we just stopped seeing it- the scraped walls, the torn wallpaper, the threadbare carpet.

Our “Hall of Shame” is like poor, overworked Cinderella. With some loving care and a glass slipper, it could be the Belle of the Ball, but right now it is the ugly stepsister. It was updated back in the 80’s, with cherry burgundy carpeting that is now thread-bare and worn from years of kids’ cleats and muddy paws. The floor is stick-on faux marble black and white check, with most of the ends curling up. The wallpaper has been changed a couple of times, but always with a nod to the horrible carpet. The bannister and railings? Well, they have been sanded and sanded and stripped and sanded some more, but never completed. I spent one whole summer stripping the paint off of the stair treads, only to find that that the wood was so worn, I went ahead and repainted them. BIG mistake!

So this time I started a week early-lol! But this time I am going to take my time and do it right, from the ceiling to the floor, both upstairs and down. I am creating my “mood board”, choosing my colors thoughtfully and adding the accessories carefully. As this week goes on, I will keep you updated on my progress. And if it is not done by Easter Sunday, so be it.

Hopefully, for my guests it will conjur up lovely images of faraway rustic Italy. I will just pour some wine, carve the ham and no one will even notice my latest work in progress. It’s gonna be a long week…

Happy Renovating! Susan

The Three “R’s” – Re-Imagine, Re-Purpose, Re-Love

Like most working women, I treasure the weekends. They allow us some free time to catch our collective breath and unwind, before gearing up for the upcoming work week. Saturdays are cleaning and errand day, but Sundays are usually saved for special projects that I have set aside, typically involving crafting, sewing or home improvements. Today was a “3 R’s Project”: Re-Imagine, Re-Purpose, Re-Love. I was a DIY fanatic well before HGTV and the DIY Network came along. My mantra? “Sure, I can do that!”

Over the years, I have created extravagent wedding cakes, painted folk art, and more recently, I create and donate T-Shirt Quilts through “Threads Of Hope”– all the while working on refurbishing and restoring my 1850’s homestead. I never shy away from a project, whether its re-clapboarding the front of the house, baking a fantastic cake for a party, building a fieldstone wall, adding wainscotting to a room or crafting a quilt for an auction. I’ll try anything, with the exception of electricty. Attempted to splice some wires once with shockingly bad results. Lesson learned. I love re-using, re-cycling, re-beautifying things and giving them a new purpose.

Today I re-covered two pillows for my living room due to the “decorating domino effect”. Not sure what that means? I’ll explain. My living room is decorated in shades of blues and creams with brown accents. Recently I purchase a new rug for my dining room-red and white and gorgeous! So now the dining room rug has found a new home in the living room. Unfortunately, the transported rug is in shades of blues and reds, so exit the brown accents from the living room and enter the reds. Therefore, the brown and blue pillows needed new covers to co-ordinate-got that?

Now, dropping $50.00 for a new throw pillow is not something I am able or willing to do. My shopping is a constant struggle between want and need, and throw pillows typically don’t fall into the need column within my limited decorating budget. So, having two perfectly good down-filled pillow inserts, it was time to pull from my fabric grab-bag to re-cover them. Disclaimer: In a previous blog, Map It Out, I described my husband as a pack-rat. I want to state here that I do have my weakness when it comes to saving:fabric.

I save left-over fabric pieces, curtains, sheets, bedspreads, pretty dresses, in the event that I might need a scrap or two for a project someday. In my defense, I do a lot of quilt-making, painting and crafts, and fabric scraps are used for everything from rags to ruffles. Today, I pulled a lovely old blue Waverly Toile Valance out of my bin, and with that discarded window treatment I made two new covers for my living room throw pillows-love them! The cost? $1.78 for the covered button kit I purchased at Joanns (using a 50% coupon, of course). Had I gone shopping for those same two Waverly-covered, down-filled pillows, I would have paid upwards of $45 each, and with all due respect, they would not be nearly as pretty as the ones I created today.

So another Sunday gone, another re-purposing project completed-time to go clean up the dining room and gear up for another Monday morning. In the meantime, I can check pillows off the list of things to re-imagine, re-purpose and re-love.

Beware the Ices of March

So, we thought we were going to get through this glorious winter relatively unscathed, right? Damn that Puxatony Phil- one month to the day after he saw his shadow and predicted six more weeks of winter, Mother Nature finally co-operated and dumped a few inches of snow on us. When the snow turned to rain yesterday, I figured this morning’s commute would be on dry roads with nary a snowflake in sight. Imagine my surprise when I opened the back door to let the dog out and saw this picture!

The beauty of the freshly fallen white snow contrasting with the red and black of the barn got me to thinking about the color white and how it translates to design. White stands for purity and innocence- think angels and brides,

goodness and cleanliness- think doctors and nurses or good vs. evil

and brilliance and light. To the human eye, brilliant white can be painful and blinding, which is why, in decorating, it is best to add even the smallest amount of contrast, so that the room does not appear to be too stark.

According to Benjamin Moore (my absolutely all-time favorite paint), the white color palette is their top-selling paint choice, and boy, do they have white paint choices! White Dove, Linen White, Cloud White, China White, Decorator’s White, Najavo White, Atrium White-the list is endless- all clear and natural and absolutely versatile. Whites can be the blank canvas for modern, traditional, french country, shabby chic or farmhouse country design.

It can be sleek and sophisticated or friendly and warm, depending upon the hard and soft furnishings. It can fill a room with light or create a dramatic frame for a window or dark-hued wall.  Here are some of my favorite white spaces on Pinterest. Enjoy!