Coffee Toffee Pudding Pie

Have you ever needed to make a dessert quickly and don’t know what to do?! Here’s a simple recipe that you can adapt to whatever you happen to have handy in your cupboard or fridge.

img_5455A New Year’s Day lunch invite prompted me to create a simple and yummy dessert using only the ingredients left over from the holidays! Here’s the deal:

These are the ingredients I had on hand, but you can use whatever your cupboard has to offer: a Pillsbury Pie Crust (the one remaining frozen crust leftover from Christmas), a jar of Stonewall Kitchen Coffee Caramel Sauce, Jello Instant Chocolate Pudding, a 3/4 full container of Cool Whip, some confectioner’s sugar, a block of cream cheese, vanilla extract, milk and some Heath Toffee Chocolate Crunch Bits. img_5445
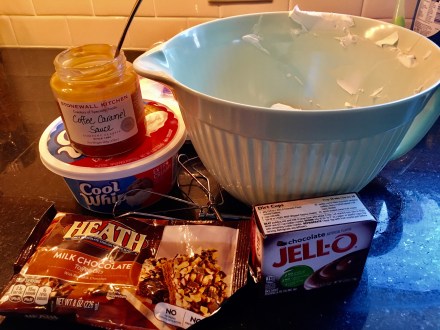
I baked and cooled the pie crust according to the box instructions.

img_5446If you don’t happen to have a frozen pie crust, you can substitute some crushed up cookies mixed with melted butter! (or, this dessert is yummy without a crust!) Before it cooled, I added a layer of Heath Toffee Bits and drizzled some of the Stonewall Kitchen Caramel on top. That allowed the flavors to melt into the warm crust a bit. Don’t have Heath Toffee Bits on hand? Use some crushed up candy left over from Christmas (or Halloween for that matter!) Peanut butter cups with some PB added to the cream cheese, chocolate kisses or Santas, peanutty bars, even candy canes will give the dessert some yummy crunch! Or, you could use some frozen or fresh raspberries and substitute a raspberry puree for the caramel. The possibilities are endless!

img_5451While that was cooling, I creamed one 8 oz brick of light cream cheese until smooth. (OK, lets be real.

img_5448Using LITE cream cheese made me feel a little better about breaking my NY resolution on DAY 1.) Then I dumped in the confectioner’s sugar and a tsp of vanilla extract.

img_5447After beating that mixture until smooth, I folded in a cup of thawed Cool Whip.

img_5449I layered that into the prepared, cooled pie crust, then added a second layer of bits and coffee caramel sauce.

img_5452BTW, if you don’t happen to have a jar of caramel sauce on hand, you can make your own-try this super easy, super delicious recipe I Pinned using sweetened condensed milk! I put that back in the fridge to cool and made my chocolate layer using the box of Jello instant chocolate pudding mix and 1 1/2 cups of 2% milk. LOL-see, this really is a healthy dessert : 0

img_5453I smoothed the pudding onto the cream cheese layer, then added dollops of the remaining Cool Whip around the edges.

img_5454
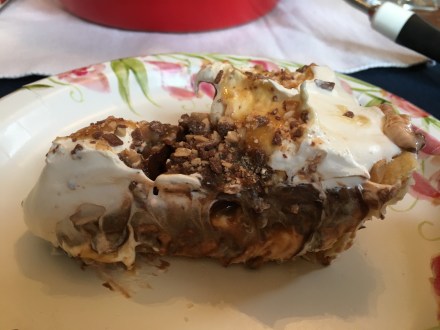
Finally, I drizzled some caramel and added handfuls of Heath Chocolate Toffee Bits until it looked like this:

img_5455When it was dessert time, the pie cut easily but messily- but isn’t that the way gooey, yummy, chocolatey good desserts should?!

img_5463Total time in kitchen, about 20 minutes. Total time to devour dessert?

img_5461About 5 minutes! Have a Happy New Year everyone- I hope you’ve made some sweet resolutions that you can keep too! xoxo Susan


Facebook Follies

Yesterday I posted this picture from KMPH FOX 26 on Facebook. It must have resonated with a few folks, because as of this morning, it already has over 23,000 Facebook views and shares! The reason it is so popular? People are frustrated with the way Facebook keeps changing their parameters of how we can post and view our own pages. My favorite is #6: “Let me see every post from pages I like. If they post too much, I’ll hide them myself.” Too often, I find myself searching through my friends’ profiles because Facebook has determined their posts are something I don’t want to see-but if I didn’t want to see them, I wouldn’t have them in my friends’ list, correct? WKMP Fox 26 A few days ago I was directed to a web video about Facebook by my son, who happens to work in marketing. His company had thought that the information in the video was important enough to share with his marketing team, and he deemed it important enough to share with me. We all know the frustrations of Facebook: they keep changing the game, especially for the small business owner who is just trying to gain exposure through social media. Previously, if I posted something on my Country Design Home timeline, it would be shared with my followers-all my followers. But then Facebook started selling “BOOST YOUR POST” advertising, where you could garner “likes” with a small investment ($5 and up), and they stopped sharing my posts for free. My paid posts would be shared with my friends, and their friends, and their friends-a pyramid scheme of sorts-the more you spent, the more exposure you received. My unpaid post would sit there and perhaps be shared with a mere fraction of my total followers, unless they shared it. So, I tried the Boost Your Post a couple of times at $5 each. The first time was fairly successful with a couple of hundred new “likes”, the second time I saw no appreciable difference in my likes. BUT, what I did notice was that the paid “likes” that I received through Facebook advertising were not from followers who liked country design, did not comment or engage in my page at all, and many had blank profile pages. This is a recent typical “new like”: Vu Tuan (the profile states this person is male)-is there any indication here that she/he would be the least bit interested in country design? I don’t know for sure because I cannot translate Vietnamese, but I am thinking not, since most of her/his likes are American TV shows and companies.

Facebook Vu Tuan

So, where on earth are these likes being generated from? Is Facebook committing advertising fraud or not? This is a You Tube video from Derek Muller of Veritasium, who normally writes about scientific research and phenomena, but he published this video about Facebook advertising fraud because he believed it is an important topic. And, with over 1.5 million views, I would guess that he is not alone. Veritasium Video Pic This video (along with several other sources I have read) explains that most of the paid “likes” are being generated from “click farms” in developing countries like India, Indonesia and Bangladesh. The circled bubbles in this graph are the “likes”  from developing countries from a paid Facebook advertising campaign he had created specifically to test his theory. Veristasium Facebook Engagement These workers are paid $1 per thousand clicks to essentially sit all day and click away at anything and everything, whether it is directly related to the paid Facebook ad page or not. In essence, they are not “liking” you or your page, they are merely clicking away to make a dollar. Now, according to Veritasium, it is against Facebook rules to purchase likes through web companies that provide clicks per dollars, and your account can be suspended for that. But, the video goes on to claim that despite that rule, Facebook itself engages click farms to sell their advertising packages. In another article on Search Engine Watch, Facebook Ad Fraud: How Can Advertisers Combat Paid Likes? the author, Jennifer Slegg goes on to explain some strategies and steps to take to avoid having your advertising dollars being wasted on spam Facebook accounts. And, on Wikimotive: Why The Facebook Fraud Video Is Not Completely Accurate, author Erin Ryan refutes some of Veritasium’s key points, while citing her own advertising clicks to dollars spent, which is, on average, much more successful than those from the video. She states: “I’m not stating that the results that Veritasium have calculated are false, but the results may have been skewed, as the video doesn’t fully explain the targeting process.” Which is really the key issue here. We are all attempting to engage followers who are interested in what we are doing, selling, saying or creating so we must TARGET that audience specifically. So, what’s a low-budget, low-follower Facebook user to do if you’re not interested or able to purchase their ad boosts? Well, you can abandon Facebook altogether, there are plenty of other social media vehicles that are useful for spreading your information. But, like it or not, Facebook is still a powerful social media tool, and many bloggers and websites use Facebook “like” numbers as a gauge of how popular you really are. (However, I am typically suspicious of Facebook profiles that have 100,000+ “likes” if their other social media does not support that inflated number.) So-a few options. You can grow your followers organically, meaning that you search out other pages similar to yours, like them, follow them, comment on their pages and hopefully gain a follower and a new Facebook friend. This takes time, patience and the ability to sift through hundreds of pages, but once you have established that base, then more of your posts will be seen by more people, and you will gain more followers who will then in turn, see more of your posts. Or, you can join one of the many, many contests and giveaways that circumvent the paid Facebook advertising altogether. BUT, you are still paying for advertising, only now its going to the originators of the contest-the “hosts”. You pay them, sometimes upwards of $50, for a chance to participate in a “click-fest” hosted through a third-party contest portal like Rafflecopter. In order to win the prize, readers must click and like the hosts’ Facebook, Twitter, Instagram, Pinterest, etc… pages. There can be as many as 40-50 clicks that are required in order to enter the contest, which can be tedious, but hey, its a chance to win some quick cash or gift cards! Over the holidays,I participated in a Facebook New Year’s Giveaway, where the first prize was $500. I paid my $40 to the hosts, and watched my “likes” grow by approximately 1500, which was great! Some dropped off and “unliked” me once the contest was over : ( but my new followers are primarily from the US, engaged in what I am posting and continue to follow my page on Facebook. But, in the end, I felt that I was merely buying “likes” to boost my Facebook numbers, and for me, that is not the answer to gaining true fans of my blog, which is what I am really trying to promote. So, for now, I am going to keep my advertising dollars and focus on my true purpose: blogging and DIY’ing-and hope that my readers will “like” me because (as Sally Fields once declared), you really “like” me!!! If you have any thoughts, ideas or suggestions on this interesting and timely topic, let me know! I would love to hear how all of you promote your blogs and gain followers. In the meantime, have a spring-is-almost-here Sunday, everyone! Susan

The Master in Class at Maison Decor

Recently, I had the good fortune to observe an Annie Sloan Chalk Paint class instructed by Amy Chalmers, owner of Maison Decor in Reading, Mass.

Amy Chalmers

With the perfect blend of skill, patience and great humor, Amy was able to successfully educate the attendees of the class on the basic techniques of using chalk paint to make their life more beautiful.

Maison Decor Life More Beautiful SignI first met Amy about a year ago, when I ventured into her store in Malden (now being used primarily as a workshop). Although we chatted that day about her blog and her company, I hadn’t really had an opportunity to learn about her own design experience until now. When questioned about her art background (when you see her shop, you know there is a very talented artist in residence), this was her response:

Amy Painting Armoire“I did study art at Northeastern and our program involved taking classes at the Museum of Fine Arts, which was amazing. But I was an English major in creative writing and art was my minor. I just always was the artsy kid, and my dad built me my own special art table when I was 12…it was modeled after an architects drafting table with a raised work surface and it had lots of cubbies on one side for me to put my art supplies. My parents just encouraged my creative leanings and I am glad they did. I painted a mural on my bedroom wall in high school~so it was just something that I found very natural. I think it was my first grade art teacher that ignited the fire inside of me, I was so excited about my art classes with her, and I remember thinking that I wanted to grow up to be an art teacher!”

After her schooling, Amy got into fabrics, making slipcovers and drapes, and started her own business in her late twenties sewing custom pieces. Interior design work followed, and for over 20 years she had her own business specializing in window treatments and color selections. Focusing primarily on residential interiors, she did do an occasional commercial space, including the McDonalds in Fanueil Hall in Boston! (what Annie Sloan colors are in that yellow and red palette?!)

Chalk Paints on Windowsill at Maison Decor

Fast forward to the present, where Amy spends the bulk of her time in the Reading Shop as an Annie Sloan “stockist” and teacher, offering painting workshops while creating and selling gorgeous pieces of furniture and decor, all finished with Annie Sloan Chalk Paint.

Maison Decor Chalk Paint SuppliesEntering into the store from Main Street, you feel as if you are stepping into an old chateau in the French countryside.

Maison Decor Shop VignetteHer style is quintessential French Country: loads of soft, muted colors, (Duck Egg Blue, oh yum!)

Duck Egg Bluestunning crystal chandeliers

Maison Decor French Crystal Chandelierand vintage pieces, all restyled and refinished using Annie Sloan paints and finishes.

Blue Painted DresserShe and her sons, Justin and Colin, also working in the business, created this cobblestone floor using sponges and chalk paint. Magnifique! FYI-the guys teach a “men’s-only” class, for the gents who would like to learn the painting techniques while not surrounded by women. Or maybe not.

Maison Decor Cobblestone FloorI arrived a bit early on workshop day, checking out the work table at the back of the shop, all set with the necessary tools and aprons her participants would need.

Maison Decor Class PrepOnce the class got rolling, Amy was a great teacher, at first educating her students on the paints, the company and furniture styles, but then it was time to get messy!

Time Clock @ Maison Decor

Amy’s charming teaching style is stand-up comedy meets mad scientist meets art professor.

Class PaintingShe knows her stuff, and is eager to impart her vast knowledge and expertise to her students, demonstrating technique and patiently answering any questions from her class. This is a hands-on workshop- no boring lectures here!

Amy Chalmers Teaching ClassAfter a few hours of painting and glazing and using blow-dryers (you’ll have to take the class to find out what those are for : ) the final reveal: These were Amy’s demo pieces:

Completed Samples, Teacher

and here are some samples from one of the class members: pretty close, agreed?

Completed Samples, Student

If you are interested in learning about Annie Sloan Chalk Paint, and if you don’t know what that is, check out Pinterest (and if you don’t know what that is, you clearly have not been reading my blog…)

Annie Sloan Chalk Paint

This unique paint, originating in England by a former rocker, is slowly making its way through the US and changing the way American craftspeople re-purpose and restyle their furniture.) Or, you can head over to Maison Decor at 150 Main Street in Reading, and learn everything you need to know from the master, Amy Chalmers, in one of her continually added workshops. They stock all of the necessary supplies there, or you can order online.  And if you do check her out, tell her Sue from Country Design Home sent you! Have a charming Sunday, Susan

Fancy That! Easy Chalkboard Art!

We’ve all seen the signs. Fancy chalkboard art is all over Pinterest, it’s at weddings and birthday parties and on this month’s cover of Country Living Magazine.

Chalkboard Country Living Magazine

So, you ask, how does one (who really cannot draw more than stick figures) create a great-looking sign that you can be proud of? Well, I have done quite a bit of research and have read many, many how-to tutorials. Most involved special transfer paper, graph paper, rulers and grids and painstaking copying. That didn’t appeal to me-I like quick, fast and easy (insert joke here). The more things I get done, the more things I get to keep doing! I needed a sign for next week’s booth, so I thought this would be the perfect opportunity to try my own approach to chalking it up. Here we go:

Step 1: Go to the barn and get an antique cupboard door that’s been hanging around for generation or two-thanks, Coach!

Antique Door

If you are making your own chalkboard, like I did, I recommend Benjamin Moore Chalkboard paint.

Chalkboard Paint-Benjamin MooreI have tried many brands and this one is very smooth and creates a nice writing surface. You need two coats. Follow the directions on the can. It takes 3 days to cure. Follow the directions on the can. Make sure you “size” the board before you write on it with chalk. Then wipe it down. Follow the directions on the can.

Step 2. Decide what you want to say. I needed to make two signs: one for Country Design Home and one for the name of the monthly market. For the May market, its Mom’s Garden.

Mom;s Garden

Use your basic paint program or photoshop or whatever you use to create the words and graphics you would like to have on your sign. You can be as fancy or plain as you like. Size them to the exact specs of the board you are decorating. You will need to create the entire board, and you can do that in sections or all on one 8 1/2 x 11 sheet of paper. Print them as you normally would on regular printer paper, do not flip them to the reverse. If you have printed a large design in sections, you need to tape the whole thing together before you tape it to the board. You can use the program from Blockposters to create a large mural-type board.

Step 3. Flip the paper over and then take some sharpened chalk and draw along the lines of the print. I will call this reverse chalking. Be neat, but you don’t have to be fanatical about it. That’s what wet wipes are for.

Reverse Chalking

And yes, you can sharpen chalk with a regular pencil sharpener-who knew?! And it doesn’t make that squeaky “nails on the blackboard” noise either!

Chalk Sharpener

Step 4. Carefully place the paper, chalk side down on your prepared surface. Don’t move it around too much or it will leave smudgy stuff on your nice clean board. Tape it in place. Repeat, tape it in place.

Taped Design

Step 5. Take something smooth but pointy- like this cuticle thingy (lord knows, I don’t use it for my nails…) and rub all of the lines that you want to magically appear on the chalkboard.

Cuticle Press

Step 6. You can carefully lift the paper up just to make sure you have transferred all of the chalk lines you need as you go.

Chalkboard Design Check

Step 7. When you are happy that the design has been transferred to your liking, you carefully remove the paper, and voila! Instant fancy printing!  I added just a few corner embellishments, but this is where you can go crazy adding all kinds of cute graphics free hand!Chalkboard Sign

You will most likely need to use your sharpened chalk to clean up the edges, deepen the color and thicken the lines. (I also read somewhere that you should wet the chalk or the board to make the lines darker and clearer. That didn’t work for me, but have at it if you don’t think your lines are dark enough.) If you make a mistake, just use a wet wipe and try again.

Step 8. If you wish to make this permanent, then spray with some matte acrylic spray. I read somewhere that you could use hairspray, but I didn’t try it so I can’t vouch for that technique.Krylon Matte Finish

Step 9. Chalk it up to another great D.I.M. (Do It Myself) tip from Country Design Home! Susan

“Font”astic Furniture Fonts!

Recently, thanks to Coach’s fantastic rummaging abilities, I find myself in possession of several new wooden pieces that need some TLC magic. One of the design styles I continually admire on Pinterest are painted pieces decorated with French Typography. Like this one featured on The Graphics Fairy:

The Graphics Fairy Dresser

or this rustic little nautical dresser from Joss & Main

Joss & Main Dresser

There are so many brilliant DIYer’s out there who take old, junky furniture and accessories and transform them into beautiful decorative accent pieces for their homes or, in many instances, for sale. This sideboard, originally a dark and dingy brown, was painted and stenciled and turned into this beauty by the husband and wife team at Three Mango Seeds.

Three Mango Seeds Console

And check out the finish on this vintage table transformed by Red Hen Home! Love the dark stained wood with the black stencil-very ooh, la, la!

 Red Hen Home

So, how do they do this, you ask? Where do all the letters and graphics come from? And how do I use them on furniture? One website that I subscribe to, The Graphics Fairy, sends a daily email with new and interesting free graphics and fonts- that’s right, free! Great for fresh ideas, inspiration or perfectly easy how-to instructions.

Graphics Fairy How To

Included on her pages is how to download and print the graphics– obviously the size of the piece will determine the size of the graphic, and if it is a large dresser or console, you need an enlarged graphic, right?  Blockposters.com to the rescue!

Blockposters.com

You download your picture onto their website, add the dimensions you would like and it creates adjacent blocks of graphic to the size specs you enter.  Then you can print them right on your home computer and transfer them onto your piece. Click here for The Graphics Fairy Transfer Tutorial on all the ways transfer. So now, you have the graphic you like, where do you find all those fancy fonts? Again, The Graphics Fairy has many to choose from, but you can also check out azfonts or fonts for peas (super cute stuff for painting, scrapbooking, etc.).

Fonts for Peas

So, if you have an old piece of furniture, or spot one at a yard sale that you just gotta have because the size works but just not the style, think about painting and adding some graphics for a whole new look. Recycling, refurbishing, reloving is what country design style is all about! Have a fontastic

Thursday, everyone! Susan

A Sweet Swap

Wednesday was our second annual cookie swap at my work place-sweet!!! When I proposed the idea last year, it initially was greeted with some trepidation (why would I swap my cookies, and how do I decide what kind to bring?). But it was such a success that this year my co-workers were quite enthusiastic about rolling up their sleeves and rolling out some dough!

Cookies Gingerbread men

Knowing you will be going home with two dozen+ assorted home made delicious cookies is quite an incentive! I found this book, which I thought might have some great swapping recipes, along with tips for a fun and successful swap. Although we did skip the recipes for Juicy Sangria  and Fresh Lime Margaritas-tequila is rather frowned upon in the middle of a work day.

Cookie Swap Book

Then I turned to my holiday Pinterest board for recipes, and I found this one for cute reindeer pretzel cookies. Reindeer Pretzel Cookies on Country Design HomeWhich I did not follow exactly. So they came out like this.  Cookies Pretzels Not very pretty, very yummy, but sooo not pretty! They would be right at home in the land of misfit toys– am I right? For my other selection (we each brought in two dozen to swap), I went with a traditional sugar cookie, drizzled with icing and decorated with sprinkles.

Cookies Trees

My co-workers’ yummy cookies included: Chocolate Coconut Disasters (per the baker, but they were really awesome!)

Cookies Coconut Disasters

Peppermint Bark

 Cookies Peppermint Bark

Chocolate Dipped Macaroons

Chocolate Dipped Macaroons

Peanut Butter Rolo Cookies

Cookies Red and Green Rolos

I provided the trays, cello wrap, ribbon and the little gingerbread guys for gift tags.

Cookies Trays and Wrap

When we were finished, each participant walked away with a tray filled with variety of cookies to bring home-yum!

Cookie Trays

For more holiday recipes and ideas, please visit my Merry Happy Holly Days on Pinterest. If you have a favorite cookie recipe that you would like to share, send it to me and I will add it here!  And have a sweet, sweet Friday everyon! Susan

Craftsy. Learn it. Make it. Love it.

This week’s High Five for Friday goes to Craftsy.com!

Their mantra: Learn it. Make it. It’s like going to community college night classes in the comfort of your own home-I wish I had thought of this! You know all those awesome hand-crafted items on Pinterest and Esty that you think “gee, how do I make that?!” And you are too busy, too stressed, work full-time, don’t have the tools or the knowledge or someone to show you how to make it happen? Well, this website is for you! It’s a free membership, you sign up and have immediate access to thousands of patterns and professional online how-to videos and information for everything from cake creations and crocheted clothing to decorating your nest. You learn at your pace, on your time, whether you are burning the midnight oil in your PJ’s or hanging out on the back porch on a lazy summer afternoon. They even have an online store where you can purchase the craft items you need for your projects. I have added a couple of my own designs to my Country Pretty page, and will be adding more shortly. (so for any of you out there that want to make a whale table of your very own, check my link soon). So whether you want to create a very special cake…

or crochet a hat (this one’s from Color My World Crochet– so pretty!)

Create a chalkboard sign 

Or antique a table…

…click on the Craftsy logo link above and get crafting!  TGIF everyone!!! Susan

Classe de couleur avec Claude Monet

Bonjour, les etudiants! Today’s class is “color inspiration from the famous impressionist artist Claude Monet“. A few year’s ago we took a Seine River Cruise from Normandy to Paris (magnifique!) with many stops along the way, including Rouen (where Joan of Arc was burned at the stake), Normandy (where the allies stormed the beaches in WWII) and one of my favorites, Giverny, the home of French Impressionist Claude Monet. Monet was a master in the use of color, both in his famous paintings and in his home and gardens, which he planted to inspire his works of art.

Let’s take the tour of Monet’s Home in Giverny…and use it as your own inspiration!

Monet’s Parlor in MonoChromatic Blue

Monochromatic Living Rooms Today

The Yellow and Red Dining Room of GivernyInspired Yellow and Red Dining Rooms

                 Blue and Copper Kitchens- Complementary Blue and Orange

Monet’s Stunning Kitchen at Giverny

Modern Blue and Copper Kitchens-beautiful!                           The Pastel Bedroom Upstairs in Monet’s Home-

Split Complementary Colors of Yellow, Green and LavenderAn adorable children’s room from with yellow, green and lavender- so pretty!

%d bloggers like this: