We’ve all seen the signs. Fancy chalkboard art is all over Pinterest, it’s at weddings and birthday parties and on this month’s cover of Country Living Magazine.

So, you ask, how does one (who really cannot draw more than stick figures) create a great-looking sign that you can be proud of? Well, I have done quite a bit of research and have read many, many how-to tutorials. Most involved special transfer paper, graph paper, rulers and grids and painstaking copying. That didn’t appeal to me-I like quick, fast and easy (insert joke here). The more things I get done, the more things I get to keep doing! I needed a sign for next week’s booth, so I thought this would be the perfect opportunity to try my own approach to chalking it up. Here we go:
Step 1: Go to the barn and get an antique cupboard door that’s been hanging around for generation or two-thanks, Coach!

If you are making your own chalkboard, like I did, I recommend Benjamin Moore Chalkboard paint.
 I have tried many brands and this one is very smooth and creates a nice writing surface. You need two coats. Follow the directions on the can. It takes 3 days to cure. Follow the directions on the can. Make sure you “size” the board before you write on it with chalk. Then wipe it down. Follow the directions on the can.
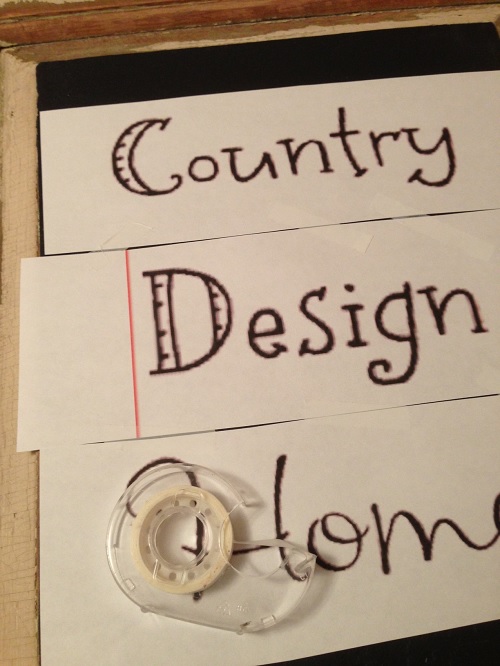
Step 2. Decide what you want to say. I needed to make two signs: one for Country Design Home and one for the name of the monthly market. For the May market, its Mom’s Garden.

Use your basic paint program or photoshop or whatever you use to create the words and graphics you would like to have on your sign. You can be as fancy or plain as you like. Size them to the exact specs of the board you are decorating. You will need to create the entire board, and you can do that in sections or all on one 8 1/2 x 11 sheet of paper. Print them as you normally would on regular printer paper, do not flip them to the reverse. If you have printed a large design in sections, you need to tape the whole thing together before you tape it to the board. You can use the program from Blockposters to create a large mural-type board.
Step 3. Flip the paper over and then take some sharpened chalk and draw along the lines of the print. I will call this reverse chalking. Be neat, but you don’t have to be fanatical about it. That’s what wet wipes are for.

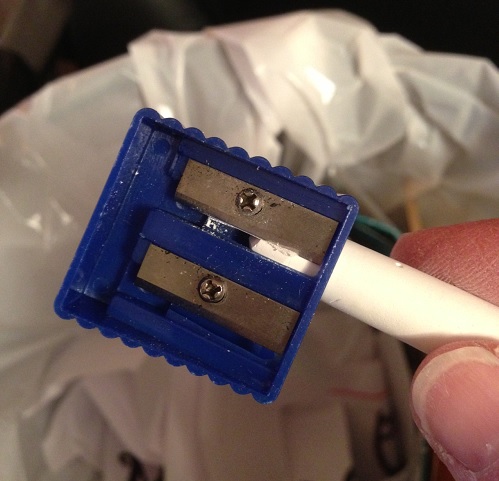
And yes, you can sharpen chalk with a regular pencil sharpener-who knew?! And it doesn’t make that squeaky “nails on the blackboard” noise either!
Step 4. Carefully place the paper, chalk side down on your prepared surface. Don’t move it around too much or it will leave smudgy stuff on your nice clean board. Tape it in place. Repeat, tape it in place.
Step 5. Take something smooth but pointy- like this cuticle thingy (lord knows, I don’t use it for my nails…) and rub all of the lines that you want to magically appear on the chalkboard.

Step 6. You can carefully lift the paper up just to make sure you have transferred all of the chalk lines you need as you go.

Step 7. When you are happy that the design has been transferred to your liking, you carefully remove the paper, and voila! Instant fancy printing! I added just a few corner embellishments, but this is where you can go crazy adding all kinds of cute graphics free hand!
You will most likely need to use your sharpened chalk to clean up the edges, deepen the color and thicken the lines. (I also read somewhere that you should wet the chalk or the board to make the lines darker and clearer. That didn’t work for me, but have at it if you don’t think your lines are dark enough.) If you make a mistake, just use a wet wipe and try again.
Step 8. If you wish to make this permanent, then spray with some matte acrylic spray. I read somewhere that you could use hairspray, but I didn’t try it so I can’t vouch for that technique.
Step 9. Chalk it up to another great D.I.M. (Do It Myself) tip from Country Design Home! Susan


I too was just asking a friend today how people make all the fancy writing on projects. Gonna give this a try. Thank you!!
LikeLike
Let me try this again! I lost the other one. This was a great tutorial. I’m going to give it a try. I’ve found that using Soft Chalk Pastels, found in the Art Dept. at Hobby Lobby, gives me a brighter long lasting sign. I’ll be interested to see how it works on the back of my transfer. Thanks and I’m glad I found your blog!
LikeLike
It really is the easiest way to transfer graphics with chalk. I will give the soft chalk pastels a try. Where is the Hobby Lobby? I keep seeing people mentioning it, but I don’t know that we have them around here.
LikeLike
Hobby Lobby is like Michaels…a craft and hobby store. They both carry almost everything you need for crafts. I’m not sure where you are located but hope this helps.
LikeLike
Thanks! We don’t have them here in Massachusetts (at least not that I know of). But we do have Michaels and AC Moore and Joanns, and they all have 40% coupons-yay!
LikeLike
You can always shop online with Hobby Lobby and they, too, have the 40% coupons available. Life is really good then isn’t it:)
LikeLike
Great tutorial. I’m going to give it a try. I’ve found that rather than using regular chalk that Soft Chalk Pastels, found in the Art Dept. at Hobby Lobby, works better for me in brightness and staying power. I’ll try it on the back of the paper and see how it goes. So glad I found your site!
LikeLike
What a great idea, thanks!
LikeLike
You’re welcome! Easiest way to transfer chalk designs!
LikeLike
Well this is awesome! I was just asking someone this morning how people did all that fancy writing on chalkboards! Thanks for the tutorial.
Stacy
http://www.anygirlcandoit.com
LikeLike
Great! You see, any girl can do it : )
LikeLike
Just love the chalkboard art.
LikeLike
Looks great! I have been wanting to try this chalkboard paint for awhile. Thanks for sharing how to tips!
LikeLike