Hey! It’s been a minute, but I think I finally found something worth writing about. A few years ago, I purchased this print from Fleurish Home and Garden

at a Vintage Bazaar. Ben Franklin had it write*; interesting reads begin with purpose. This month, after two years of languishing in some sort of pandemic hell malaise, I have found just that purpose. Recently, I happened upon a TikTok video on my FYP. (for those who’ve not had the pleasure of this time-wasting activity, scrolling through videos about nothing and everything, FYP is the for you page-the algorithm that TikTok uses to determine what you’d like to watch, because apparently, you’re not able to do that on your own). The video I happened upon was of a woman’s voice-over, explaining how she was putting together some bedding to give to a refugee family while displaying her choices on screen.
And so, I discovered
Intrigued, I kept watching…and watching…the videos are short but incredibly heartfelt and places on full display what happens when people leave dire situations where they cannot exist peacefully or thrive. More often than not, moving with nothing more than the clothes on their backs and with little to no resources, these are the people: friends and neighbors, moms and dads, brothers and sisters, grandparents and teens, and so many little children who have nothing, that turn to Project Home Again for assistance in setting up their new living spaces-all free of charge. If you watch the video below, it will give you a better sense of what they are all about.
The brainchild of founder Nancy Kanell, Project Home Again has been in existence for over 19 years in the Lawrence/Andover area of Massachusetts. You can read all about the origins in their bio, linked here. Suffice to say that the fateful decision of Nancy’s to help one friend-a domestic abuse survivor-to replace a broken stove, has changed the lives of so many, many more. So why are they on Tiktok and where do I fit in this story? For years, they have simply relied on the kindness and generosity of their neighbors and friends in their surrounding towns-everything from bedding to kitchenware to furniture was donated, sorted and then readied to give to someone in need.

The clients would then go into the warehouse where everything is displayed, and they would choose what they wanted. Once the pandemic hit, the warehouse had to be closed to visitors, so Nancy would make the choices herself with the guidance of the social workers who were representing the clients. What a precious selection for a dino-loving little boy : )

Also, since people could no longer visit the facility or donate their goods, Nancy turned to Tiktok as a means of telling the story of Project Home and spreading some “good vibes” during such difficult times. Never in her wildest dreams did she imagine what would come next. Currently with 420K+ followers and over 10 million likes, her legion of donators log in to hear her stories and the thoughtful process in which she chooses the household goods to be given to each recipient. As her following has increased, so have the donations-from across the country and around the world. Bedding, bath, lamps, rugs, household appliances, curtains, decorations, kitchenware & furniture…

if she mentions a need, or it is listed on their wish list, it is fulfilled by her amazingly generous followers via Amazon and Target and Walmart and so many more. With the increased online exposure, the donations are increasing, but the requests from agencies and social workers are also growing exponentially. The beauty of this is that the more Project Home Again receives, the more they are able to give to the over 160+ agencies across the state requesting assistance.
As for me, since the town where they are based is literally 20 minutes north of me, I reached out to ask if they needed any volunteers (one of the great perks about being retired is having the time to give). And they did, so I am now a member of the volunteer army at Project Home Again. The volunteers that I am honored to be working alongside of are so generous with their time and happy to help out in any way necessary. This week, we hauled mattresses, opened mountains of boxes

(and BTW- to whomever the person is that invented those air-pocket plastic shipping pillows- UGH), sorted, marked and shelved the donations, moved furniture, and put together a full display of items for clients as they arrived to pick up their newly acquired goods. The work is gratifying, sometimes heavy, a lot of fun and quite emotional when you realize how those less fortunate are struggling just to survive.

To read more about this incredible organization, please visit their website. There, you can learn how to donate goods or money, request assistance or become a partnering institution or a volunteer (like me!). And as for TikTok, go ahead and take a look at her almost daily posts. I promise that you will be just as profoundly moved and awed as I am while watching Nancy’s videos. In this time of continued pandemic strife and amid all the negativity in this world, Project Home Again shines a bright light on the goodness and generosity of our fellow humans. Have the best day you deserve. XOXOXO Susan
*right

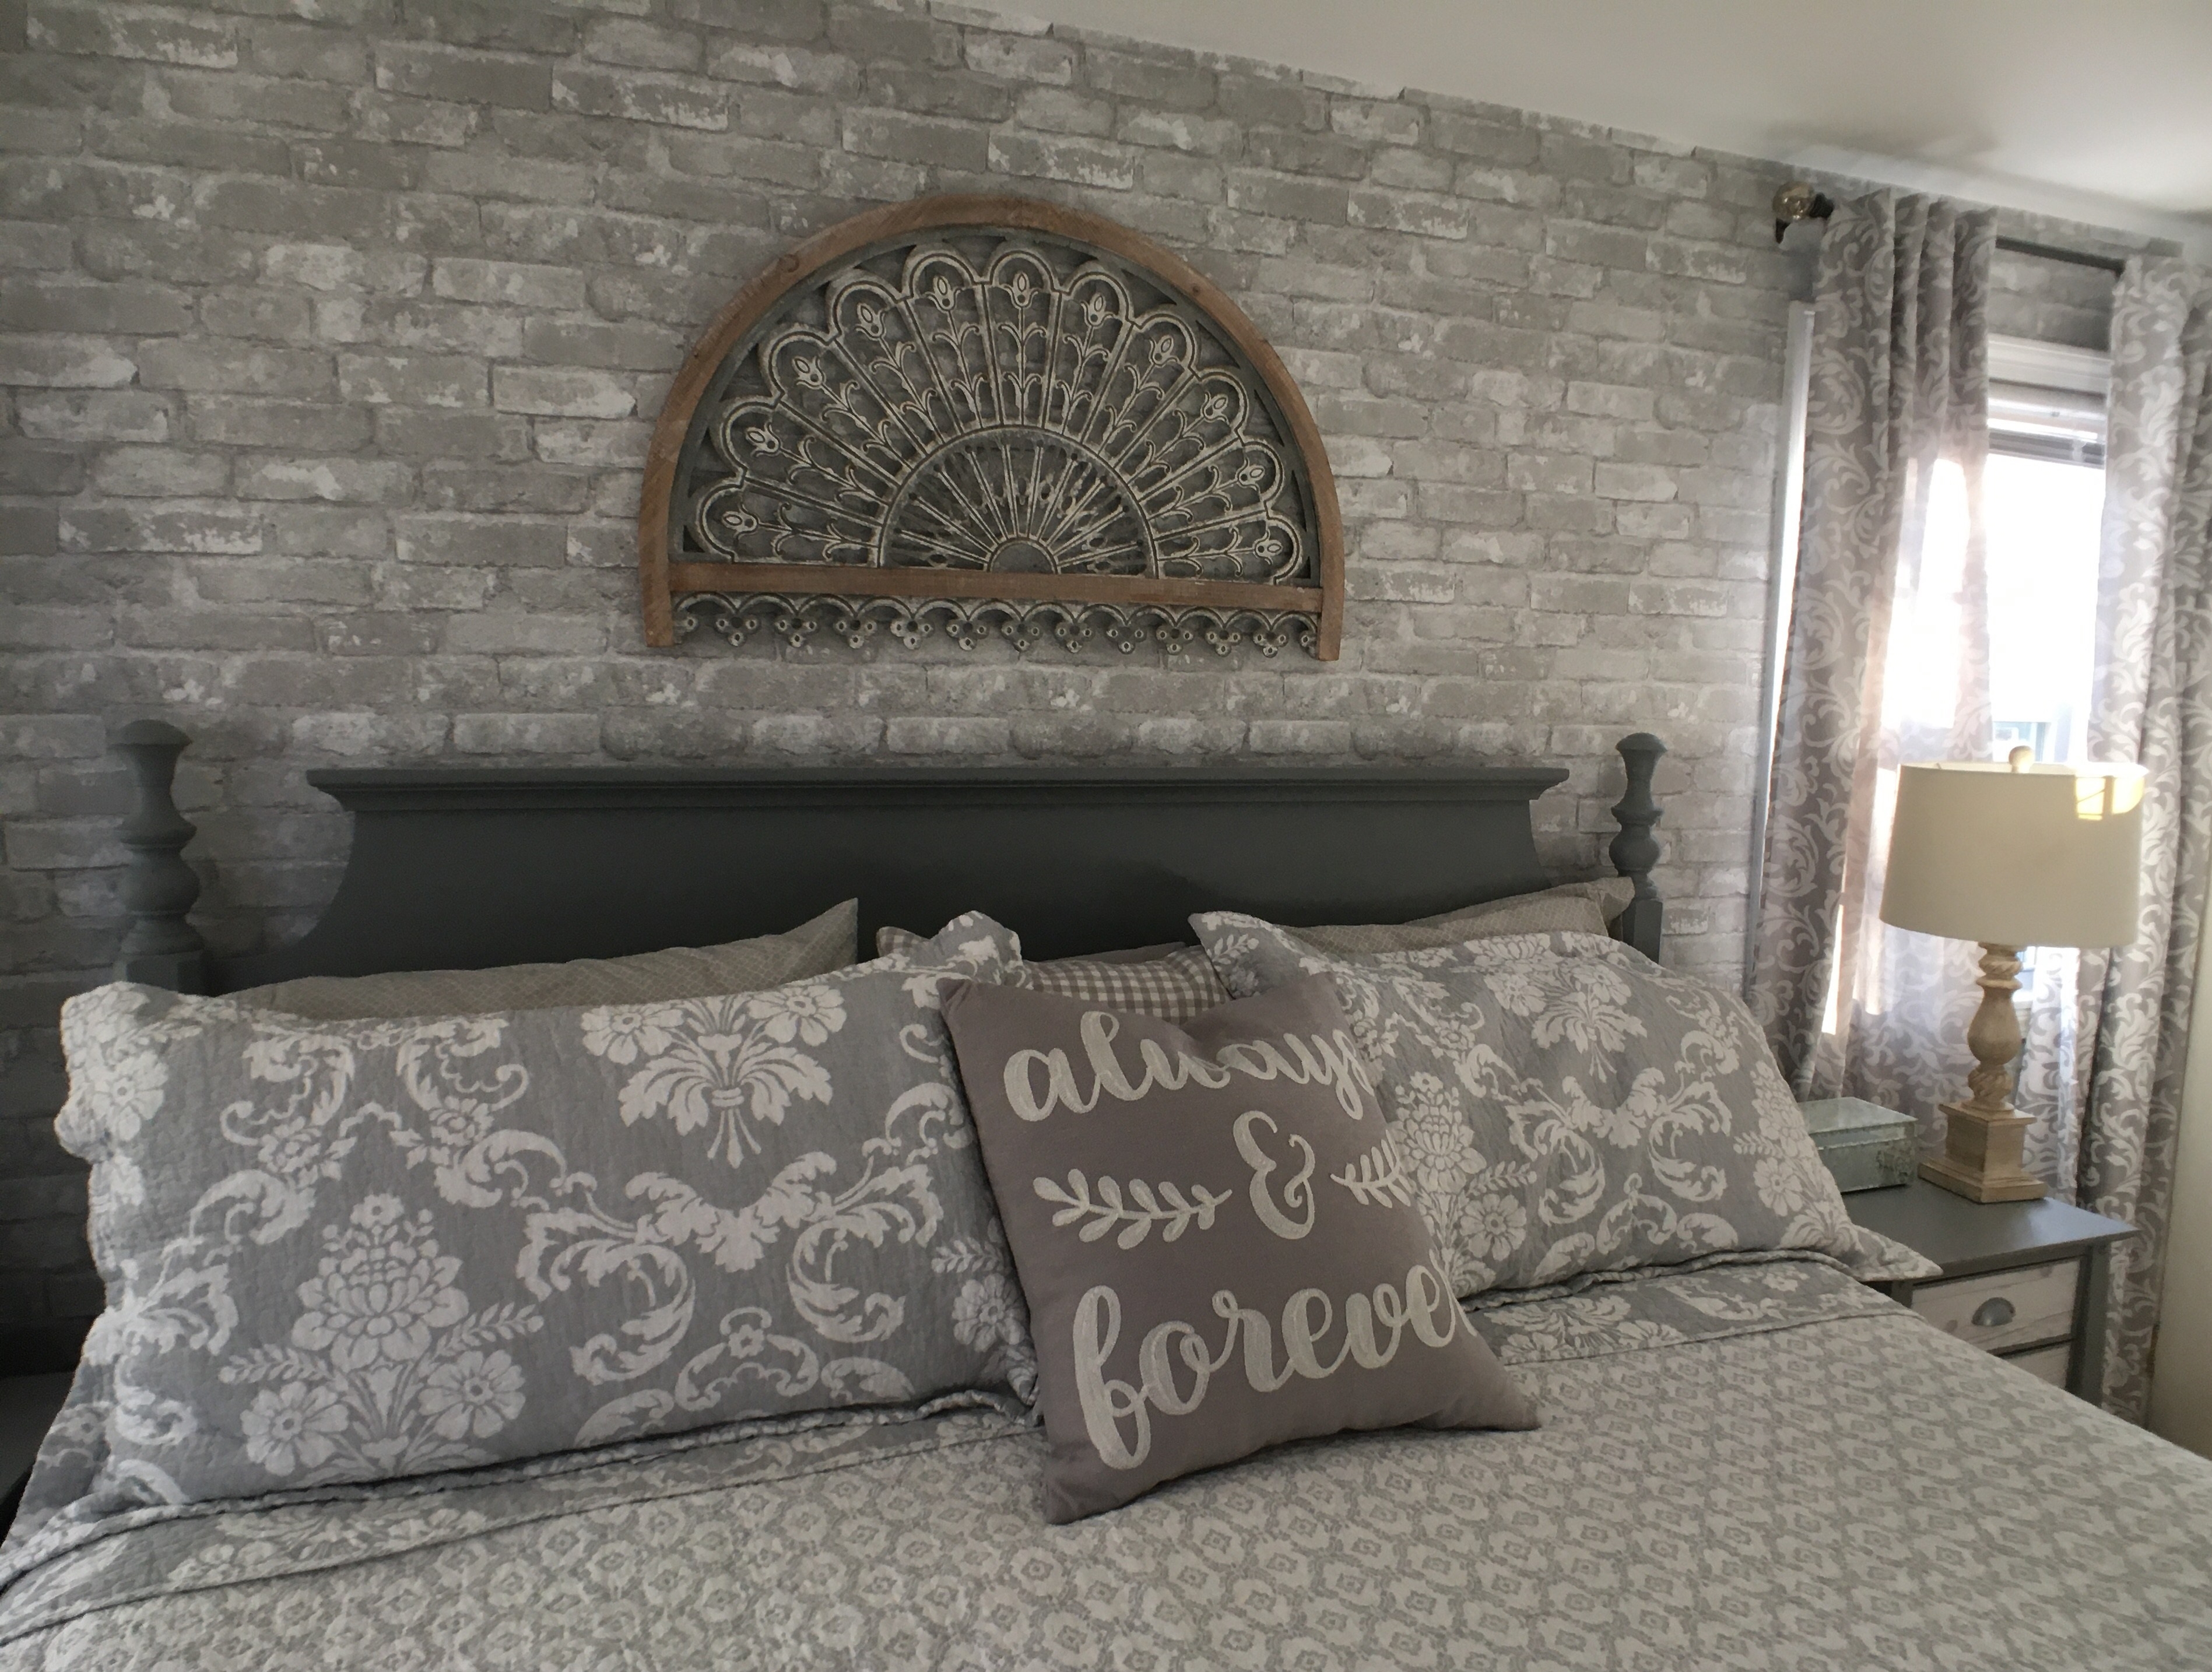 It all started with the windows. You know, the old double-paned ones where the seal has broken and you can no longer see out of them because they’re all foggy? When you live in a very old house, there is always a longgggg to-do list and never enough time or resources. When we finally had them replaced, we discovered…we actually have sunlight-and a view! Who knew we had a water view from our master bedroom-it had been so long since I actually looked out that window…
  … and spotted a tiny sliver of the lake, but a realtor would list it as a water view, am I right? So…new sparkly windows means its time for a refresh of the entire room from the (seafoam green) ceiling down. Whenever I mention the ceiling, people look at me quizzically and ask “was that a thing?” I don’t know, but at the time, many moons ago, I thought it was…
 When there isn’t much in the way of architectural detail in a room, you have to create some interest in other ways. I guess that was my thinking at the time…soooo, on to the refresh! I started by painting the ceiling with two coats of
  It is a very soft, subtle gray, (almost white), color that works well with the new brick wallpaper that was applied to the accent wall. Wait, what?! Bricks are made from wallpaper?? Well, these bricks are! Can you tell they’re not real…well, at least online?
 And I can tell you that they are a heck of a lot easier to lay than real bricks, or even faux bricks. No mortar involved- just the paper, a level and a pair of sharp scissors.
 The paper is very forgiving with cuts and corners-it already has the appearance of old brick so a couple of wrinkles or slices cannot do anything but enhance the look. Last fall, I had decorated the “log room” in our Maine cottage with birch tree paper-also peel and stick.
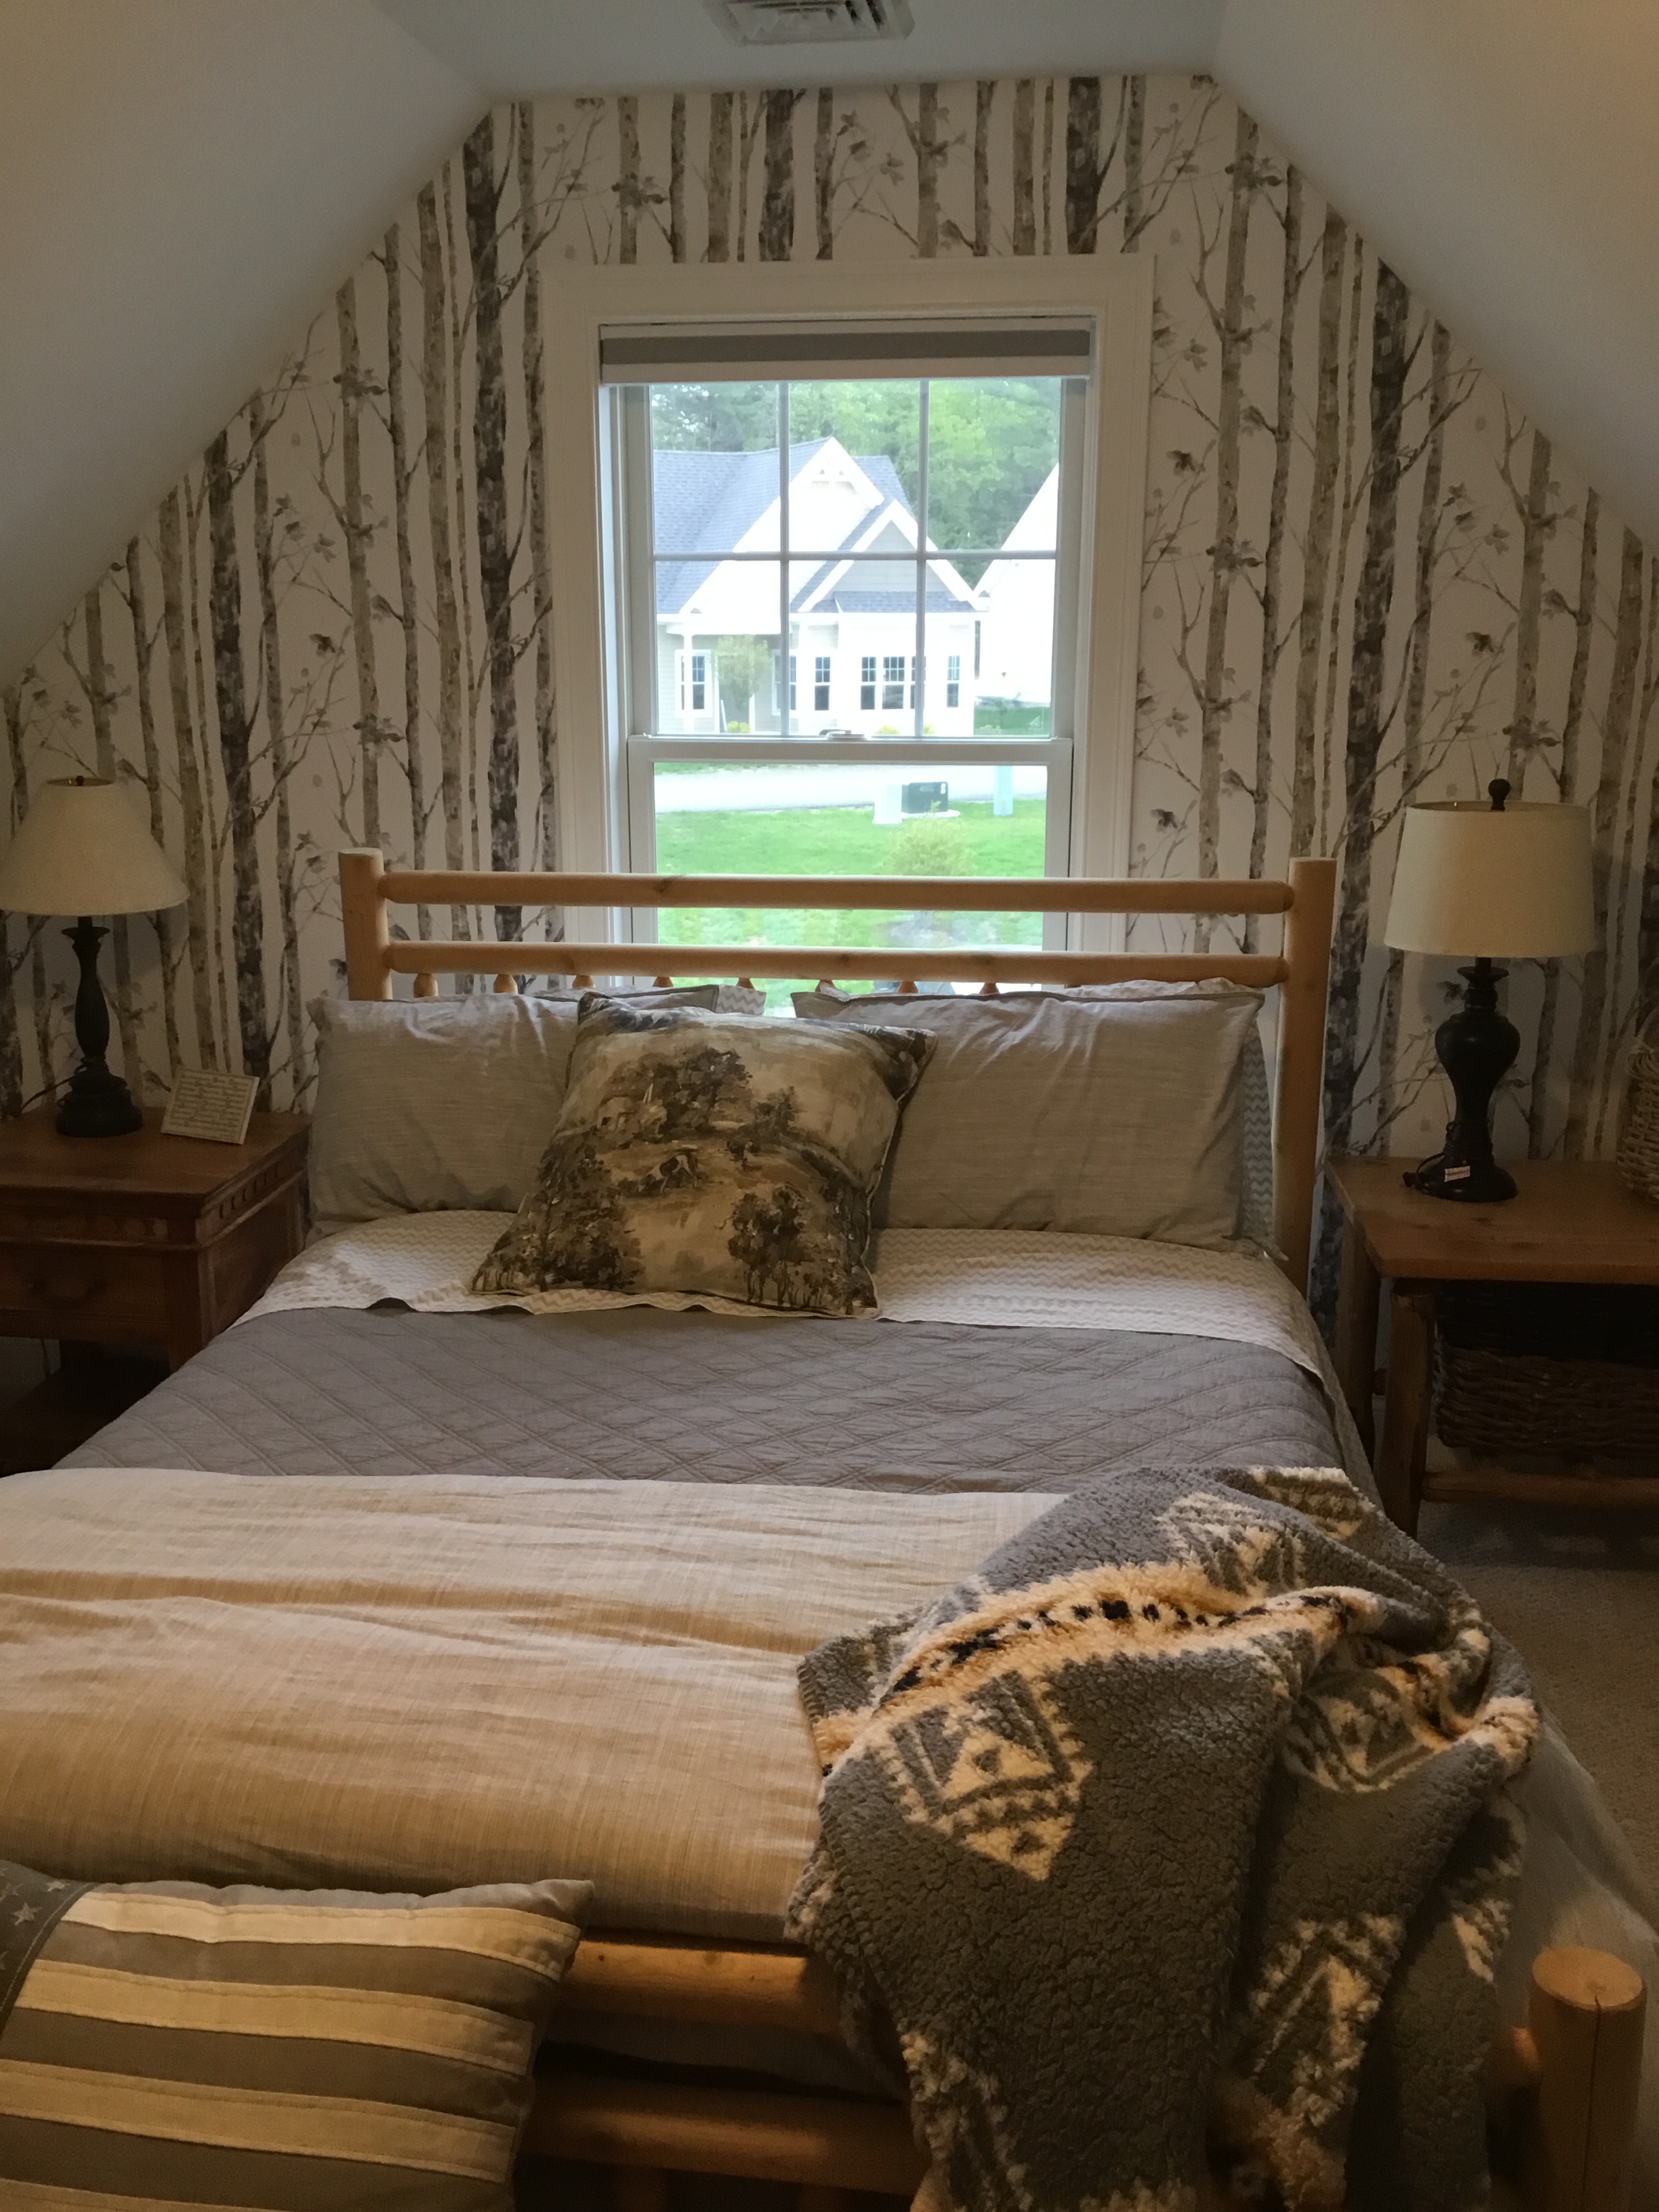 That was pretty easy, but this peel-and-stick paper by
  For each row, I positioned and leveled the top, then pulled back about 12 inches of the paper backing, allowing the paper to stick to the wall. From there, it was just a matter of peeling and sticking and smoothing all the way to the bottom.
 You know the wise, old adage, “measure twice, cut once”? Well, I measured three times, then ordered it online, got started and promptly ran out of paper before the last window.
  You see, I hadn’t accounted for the waste while matching the repeat pattern of the bricks. A rookie mistake, but trust me, I am no rookie at paper-hanging. So, what to do? I went back online to the original website to order another roll, but with the shipping costs (I had avoided that the first time because of the amount I had ordered) it was almost the cost of 2 rolls! So I decided to check
 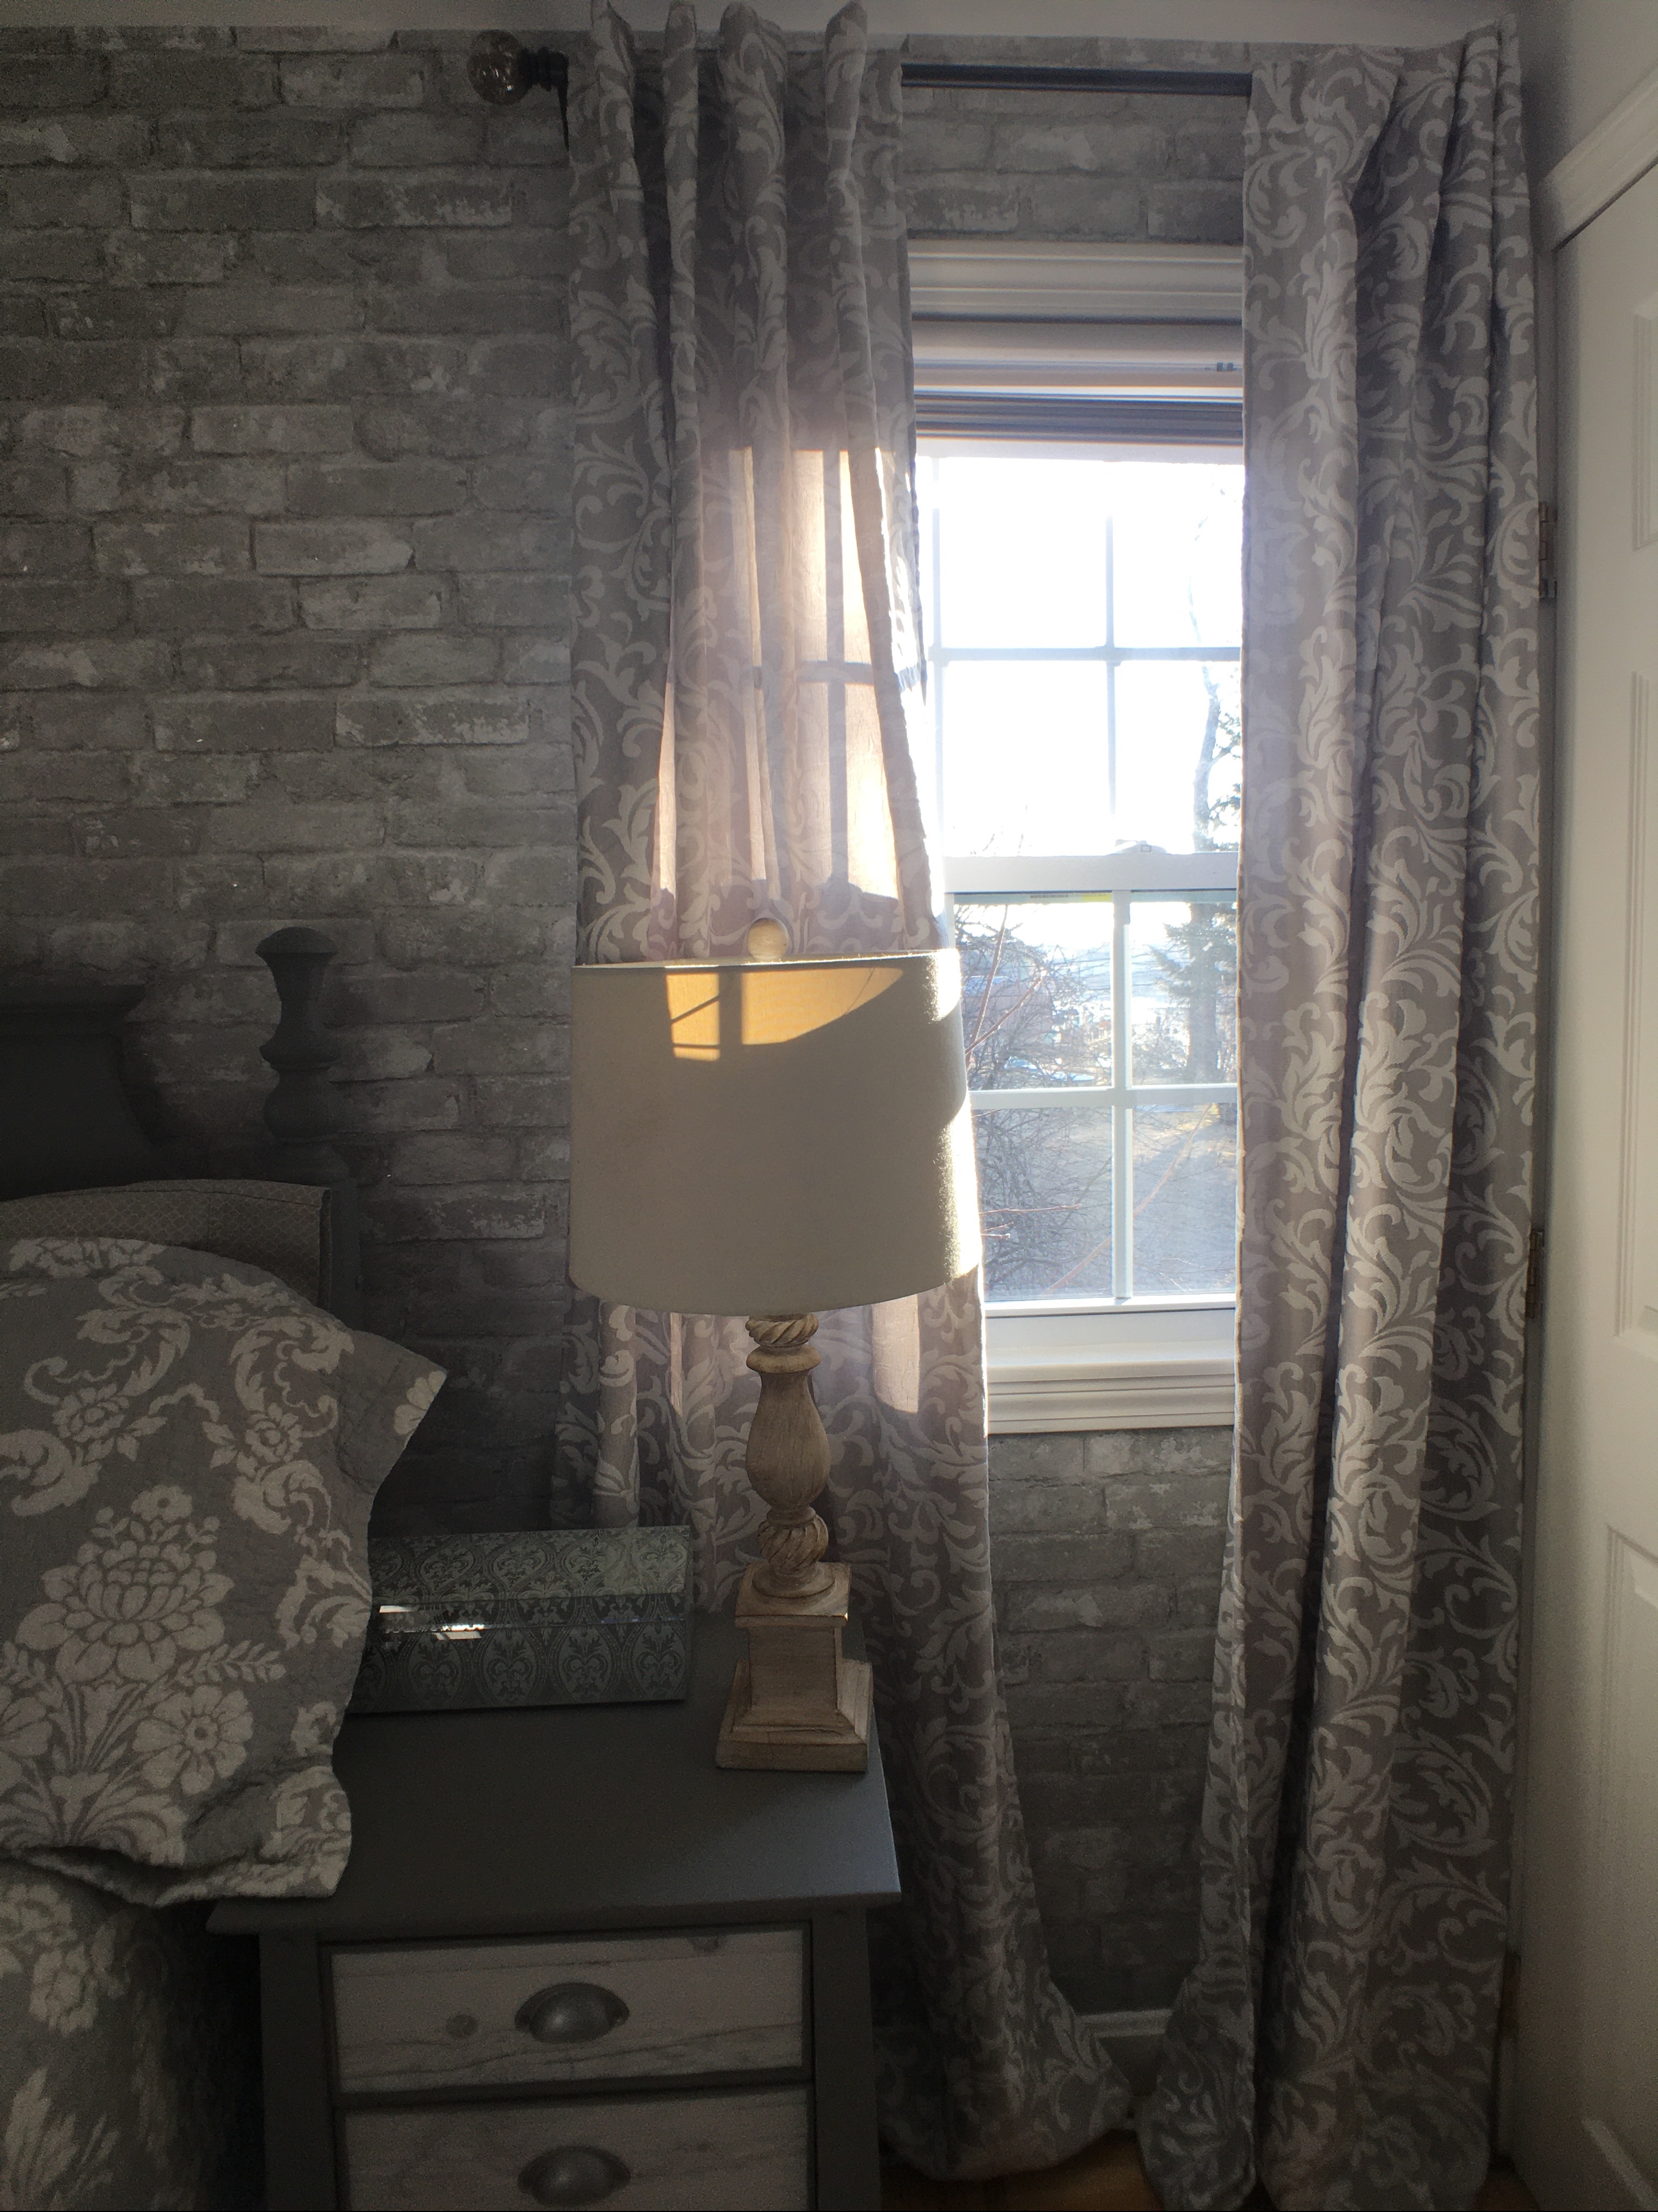 And an architectural accent piece for over our bed from
  Still have loads to do, and the clock is ticking before we head back to Maine, but one step at a time…Next up, furniture painting. Have an immeasurably great weekend, everyone!
 After a quick google map search, I determined that Waco, Texas-the home of all things
  To see those rusty old silos that sit on a street corner alongside some railroad tracks and imagine them as the anchor to your empire…well, you’ve got to give Chip major credit for that! The silos, the bakery and the
 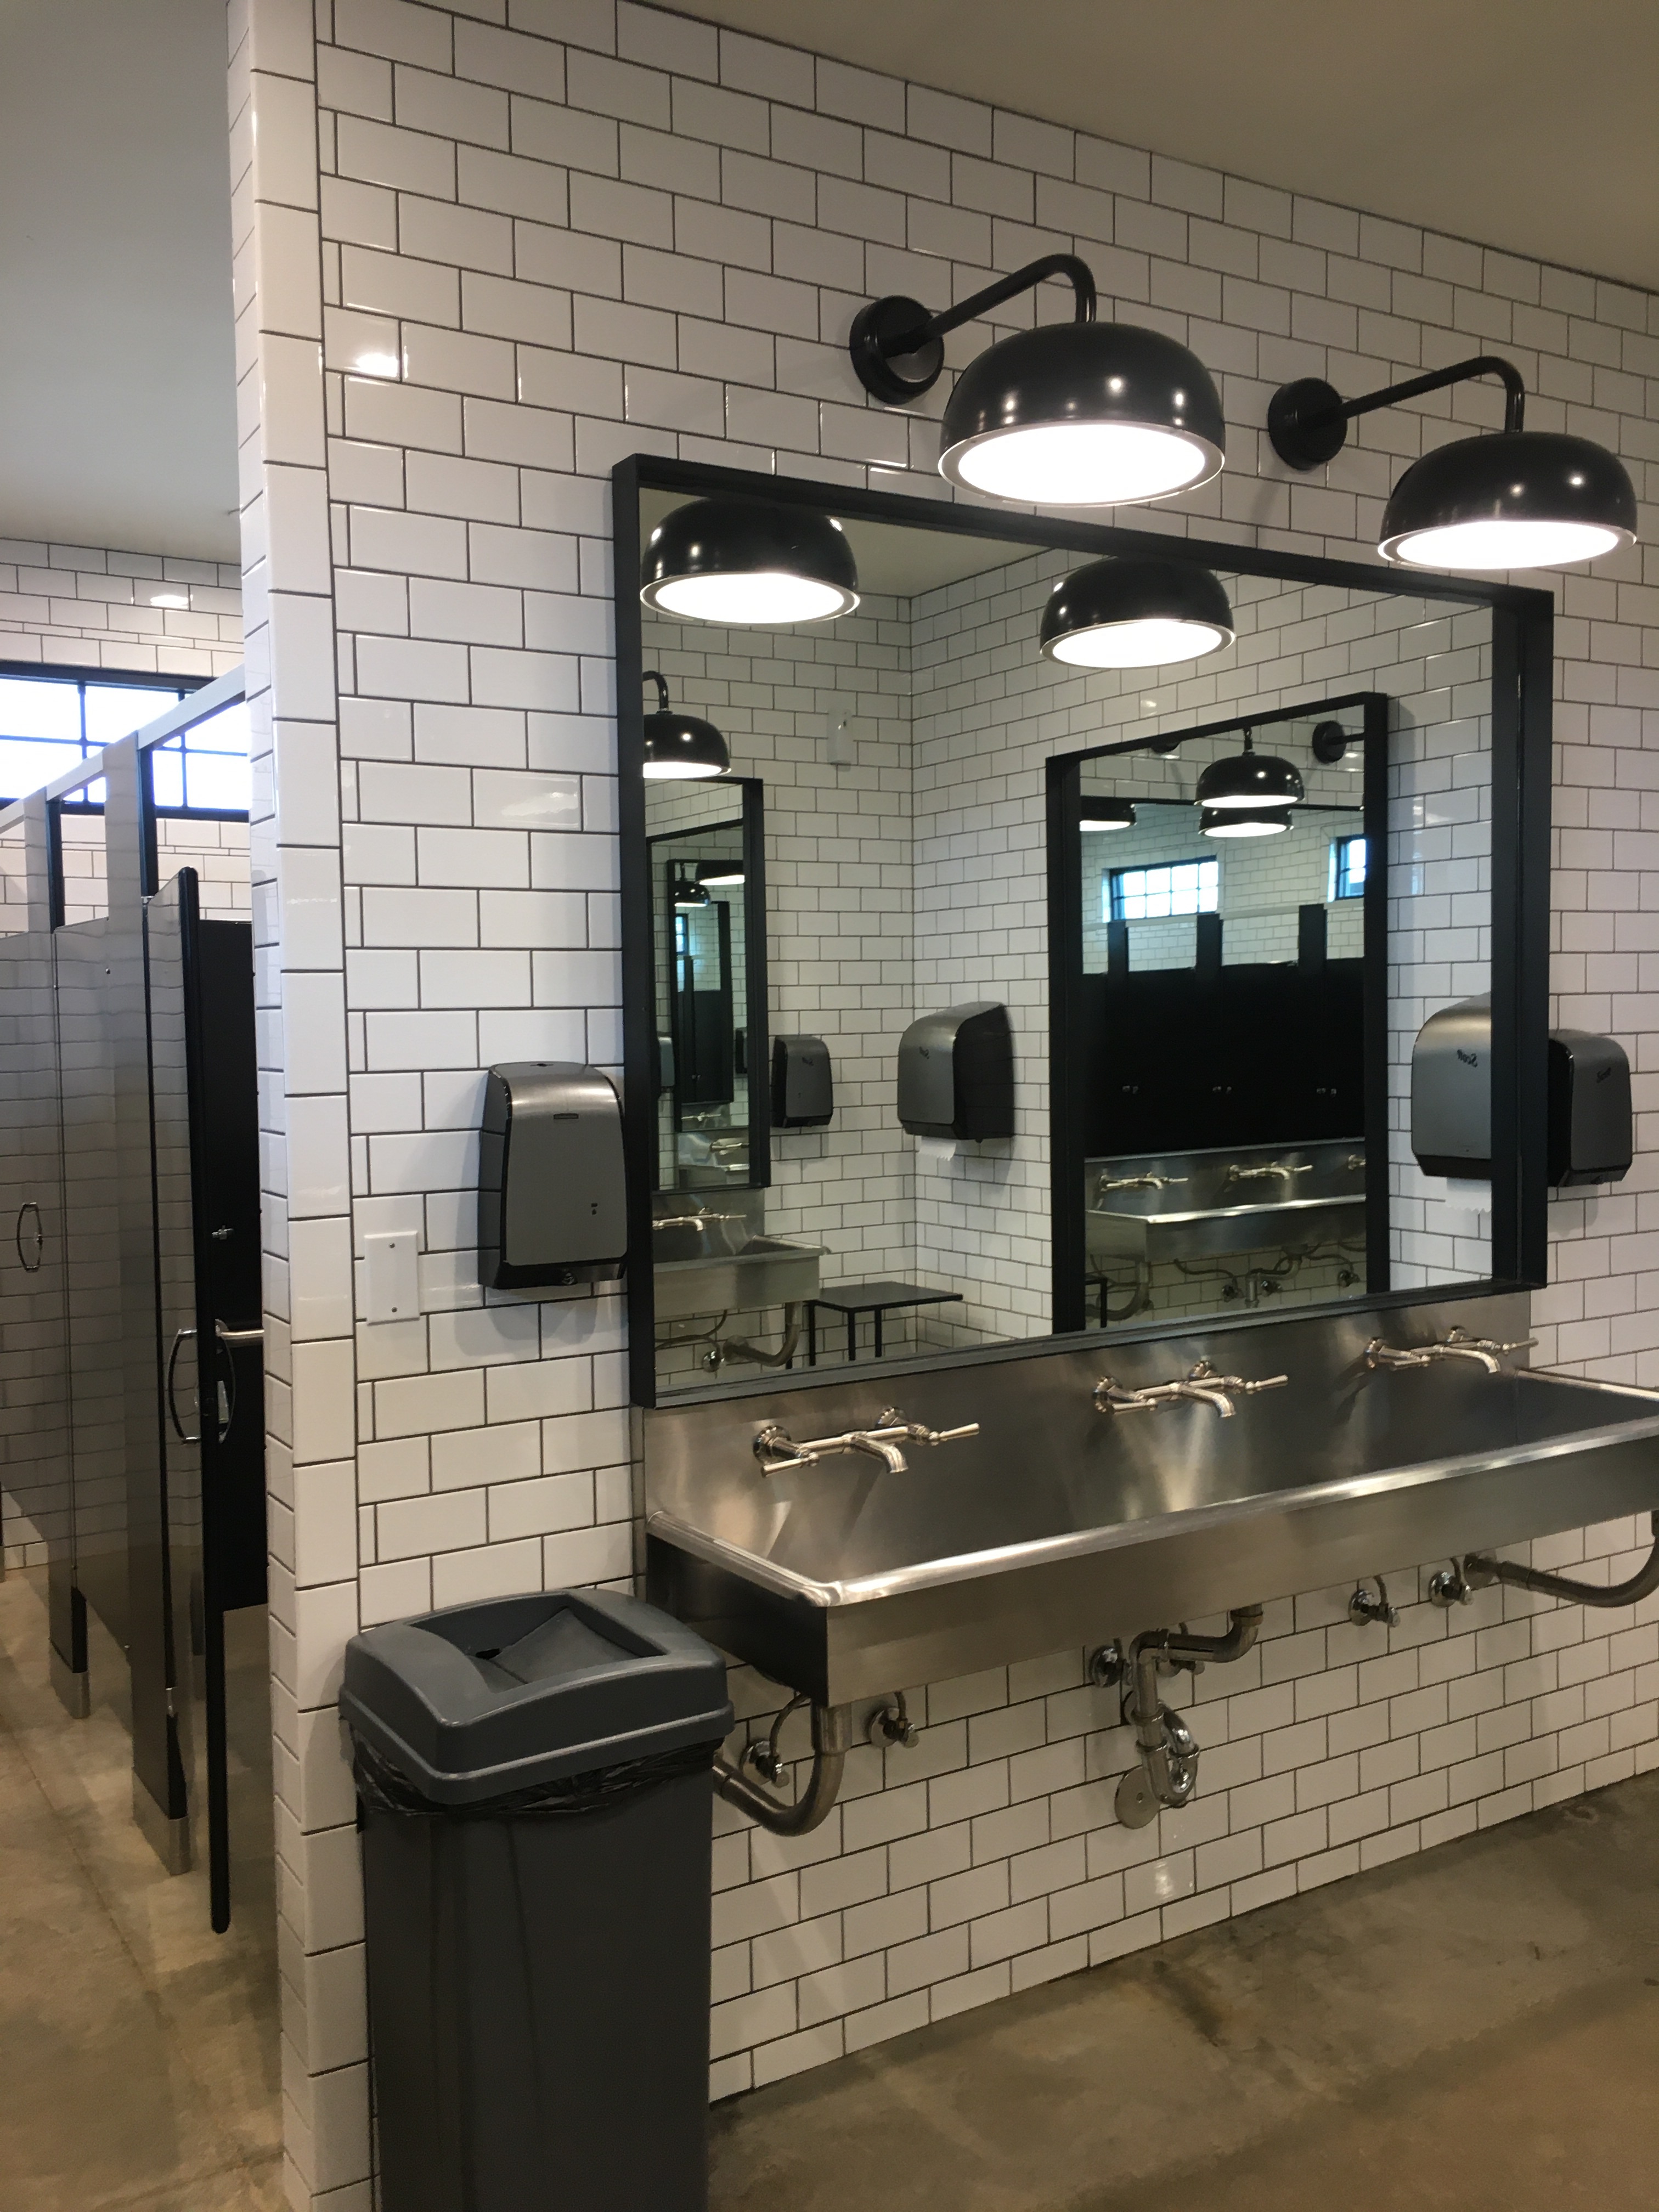 If you are a
  décor and design choice-even the old Jeep parked by the garden center…
 that is absolutely on brand and pretty as the pictures you have seen a thousand times.
 Shiplap, subway tiles, vintage tile floors, vintage wood doors, metal signage-walking into any of the many Magnolia establishments
 feels like wandering into one of their many transformed homes-and it just makes you feel like you’re home.
 The
The  is sweet…again, much smaller than it appeared on the show…the magic of television…
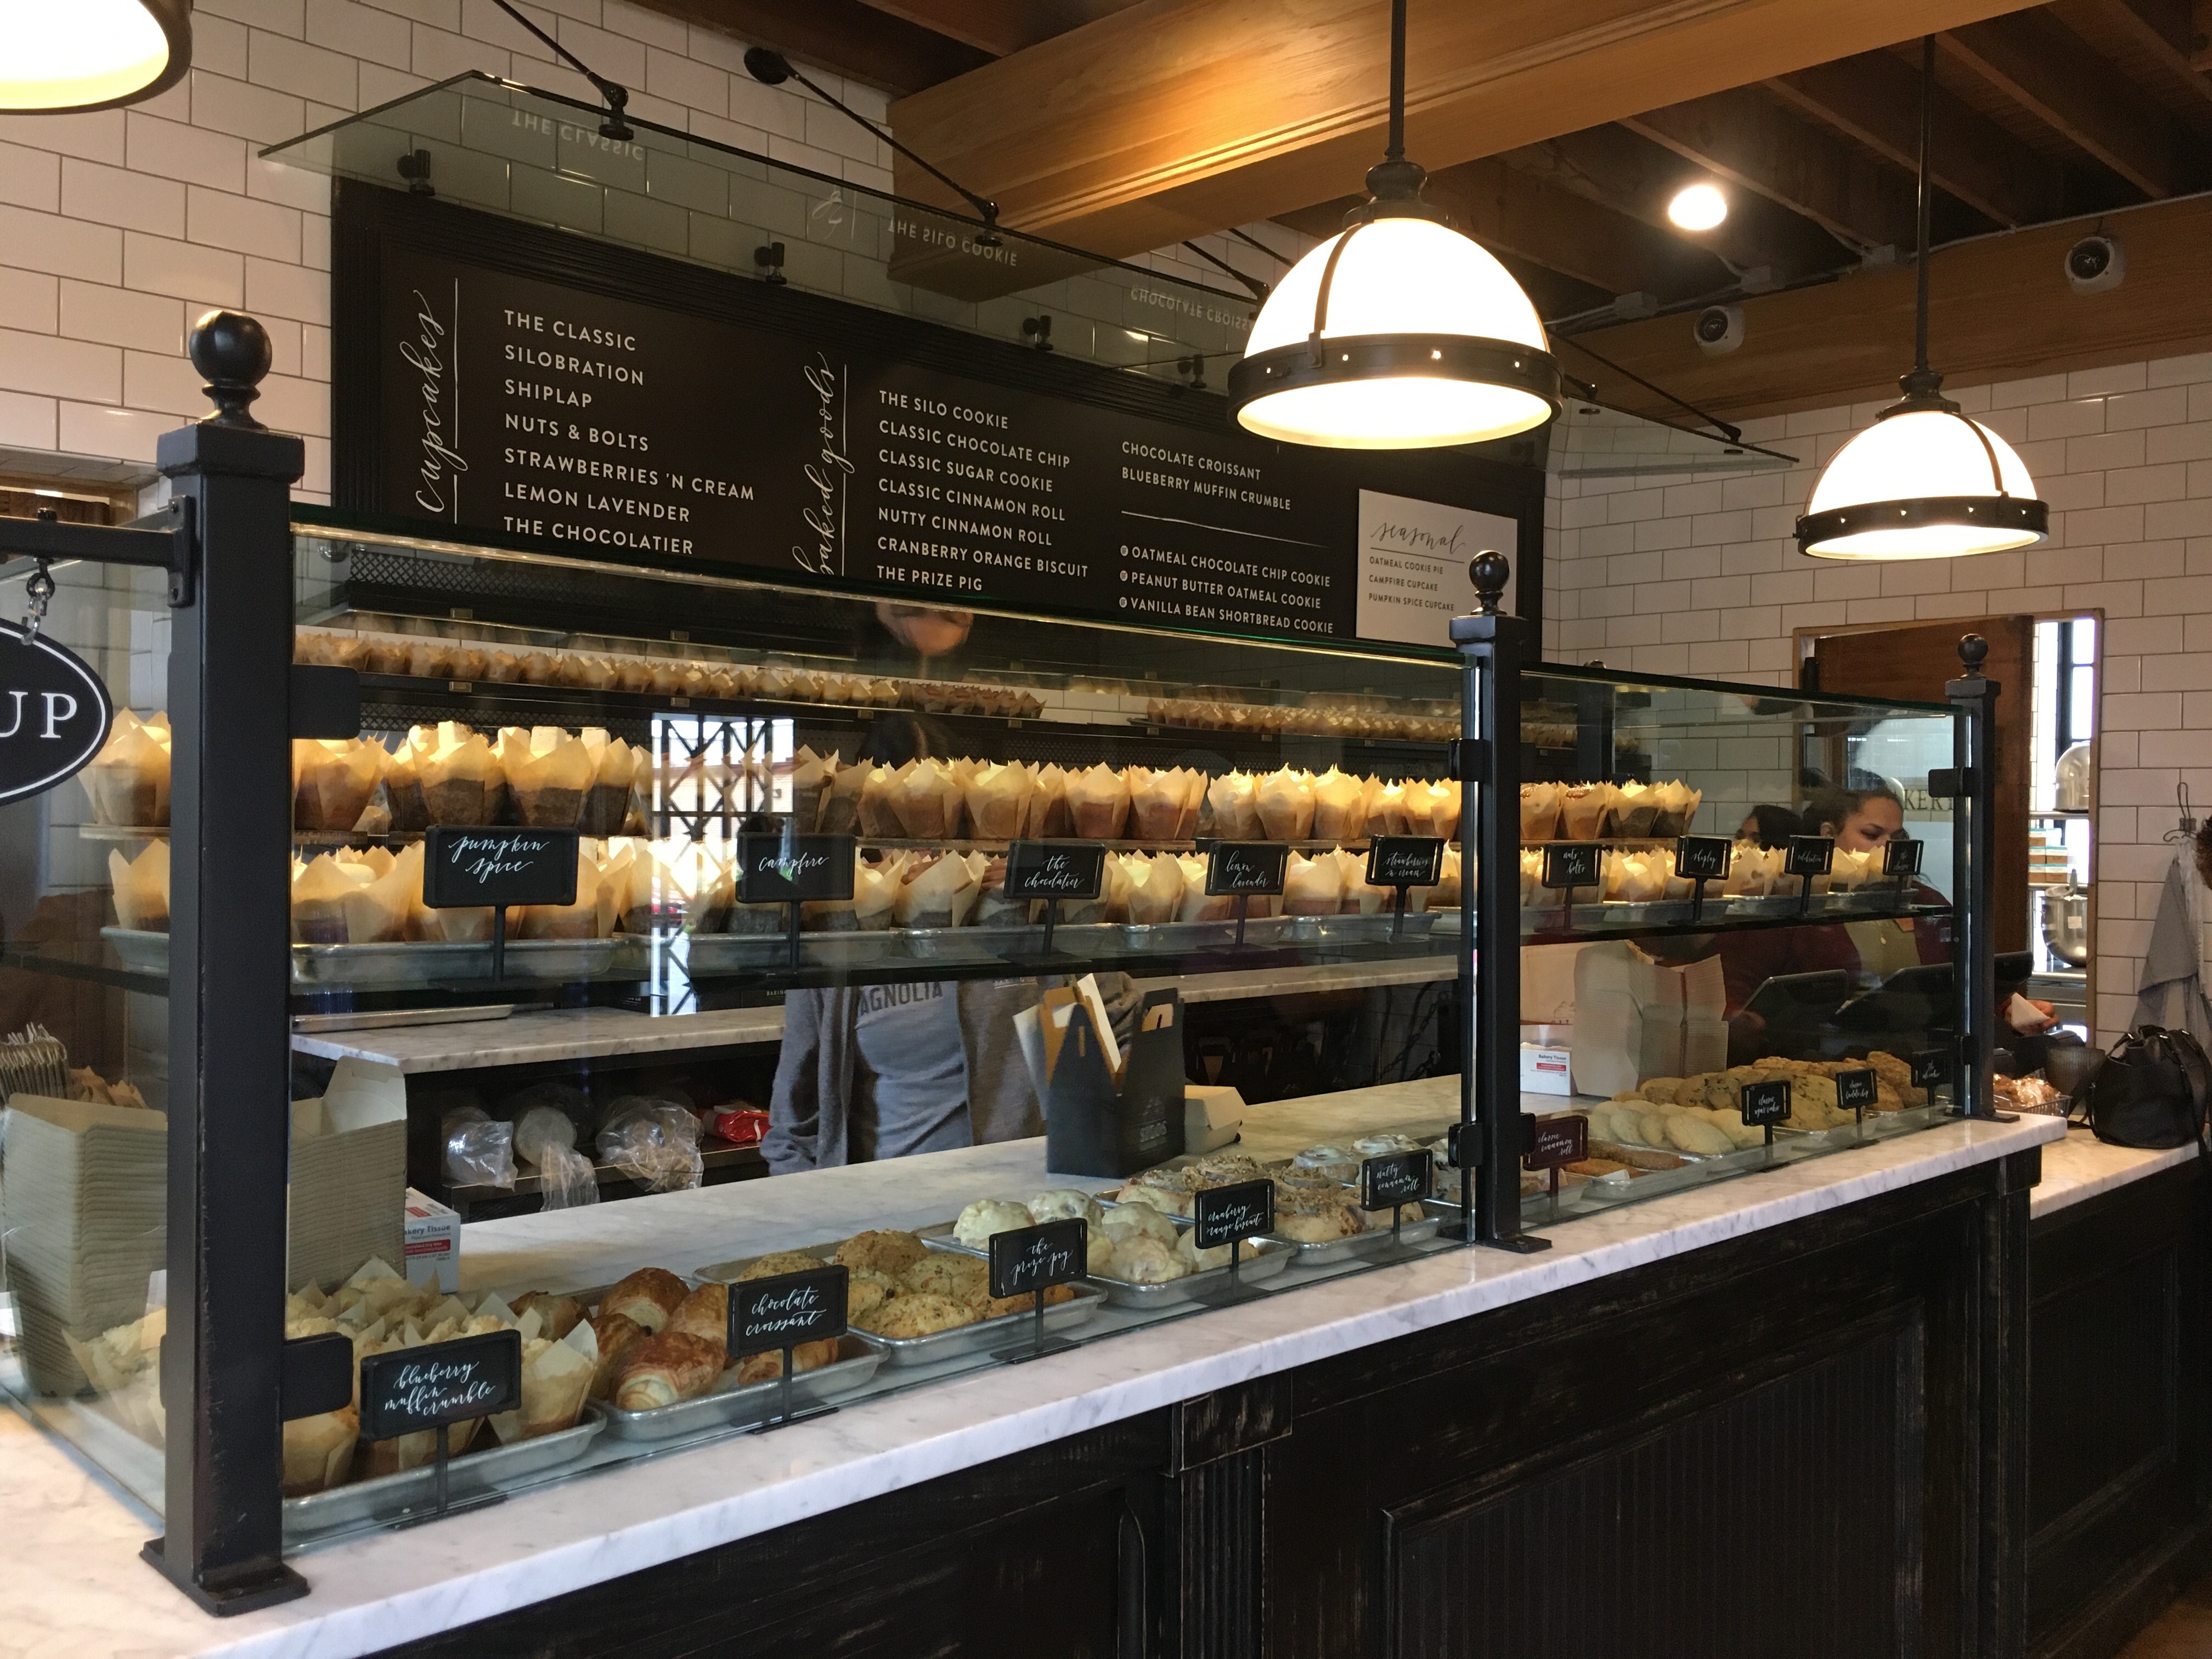 and filled with delectable treats.
 The outside enclosed “compound” has places to sit a spell,
 take pics
 and wander around the field at the silos where they hold their concerts and “
 The
The  had been decked out for the holidays,
 all vintage country style.
 Once I did a bit of shopping and checked out
 “Chip’s Corner”,
 their full-serve restaurant on the other side of town. Tasting yummy, hearty, stick-to-your-ribs fare while being surrounded by more of the
  xoxoxo Susan


 The mission?
 Such an amazing goal!
 After browsing through page after page of cuddly cuteness, I chose this particular doll-
 So
So  To honor that remarkable achievement, the family of


 The first step was to decide on the scope and scale of the mountains, then tape them off. There is no right or wrong here-the only thing I did measure was the angle of the mountain tops to keep them in some sort of symmetry.
 Once the sky was dry, we started with the light colored mountains, then layered the darker ones on top as we built the range. There was quite a bit of taping and re-taping as we went along. Just remember that the paint needs to dry and cure before you re-tape over it-otherwise it will peel right off with the tape!


 Once that was completed, we re-assembled the gray
  This lucky little baby will be “sleeping under the stars” every night in his new nursery. We can’t wait to meet him! In the meantime, more DIY Black and White Nursery ideas to follow. Have a (hopefully where you are) sunny Sunday everyone! xoxo Susan
 was owned by a local man who had fallen on hard times and was homeless and living in his car near the


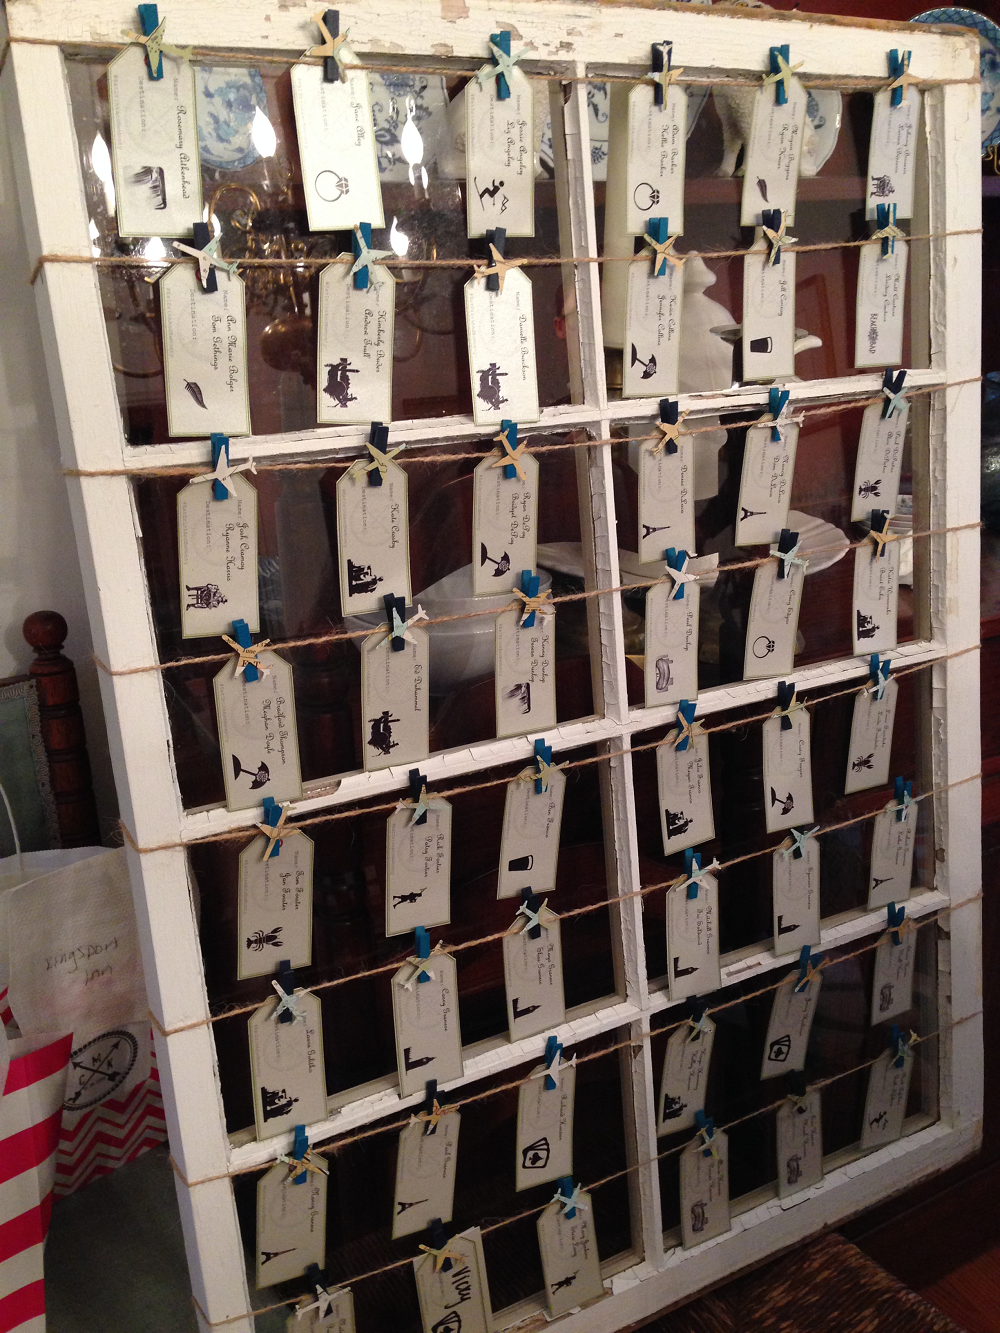


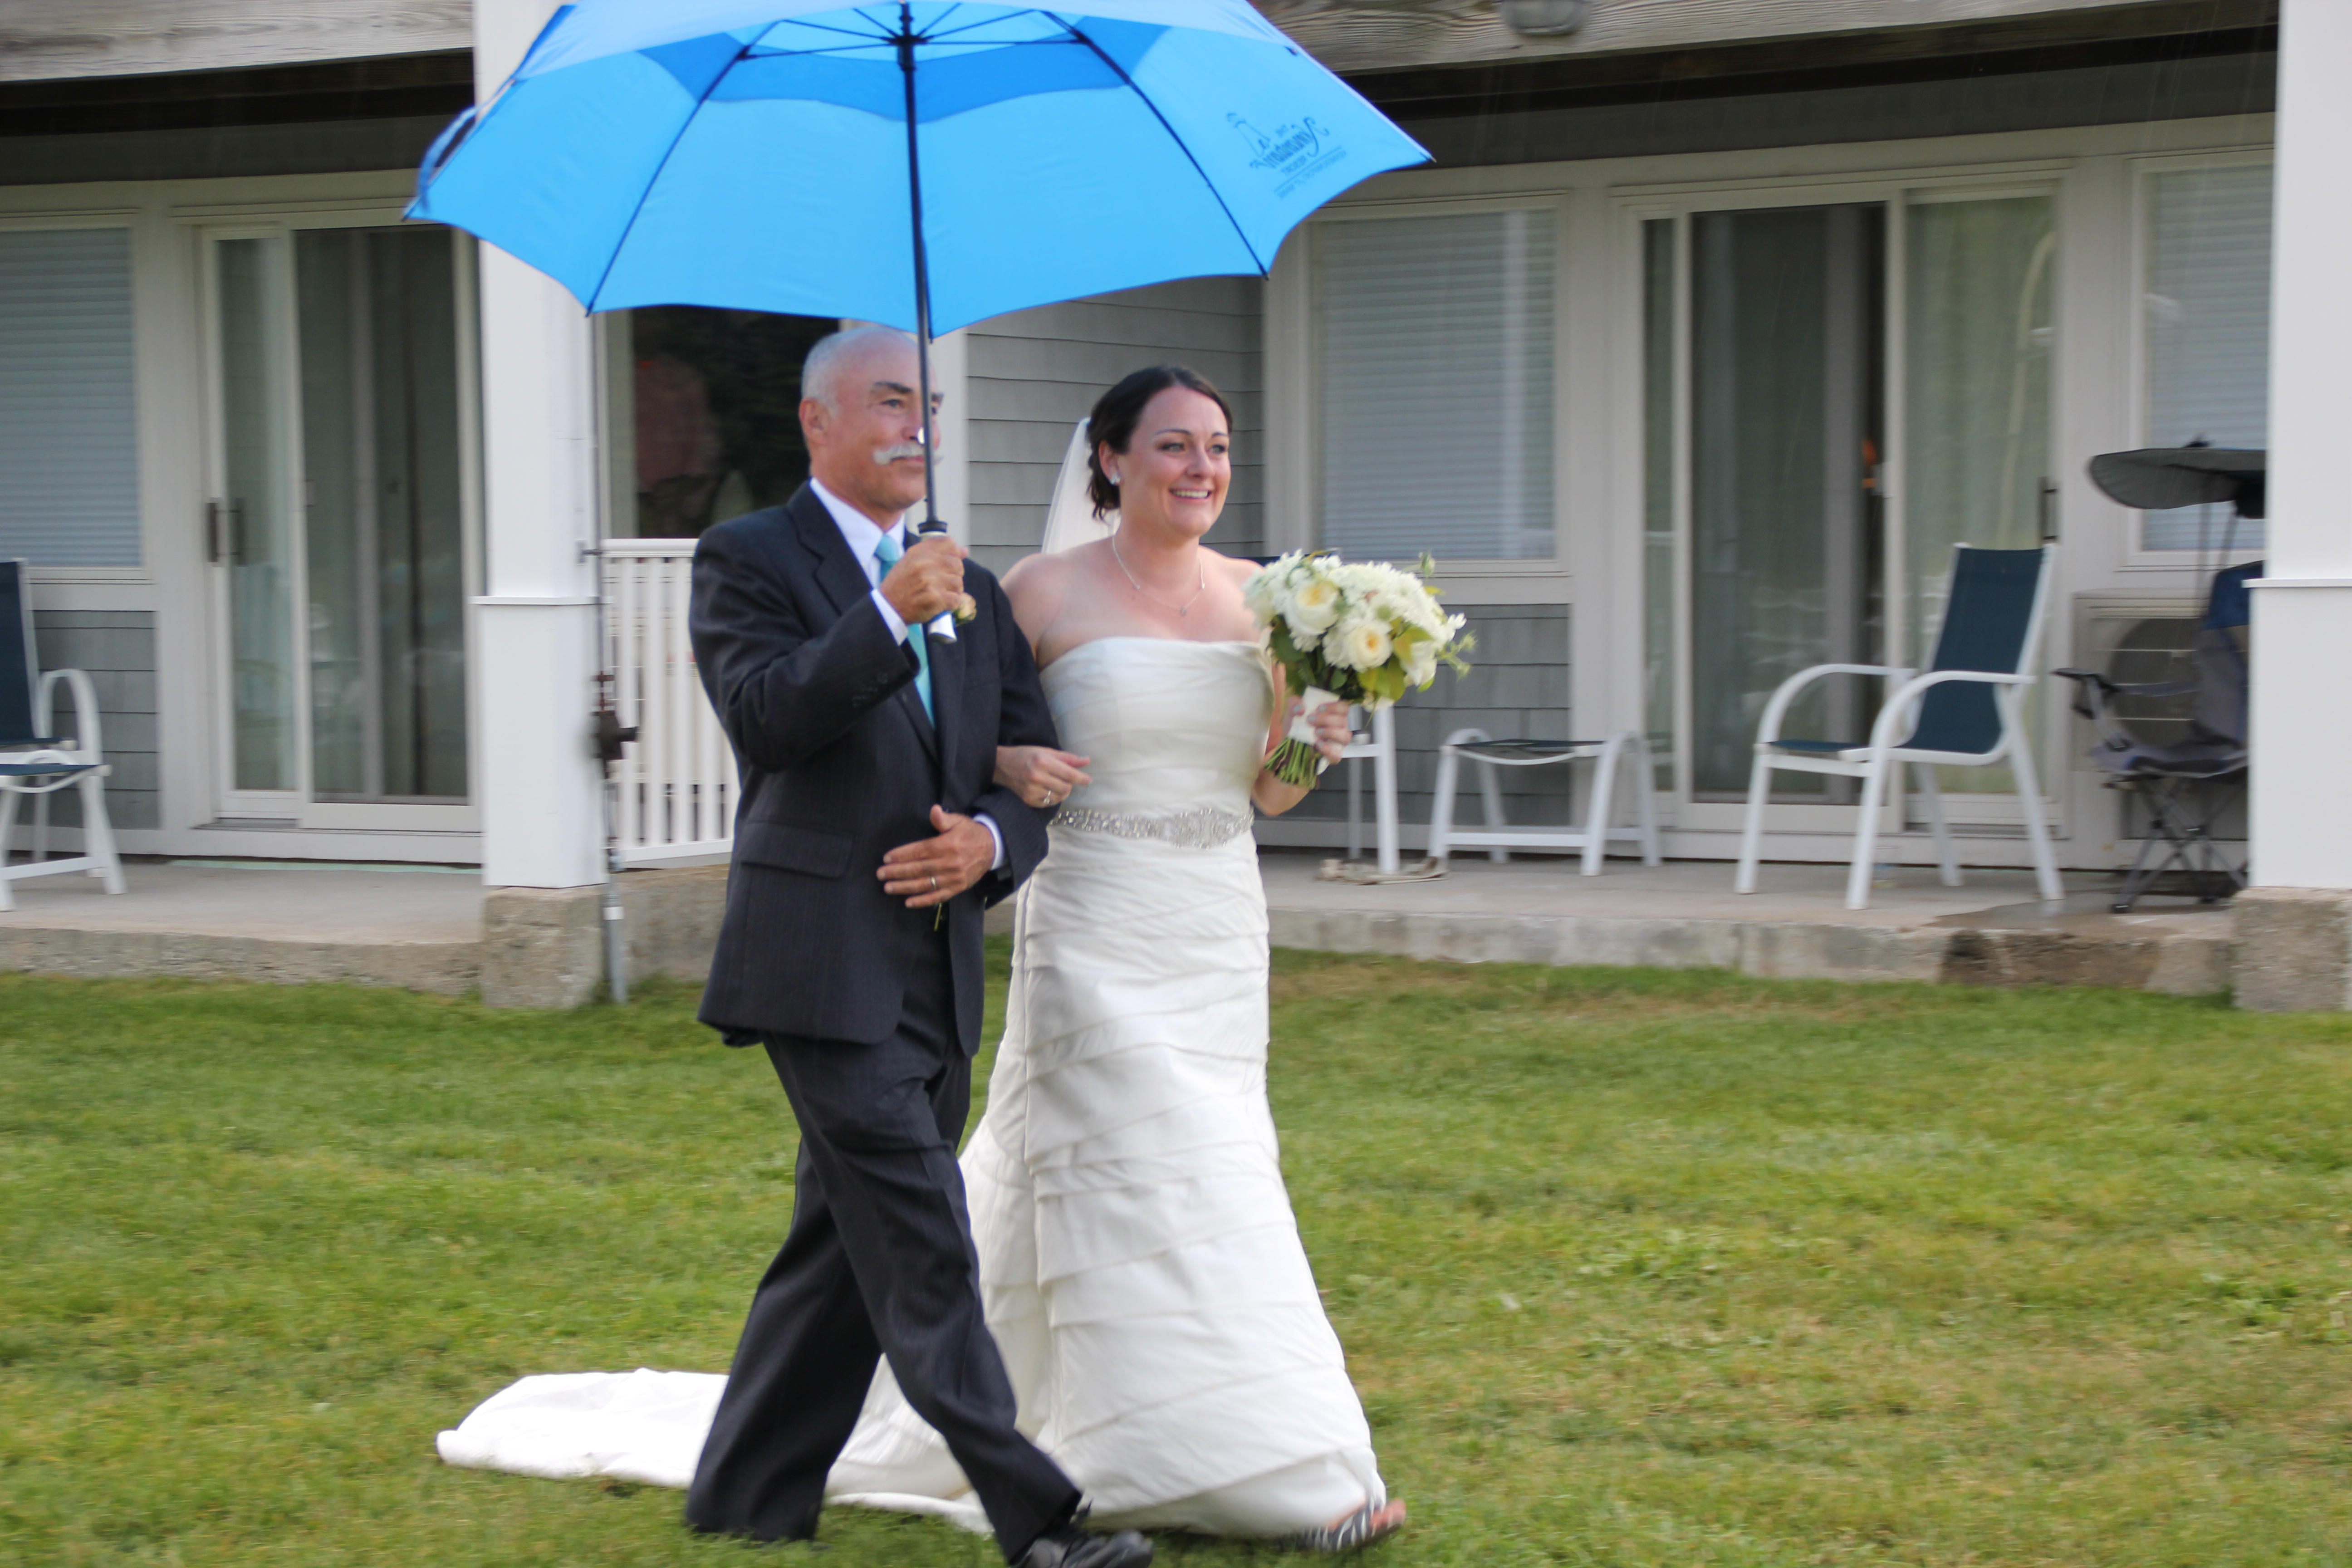
 in a Wedding Day 5K along the rocky Maine coastline.
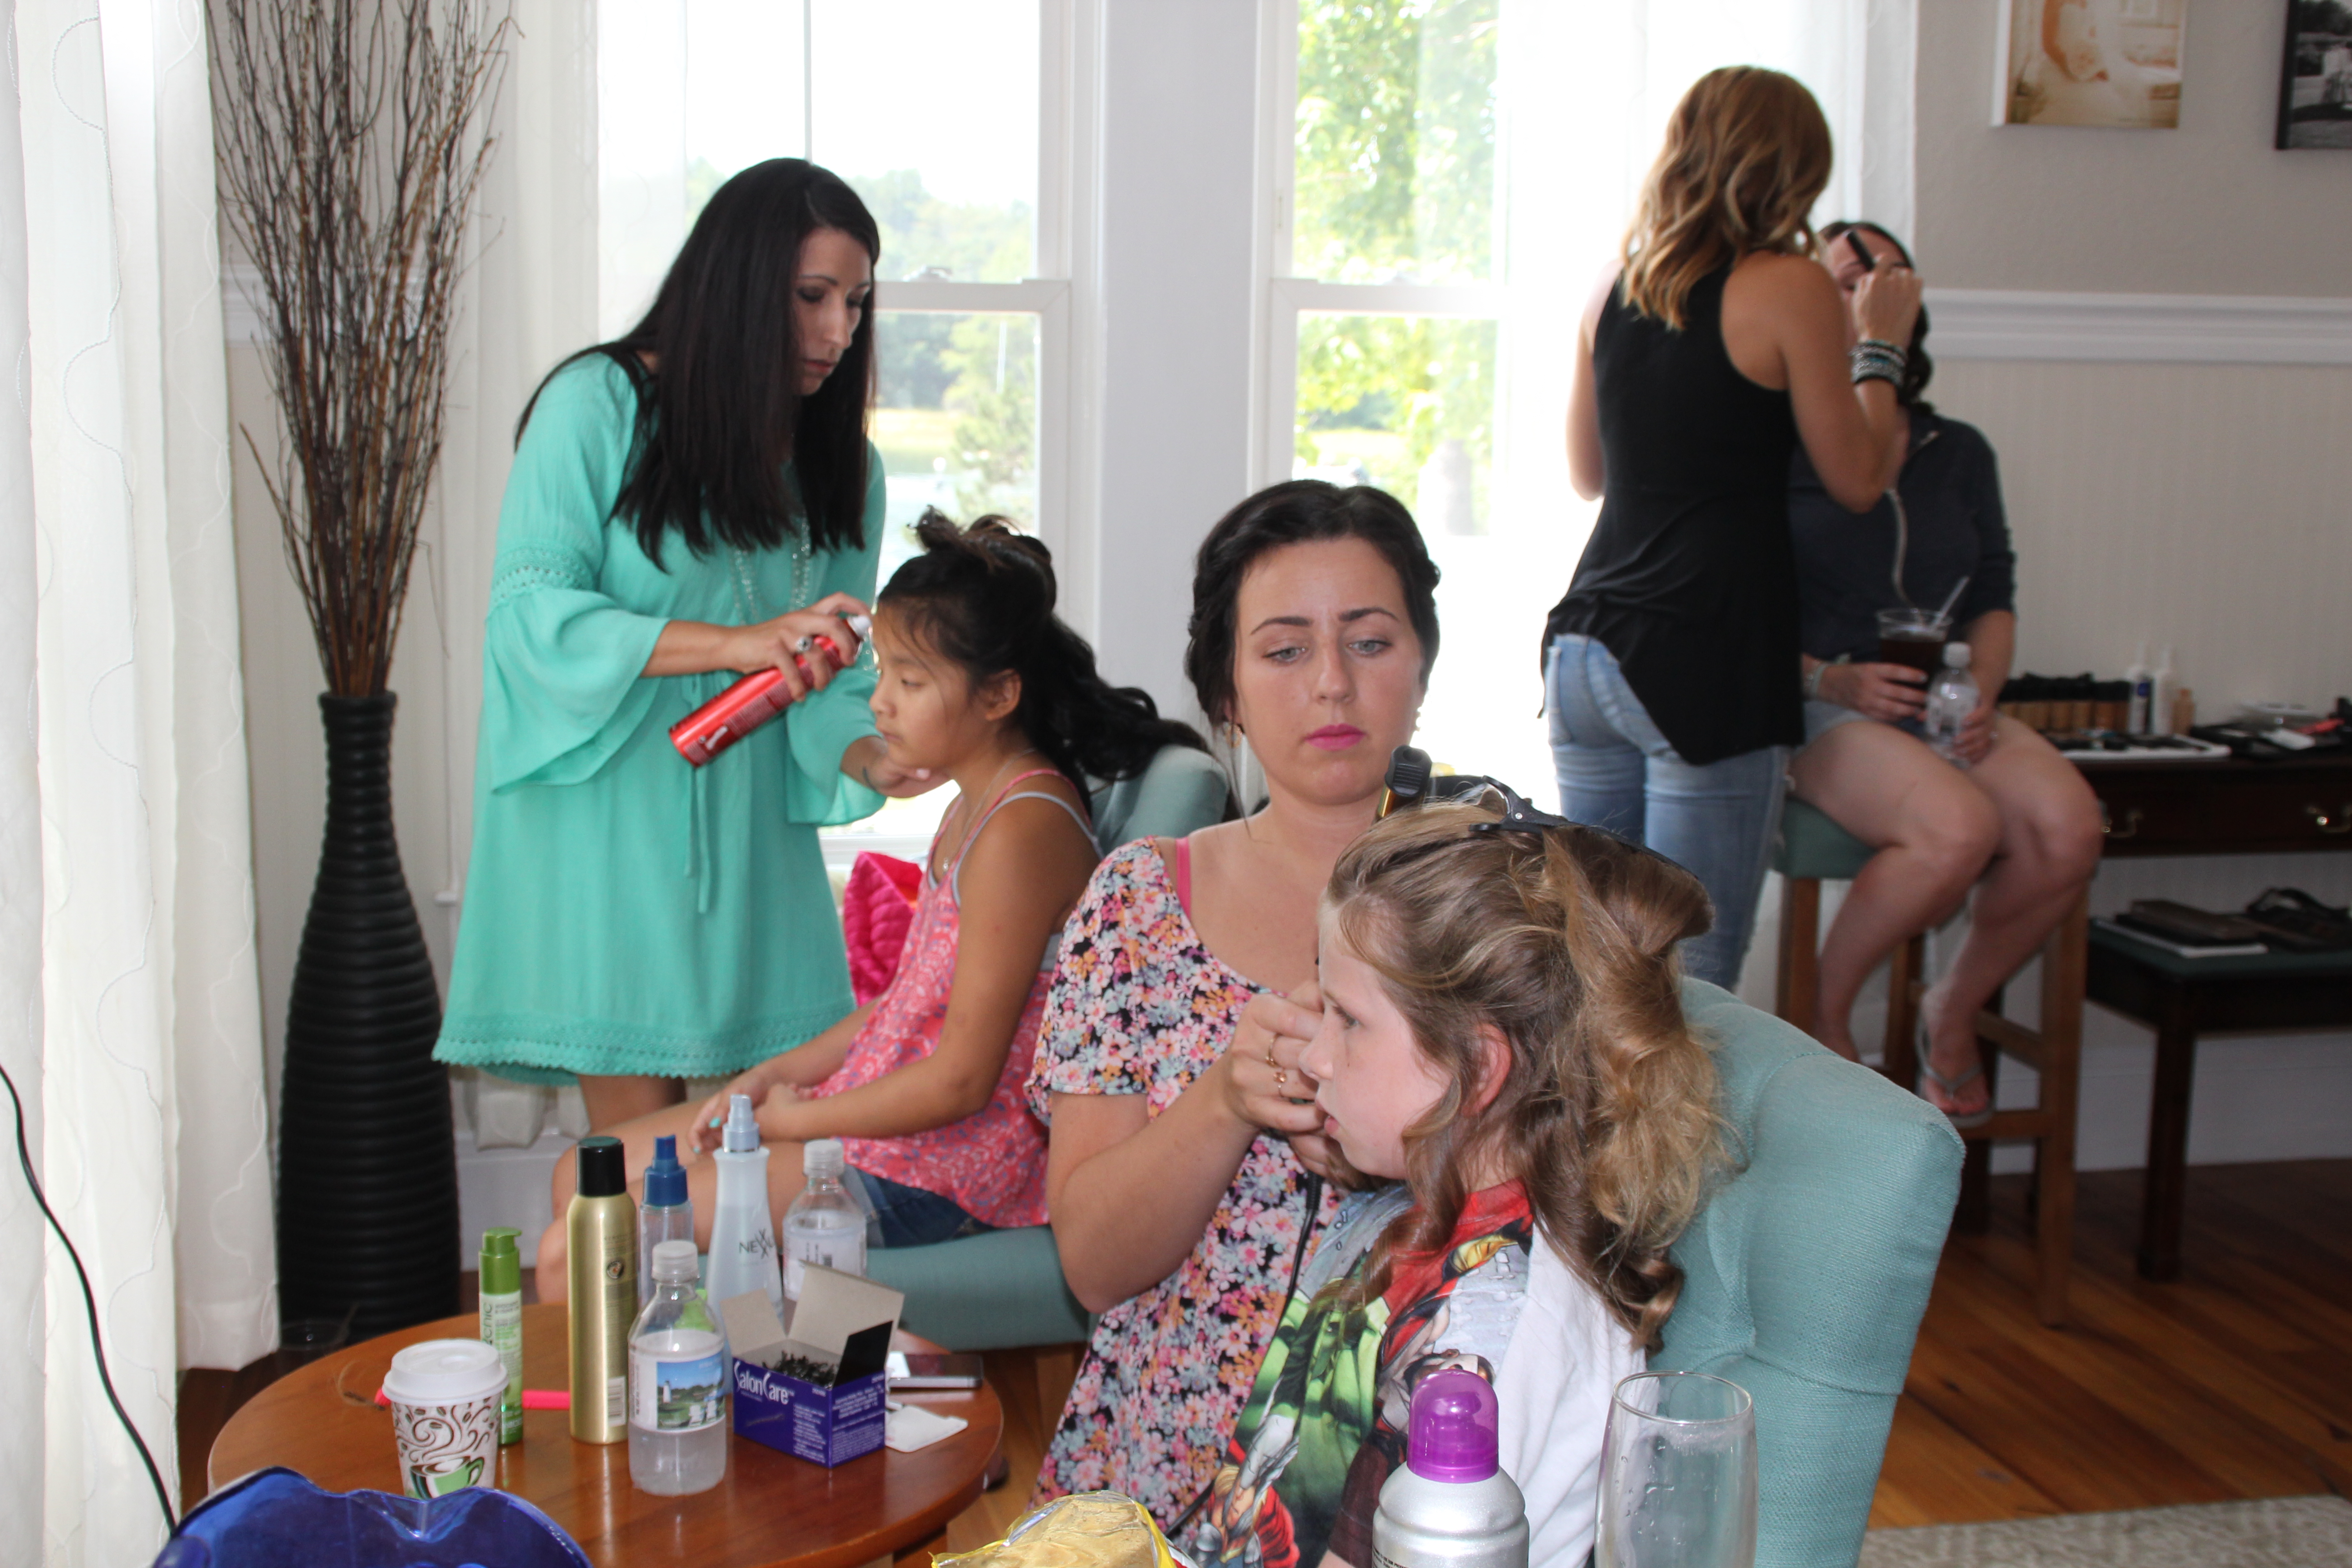
 While the bride and her party were busy being primped
 After their run, the groomsmen were also getting set for the big day


 so we optimistically assumed it was all going to be fine.
 But, as the ceremony time rolled near and our guests gathered in their seats on the green expanse of lawn near the lighthouse…


 …creating a scene right out of an adventure film…everyone ducking for cover and looking back over their shoulders
 while scrambling to race inside as the pelting rain soaked suit jackets and shawls and created a “bad hair day” for all…
 …and a pond of water where the lawn games had been played just moments before.
 something you don’t often see at a wedding ceremony…and exchanged their loving
 and oftentimes quite humorous vows,
 Was this our ceremony space of choice? Nope. But it was perfectly suited for this happy couple and their guests…providing a much more intimate and moving ceremony that ended with a rousing rendition of


