For the past few weeks, we have been converting a small study/office at my expectant daughter’s home into a nursery for our newest (soon to be born) grandson. When she first mentioned that her chosen color scheme was simply black and white, I have to admit I was a wee bit skeptical. However, as the nursery has taken shape, it has proven to be the perfect choice for a baby boy’s room! All of the walls were painted in Benjamin Moore “Wedding Veil White” eggshell finish.

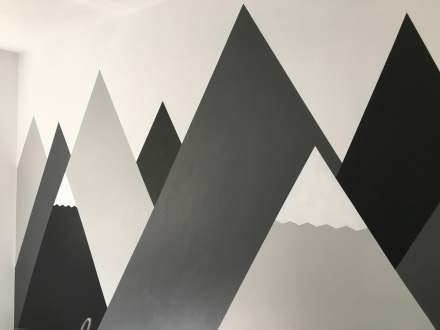
This color is a smoky white that is a neutral backdrop for all of the black and gray accents. First up-the mountains. We created the expansive mountain mural on the largest wall, essentially the length of the entire room, using different shades of Behr and Benjamin Moore paints. This isn’t really difficult, just time-consuming. AND, your taping and measuring needs to be pretty exact to create the crisp, clean lines of the mountain range-the key is to work in layers. Here is the before (well, not exactly-we had pretty much cleaned it out-we just had to remove the dog : )
 The first step was to decide on the scope and scale of the mountains, then tape them off. There is no right or wrong here-the only thing I did measure was the angle of the mountain tops to keep them in some sort of symmetry.
Once I finished taping them, I marked the lines with pencil, then peeled the tape back so that I could paint the sky above the peaks to match the rest of the walls. Everything required two coats, so there was a lot of watching paint dry-literally.
 Once the sky was dry, we started with the light colored mountains, then layered the darker ones on top as we built the range. There was quite a bit of taping and re-taping as we went along. Just remember that the paint needs to dry and cure before you re-tape over it-otherwise it will peel right off with the tape!
 Once the range was in place, we added a couple of snow-caps for contrast using zig-zag Frog painting tape.
 There are loads of DIY mountain range tutorials on Pinterest that have simple instructions to follow-once we got started, we just sort of winged it until the range was completed to our liking. And then finally, we added the sky. My intention was to cut out stencils of the moon and the stars to paint onto the sky, but my daughter had other (simpler) ideas. A quick search on Amazon revealed the perfect inexpensive cutouts- a quick click of the button and they were on her doorstep the next day! As we added them one by one, it literally just came to life and completed the look of the mountain range under a dreamy night sky.
 Once that was completed, we re-assembled the gray Pottery Barn Kids crib that was once my grandson’s-now a 3-year-old who sleeps in his “big boy” bed!
 This lucky little baby will be “sleeping under the stars” every night in his new nursery. We can’t wait to meet him! In the meantime, more DIY Black and White Nursery ideas to follow. Have a (hopefully where you are) sunny Sunday everyone! xoxo Susan


These design ideas are absolutely stunning! Thank you for sharing!
LikeLike
Thanks Phyllis! I really enjoy these projects 😊
LikeLike