Sigh…Chip and Joanna, you made it look soooo easy. Joanna would say “Chip, I would like this room to be covered in shiplap”, and then the next thing you know, it was done! Ever since I saw the very first episode of Fixer-Upper, shiplap has been on my radar. If only I could find someone to install it…but I don’t have a Chip at the ready to fulfill my shiplap dreams. So I waited and debated and thought about it a lot, then procrastinated some more, then finally decided that if Chip can do it, then so can I!
Thus began my ship-lapping journey, searching through countless samples and designs from many different companies. Many were too heavy and difficult to install, many were just too darn expensive…so I was beginning to abandon the idea altogether. Until I discovered this shiplap brand at Lowes!
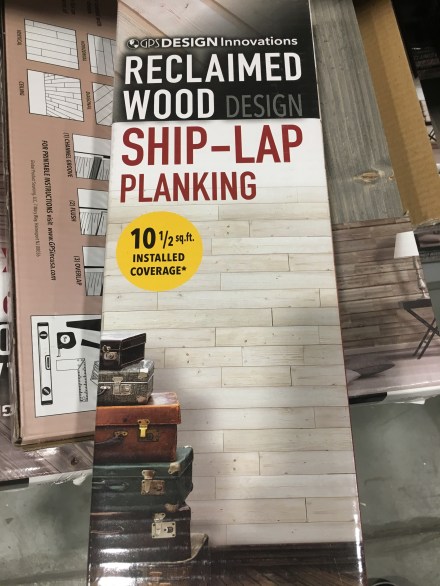
Real reclaimed, pre-finished wood planking from GPS Design Innovations, quite light and easy to work with, a fraction of the cost of many self-sticking brands…a no-brainer. What would have normally taken Chip (or any seasoned carpenter, for that matter) a day or two, ended up taking me about 3 weeks to install in my farmhouse family room. Now, this is not a tutorial on how to install shiplap…I will leave that to the pros. This is just my own personal observations about the process and the finished product.
- Buy the product that matches your skill level. If you’ve never used power tools (or any tools), stick to the pre-cut planks with the self-sticking tape.
- Use a level.
 This is important! Visually, shiplap is long lengths of boards attached to the wall in a straight row. Leveling as you go will ensure a clean, unwavy (is that a word??) sight line.
 - For my particular brand of shiplap, I utilized a miter saw, a jigsaw, a utility knife and my Ryobi Airstrike Brad Nailer
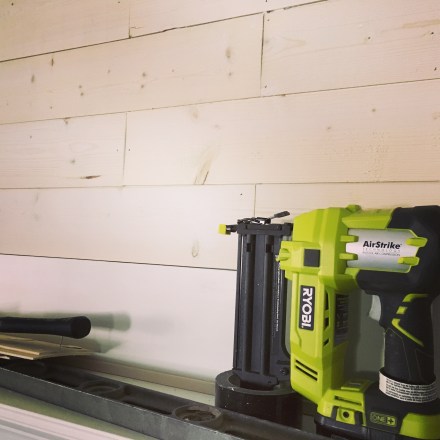 (I would not have attempted to do this installation without one.)
 - Choose the correct glue and use PLENTY of it. I started out trying to use small dabs and ended up with some planks with edges that curled up because I hadn’t glued down them down. Fortunately, this ship-lap, even glued and nailed, is pretty easy to pull off to start over.
 I used Loc-Tite Power Grab adhesive in a tube that required a caulking gun. The planking instructions stated that I could have chosen double-sided mounting tape, but I found that the plank edges tended to curl and warp if they were not glued down.
 - Figure out the design configuration before you begin.
 This particular brand of shiplap had an assortment of lengths in each box, so it was important for me to decided which pieces would go in which order for each row. I was working around a fireplace and ceiling and baseboard moldings, so I had to figure those into the equation. It would have been so much easier if I was working on a simple blank wall, but that wasn’t the case. I taped these on to the wall to visualize how it was going to work before I started the actual nailing and gluing.
 - This shaping contour gauge tool saves a lot of time-
 you push it into an area and it forms into the shape that you need to cut around.
  Otherwise you’ll need some paper and tape to create a pattern to cut around.
- Work stacking up or down in rows but do not try to work sideways and slide pieces into place in between 2 glued and nailed pieces.
 It just doesn’t end up well. Fortunately for me, this particular brand is pretty rustic, so a few cracks and holes blends in quite well!
 - Don’t try to skimp and use leftover pieces. Well, I did, but don’t you do that.
 It made it so much more tedious than if I had just kept using the larger pieces instead of trying to save them…for what, I have no idea….but I’ll figure something out.
 - My ship-lap was already finished with a white wash called Sun Bleached- but I am debating whether to add another coat of white paint to it. What do you think?!?
 For now, I am leaving it as is and enjoying the fruits of my labor.
 - If Coach wanders in and says “how much is this costing?” after you’re already 1/2 way done, just grit your teeth and keep plodding along. For the record, the total cost for this one wall was a little over $300 for the planks and the adhesive (and free sweat equity from moi, don’t forget). Again, a fraction of the cost of some of the pre-stick brands, which can run upwards of $1400 for a 10 x 12 space!
- Make sure you have all the materials you need for the entire project. I had to stop twice because I had underestimated the amount of shiplap I would need.
 Each time I returned to the store to purchase more, it had to be seasoned in the house for 36 hours before I could install it. Which meant more messy days in our family room.
 - When I put the final board into place, I honestly wanted to cry…from sheer exhaustion, but also because it makes me soooo happy to finally have the shiplap feature I have wanted for such a long time. The room isn’t finished or styled yet, but I will share the final pics once its done.
 As an aside, I have a much deeper appreciation and newfound admiration for carpenters and contractors-actually, anyone who labors for a living-especially older folks, like me. The work is fulfilling, but it is not easy-the difference is, I did this for fun, they do it for a living. So my work here is done…for now…and I am shiplapped out… until my next project comes along. Have a terrific Thursday, everyone! And if you decide you need some shiplap in your life, I know the name of a great contractor I can share with you…and its not me : ) xoxo Susan


Don’t buy this product. it’s junk!!
LikeLike
Hi Dennis! If you read the entire blog post, you will see that I already did purchase and install it! I love it- it wasn’t
the easiest material to work with, as it was rather brittle. But it looks great!
LikeLike
Looks awesome!!
LikeLike
Thanks!
LikeLike
Sue, you did a great job on this!!! I don’t think I have the stamina to do this on my own but I do want hubby to take a stab at it (with my assistance…of course) so if you see him in your travels…please don’t tell him it was time consuming and more then you anticipated!!!! Let’s keep that “our” little secret!!! #LOL #impressed #looksawesome
LikeLike
LOL-OK! I’ll tell him it was super easy and really fun : 0
LikeLike