Thanks, Black & Decker For My Big Finish!

Recently, I had heard of a contest sponsored by Black & Decker called Your Big Finish!
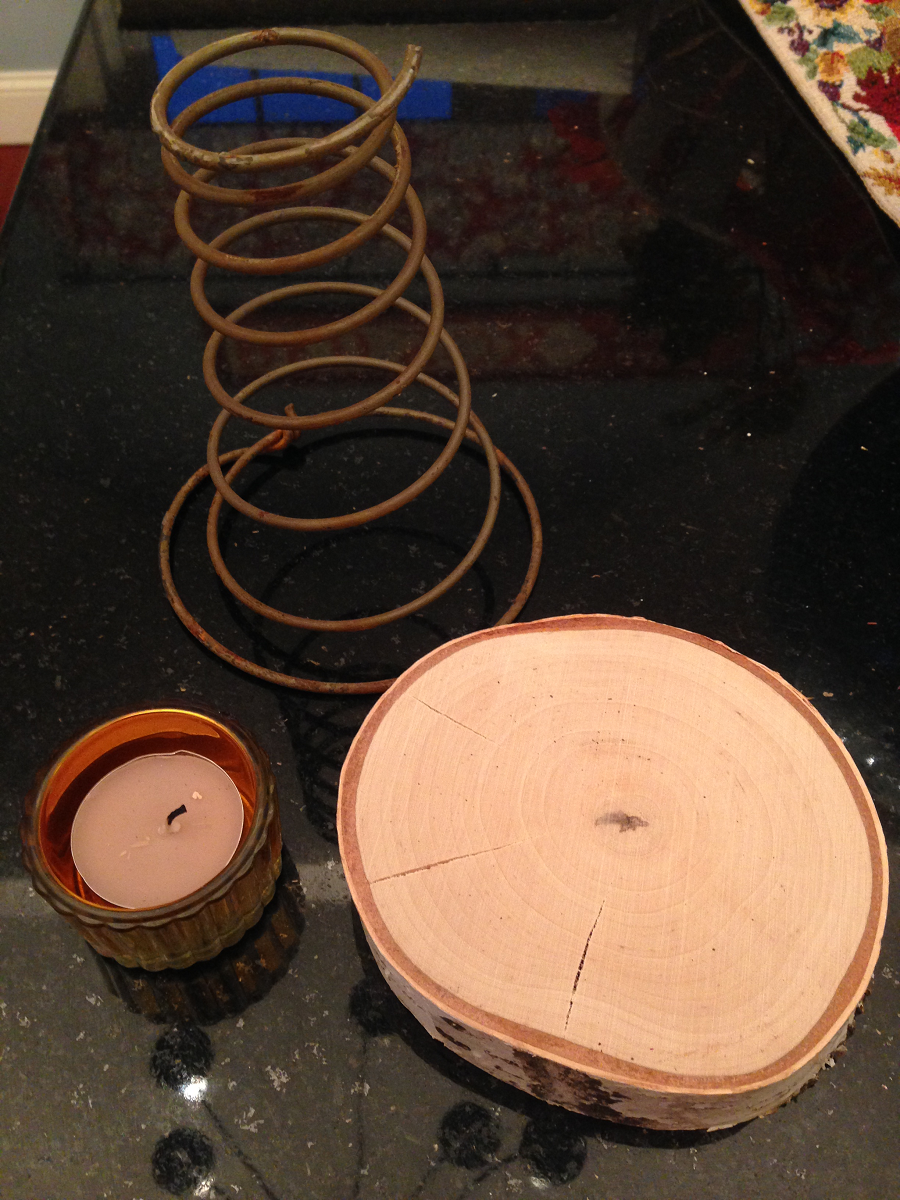
Black & Decker Your Big FinishTheir goal is to get America to finish what they started-“It’s All For Done…And Done For All”! You know all of those projects you have started along the way that are in different stages of completion…like my Hall of Shame...and my mom’s thrifty kitchen makeover? Well, those were not eligible because they are still (unbelievably) in the works. BUT, there is one finished project that I am super proud of…my HI! Rusty Bedspring Marquee Sign.

Rusty Bedspring Marquee SignSo I thought, sure why not enter it? Well, I did, and guess what? My mug is now plastered on a billboard in Times Square!

Black & Decker Times Square Billboard  Times SquareWhat?!?! Now, since I don’t live in NYC, I have no way of actually seeing my face in lights  (ugh, I hope it’s not high def so you can see all those wrinkles), but I am told that it is on the CNN billboard on the corner of 46th and 47th street. So, if anyone happens to be in Manhattan between now and December 27th, could you take a peek? Just look for the giant HI! that is rotating along with the 100’s of other featured projects. You can check out some of the others here (you’ll note that the Times Square featured projects have a little green street sign in the top right corner : )

Black & Decker Project Page

Like my friend Sarah, from Little Red Brick House’s beautiful Fireplace Makeover.

Little Red Brick House Fireplace Makeover
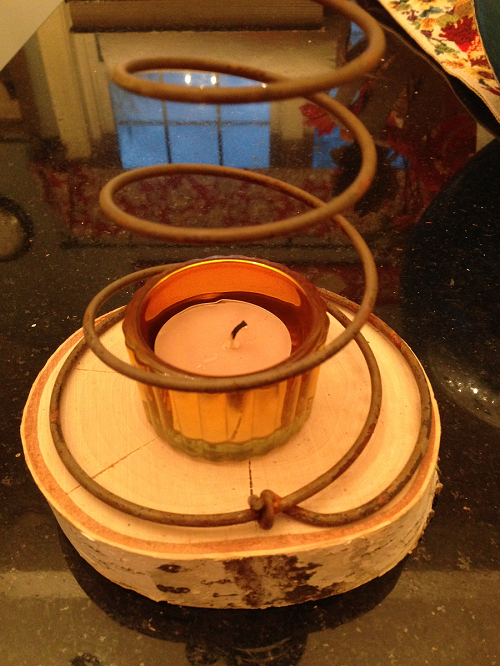
In the meantime, if you would like to see the now famous Rusty Bedspring Marquee Light in person, it’s hanging in the shop at the Barn at Todd Farm. But right now it says JOY.

Joy Sign in the Barn at Todd FarmBecause that’s a little of what I am feeling right now : ) Thanks to Black & Decker for sponsoring this contest and allowing everyday folks the opportunity for their 15 minutes of fame. And for encouraging all of us procrastinators to finish what we started!! You, too can enter for the chance to have your photo plastered on a billboard in Times Square, but also for some great prizes like some new Black & Decker tools and a grand prize of $10,000!! (which I could then use to buy the new cordless drill that I have been coveting-Santa, are you reading this?!?) Have a great finish to your Friday everyone!! xoxo Susan

Vintage Ski Hat Rack & Wreath

Oftentimes, Coach will come home with stuff and my first reaction is, “not one more thing-don’t buy anything else!” And I stomp off to go find something to do while I stew about the fact that the barn is no closer to being my workshop than it was six months ago. Because it’s still full of stuff…no matter how much we sell, it never seems to get emptied. So after I get over it, I go back and look at the new stuff that he has brought home…sometimes right away, sometimes a few weeks or months later. Inevitably, I discover some new pieces that I can work with. Such is the project I shall name:

The Vintage Ski Hat Rack On The White Picket Fence With The Stove Burner Wreath. 

Vintage Ski Coat Rack

As with most of the items I refurbish, I have no clue where they came from. All I know is one day they just appear on the porch or the deck or the yard or the basement, where they remain until I decide what to do with them. So here is the story of The Vintage Ski Hat Rack On The White Picket Fence With The Stove Burner Wreath. At the barn last Sunday, one of the other vendors was admiring the skis that we had in our shop. He had recently created a coat rack from a large pair and instructed me on the how-to. So, since I had a white picket fence section (doesn’t everyone?),

Vintage Ski Hat Rack White Picket Fence
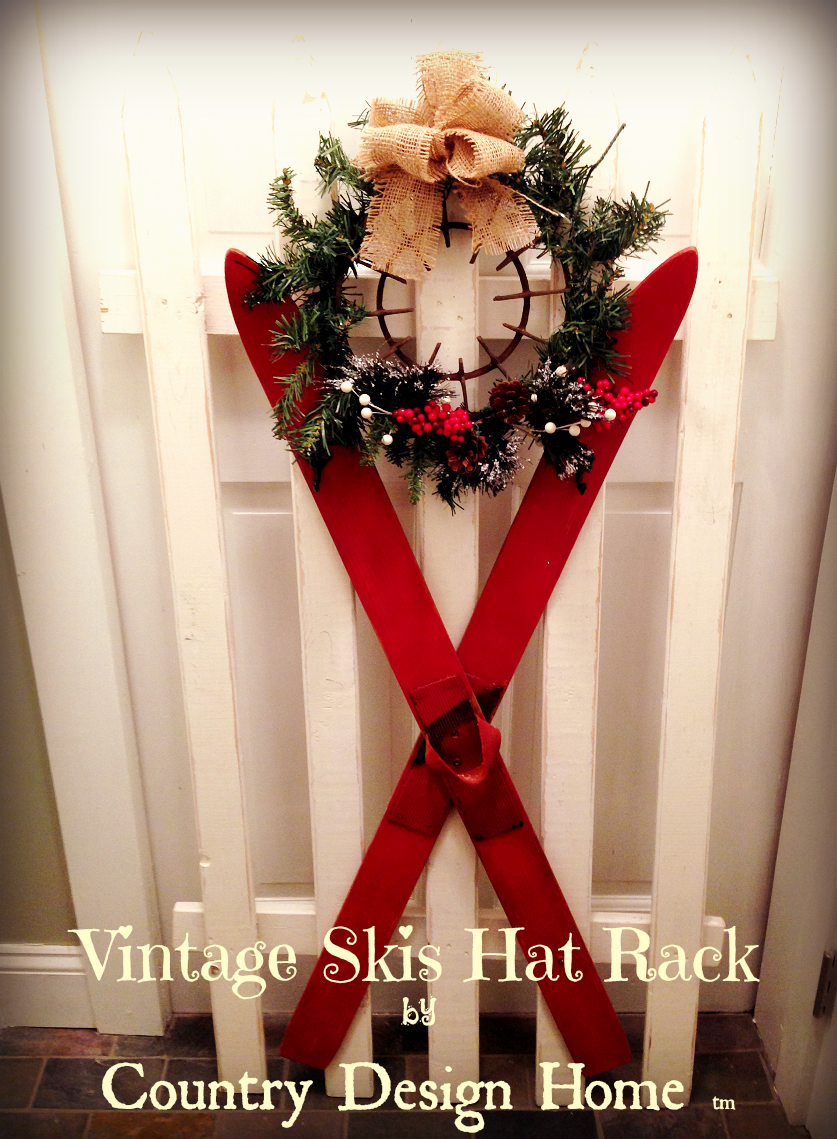
I decided to mount the skis on the fence to create a functional wall-hanging rack for caps. The skis are on the small side, so I supposed you could hang a kids jacket or two on it as well. Once I mounted the skis to the fence. I added the hooks.

Vintage Ski Hat Rack Hanging HooksBut it just looked so plain, so I decided to add the wreath.

Vintage Ski Hat Rack on Picket Fence by Country Design HomeSince I didn’t have a wreath form handy, I used the next best thing: an old rusty burner grill from a stove top. It’s round, it has little hooks for wrapping stuff around it…why not?

Rusty Stove Burner Grill

So I took some garland and wrapped it around the burner ring and secured with wire.

Wrapping Burner Grill with Greens for wreathThen I made a little garland with some berries and twigs and such and attached it to the bottom of the wreath with wire.

Wreath made from Burner Grill

Then I added a burlap bow to the top.

Burlap Bow for wreath

Then I hung it on the Vintage Ski Hat Rack On The White Picket Fence. 

Vintage Ski Coat Rack

Cute-right?! This will be at the shop at the Holiday Open House in the Barn at Todd Farm this weekend. Hope to see you there! Sue


Holiday Open House in the Barn @Todd Farm

As you might know if you regularly follow my blog, Coach and I, along with Lisa from RitaJo’sVintage,  have spent our summer and fall Sundays in the Barn at Todd Farm,

Barn at Todd Farm Postcard

a local antiques and flea market in Rowley, Massachusetts. Lots of 4:30 am Sunday mornings, hanging out with the roosters in dawn’s early light

Todd Farm Antique Truck at Dawnas we sleepily sold our wares to dealers and hipsters and Sunday shoppers searching for bargains and repurposed junque. The Todd Farm Flea Market

Todd Farm Flea Marketis split into two distinct areas: the outdoor fields, where hundreds of dealers spend their Sundays from March to November offering their treasures (at amazingly discounted prices) and the Barn at Todd Farm

Barn At Todd Farm Postcardwhich used to be primarily a junk storage facility, but is now home to various dealers and folks like us

Country Design Home in the Barn At Todd Farmwho love to recycle and refurbish furniture and collectibles. This weekend marks the 1st Annual Holiday Open House inside the Barn at Todd Farm. The barn itself is also split in two: the main barn, where our booth is located in an old dairy stall (sans cows)

Dairy Stall in the Barn at Todd Farmand the beautifully restored rustic annex

Inside the Barn at Todd Farmthat has been completely refurbished from floors to the rafters. The Holiday Open House will take place this Saturday and Sunday from 10-5 in the annex of the barn, featuring local vendors like JWrobel Studio

JWrobel in the Barn at Todd Farmand Special Guest Vendor: The Vintage Bazaar!

The Vintage Bazaar at the Barn At Todd FarmBut the vendors in the main part of the barn will all be there as well! Just wear your flannels because since apparently cows never needed heat, there isn’t any in the main part of the barn (other than our warm greetings, our JOY marquee sign and perhaps some hot spiced cider : )

Joy Rusted Bedspring Marquee SignSo bundle up and head on up to the Barn at Todd Farm Holiday Open House at 275 Main Street in Rowley.  Hope to see you all there! Susan

Candy Cane Mason Jars-DIY!

For the past couple of weeks, I have been spending lots of time working on Christmasy crafts in preparation for this weekend’s Holiday Open House at the Barn at Todd Farm. (Full details on Friday, but it is going to be fun, I promise : ). This Candy Cane Mason Jar

Candy Cane Mason Jar from Country Design Home
is one that I created last year and it was a big hit. Very simple and quick to make, it only requires a jar, masking tape, red and white paint and whatever holiday embellishments you may have hanging around. Here are the DIY instructions:

1. Clean and dry the mason jar to make sure there is no dirt or dust on the inside or outside.

2. Paint the jars an under color. In this case, these were home made red chalk paint, but you can start with white, since the stripes are the same size.

Candy Cane Mason Jars Painted Red Undercoat

3. Measure around the neck of the jar.

Candy Cane Mason Jar Measuring Neck
This one was 9 inches around the narrow part of the neck, which is where I was going to begin taping.

4. Mark off @ one inch intervals all the way around, depending on the width of the tape, which was one inch.

Candy Cane Mason Jar Measuring masking tape width


If you have different size tape, you need to figure out the math to make the stripes equidistant.

Candy Cane Mason Jar Measuring One Inch Intervals
5. Following those marks, start your tape at the rim and bring it down the jar to the base at an angle, depending on how much of a “swirl” you want to create.

Candy Cane Mason Jar Taped Jars

Make sure that you press the tape down firmly along the edges so you don’t get “bleeding” underneath. “Bleeding” is when the paint sneaks underneath the tape and creates little bits of color where you don’t want it to be.

Candy Cane Mason Jars Pressing Tape Edges
6. This is where you can change your stripes to be as fat or skinny as you would like. Just make sure you start at the top markings so the stripes are the same approximate width. They don’t have to be perfect, just close enough : )

7. Paint inside the taped stripes with the white paint, not too thickly, because you want it to be slightly transparent to allow the candlelight to shine through. On this jar I’m using Chroma Color by Cari Cucksey in a Crisp Linen White.

Candy Cane Mason Jar Painting White StripeThis is not chalk paint, but a very smooth finish latex that can be painted on any surface, then left with a shine or sanded down for a matte finish. One coat is all you need.

8. Allow the paint to dry completely.

9. Peel off the tape, and you are left with a striped candy cane mason jar…but, you’re not done yet! See all those little jaggedey edges? Those are the “bleeding” dots I was talking about. Very bad. They must go.

Candy Cane Mason Jar Tape Removed Striped

10. Take a piece of sandpaper and lightly sand the jar, exposing the raised lettering of the glass and smoothing out any rough areas and dots of paint that my have bled under the tape. The more you sand, the more rustic the jar appears and the more light shines through. Totally personal preference.

Candy Cane Mason Jar Sanding Edges

11. Decorate the neck of the jar. In this case, a bit of jute rope and some jingle bells completes the look.

Candy Cane Mason Jar Jute Rope Jingle Bells Decoration

12. When you light the votive inside the jar, it glows and shows off the mason jar raised glass lettering. The more you sand the more the light shines through. And there you have it, a pretty perfect Candy Cane Mason Jar to decorate your mantel or tabletop and light up your Christmas decor.

Candy Cane Mason Jar from Country Design Home

OK, back to my workshop to finish up for the weekend-I know how Santa’s elves must feel right about now : ) Have a sweet Thursday everyone! Susan

Easy No-Sew Fleece Tree Skirt

This past weekend, my company took part in a charity holiday tree decorating event. For the past couple of weeks my co-workers and I have been collecting ornaments and trimmings to decorate the perfect tree. Saturday morning, we met at the old school building to decorate our tree for the upcoming Festival of Trees.  And although we had enough decorations to trim not one, but two trees, we realized we had neglected to bring tree skirts! Even though that wasn’t required, the skirts give the trees a finished look that ours were lacking. So back home I went to see what I had handy in my fabric bin. I found this pretty piece of soft polar bear fleece

No Sew Fleece Tree Skirt Polar Bear Fleecewhich I thought would be perfect with the silver and white snowflake theme of tree #2. So I cut and knotted it and created a cute little skirt for the tree. Here is the HOW-I-DID-IT:

1. Fold the fleece in half lengthwise and make sure it is long enough to go around the base of the tree.

No Sew Fleece Tree Skirt Matched Edges2. Cut the unfolded end into a semi-circle, making sure the edges are even. I happen to have a round dining room table which was the perfect pattern, but you can just do the old pie plate method where you fold it in 1/2 and then cut an arc from corner to corner.

No Sew Fleece Tree Skirt Cut Circle Edges3. Starting at one end of the cut edges, cut strips of the fleece approximately 1 inch apart.

No Sew Tree Skirt Cutting FringeI typically measure these lengths to 5-6 inches, but this time I just used the scissors as my guide and did one cut to the end of the blades for each strip. The deeper the cuts, the longer the fringe.

No Sew Fleece Tree Skirt Cutting Scissors

4. Moving around the arc, you need to cheat in just a bit; the top of the cut will be a bit narrower than the edge.

5. Once the semi-circle is cut, you can start knotting. Take a top and bottom strip that match up.

No Sew Tree Skirt Fleece Matching StripsTie the ends into decorative knots I use a square knot, but you can do any type you like. I took pics of this, but their not very clear so check out this Animated Decorative Knots by Grog-any type of knot is illustrated here!

6. Knot all the way around the arc, creating the fringe effect, until you get to the other side.

No Sew Tree Skirt Fringed Edge7. Decision time! To have this skirt fit properly you can leave the folded edge as is and just drape it around the tree base to create a “blanketed” look like this. It reminds me of Linus’ blanket wrapped around Charlie Brown’s little tree.

Linus Blanket Around TreeOR you can cut a semi-circle in the middle of the folded half that is large enough to accommodate the tree base. This will allow the skirt to lay flatter on the floor. Either way is great and your holiday tree will look pretty and toasty warm.

8. Step back and admire your decorated tree : ) We did good, ladies!

No Sew Fleece Christmas Tree Skirt Logo

Total time for the skirt: 45 minutes. And, at this time of year the local craft stores stock an endless style and variety of fleece designs, so you can do anything from a jazzy zebra print to Star Wars to a Frozen theme. Have a warm and toasty Sunday everyone!! Susan

S’Mores Chocolate Pie Bites-YUM!

One of our  annual Thanksgiving family favorite desserts is chocolate cream pie. Over the years, I have baked many an apple, pumpkin or squash pie, only to see them get pushed aside in favor of the creamy-chocolate-graham-cracker-crust delight. This year, I made the chocolate pies (shhh, no one knows that I served one, but there is another one left in the fridge), but also created a new family favorite: S’Mores Chocolate Pie Bites!

S'Mores Chocolate Pie Bites from Country Design HomeThese yummy little clouds of toasty chocolate goodness were a fam favorite, and sure to become another traditional holiday treat! I originally saw these marshmallow melted cups transformed into shot glasses, but since this was a kid-friendly holiday, I decided to create the pie bites instead. Here is the How-I-Did-It:

These are quite simple to make and only require four key ingredients: Chocolate Pudding Mix… I used the Jello Cook and Serve Chocolate Fudge Pudding.

Jello Cook "n Serve Pudding

I was making the pies at the same time and planned to use the pudding as the filling, but you could certainly save some time and make the instant stuff.  Milk to make the pudding according to the box, Large Marshmallows…these Jet Puffed Marshmallows

Jet Puffed Marshmallowsare just that-large and fluffy. These misshapen sugary lumps were sent off to the land of misfit marshmallows.

S'Mores Pie Bites Misshapen MarshmallowsI figured if they weren’t straight before I toasted them, they would become melted molten messes once the heat hit them. Saving them for some hot cocoa action : )

 Keebler Graham Cracker Crumbs…

Keebler Graham Cracker Crumbsyou can make your own crumbs, but I happened to have these already crushed and ready to go. OK, ready?

1.Toast the marshmallows. If you are lucky enough to live in a part of the country where freezing cold weather is not a factor, then do this outside on your firepit or campfire. We, unfortunately, had quite a snow fall on the day I was making these, so the stove top burner it was. Mine is a glass topped burner, so I just cranked it to high.

S'Mores Pie Bites Hot BurnerWARNING!!!! Do NOT TOUCH THE HOT BURNER. THIS IS NOT A KID’S PROJECT. DO NOT ATTEMPT TO DO THIS AFTER HAVING A WEE BIT TOO MCUH SPIKED CIDER… THIS IS DANGEROUS!!!!

2. Spear the marshmallow with whatever implement you wish to use. I tried a single metal skewer but the marshmallow kept turning as the inside melted. This three-tined fork was the perfect length and the tines created heating holes that caused the inside of the marshmallow to melt more evenly.

S'Mores Pie Bites Three Tined Fork

Now, don’t ask me why, but the fork handle never got hot to the touch. Which was interesting, because the hot glow from the burner on HIGH made me feel like I was under a sun lamp!

3. Starting with the bottom, hold the marshmallow over your heat source approximately 1-2 inches above the surface.

S'Mores Pie Bites Holding Marshmallow Over Heat

DO NOT TOUCH THE BURNER. Hold it there until you see a light smoking from the marshmallow, this means the sugar is starting to melt. Time to turn the marshmallow. Look at that-a thing of golden sugary beauty!

S'Mores Pie Bites Golden Toasted Marshmallow Bottom

4. Repeat around the sides, turning when you see the pale smoke trail as you lightly brown each side until the entire marshmallow,

S'Mores Pie Bites Toasted Marshmallow Sidesexcept the top,  is a light golden brown.

…this is what happens when Coach distracts you and asks a question about the upcoming Holiday Fair in the Barn at Todd Farm.

S'Mores Pie Bites Flaming Marshmallow

5. Remove the marshmallow from your fork using another implement- DO NOT USE YOUR FINGER!! The interior of the marshmallow is HOT and melty.

S'Mores Pie Bites Removing Marshmallow From Fork

6. Place toasted marshmallow on foil to cool.  Not wax paper, that will melt. And then you’ll have a S’Mores Pie Waxed Paper Bites. As they cool, you will notice that the marshmallow centers begin to implode, but the toasted exteriors stay upright. The hot melted middles sink down, creating the cup vessel you will need to hold the pudding. So cool!!

S'Mores Pie Bites Sunken Middles

7. Make your pudding according to the instructions on the box. This is the cook-‘n serve style, so it takes a few minutes cooking in a sauce pan to get to the molten lava stage.

S'Mores Pie Bites Molten Pudding in Pan

8. Using a teaspoon, fill the toasted marshmallow cups to the top (each one will take about a teaspoon of pudding). I was a bit worried that the hot pudding would disintegrate the marshmallow cups, but they were little toasty troopers and stood up fine.

S'Mores Pie Bites Filling Marshmallow Cups with Pudding

9. Immediately sprinkle with the graham cracker crumbs. This is a sprinkle-as-you-go project…you have to add the crumbs to each one after you fill them.

S'Mores Pie Bites with Graham Cracker Crumbs

If you wait until the pudding has cooled, the crumbs will just fall off. And you cannot have a S’Mores Chocolate Pie Bite without graham cracker crumbs!

10. Cool in fridge. An hour or so should do, since each S’Mores Chocolate Pie Bite only holds about a teaspoon of pudding.

S'Mores Pie Bites Cooling in Fridge11. Arrange on pretty platter and serve. The best part is no serving implements required, just pick up with your fingers and enjoy!

S'Mores Chocolate Pie Bites from Country Design Home

I hope you all had a lovely Thanksgiving that you shared with family and friends. Now it’s time to go continue with the kitchen clean-up…hope you’re planning s’more fun today! Susan

PS: If you like this blog post and would like to receive emails containing my awesome inspired designs and DIY’s, please add your email to the subscribe button in the column on the right! We promise, we don’t use your emails for anything other than messages from me! Thanks!

Rusty Bedspring Coil Votive Holder-DIY!

What do you do when you have not one, but two giant, antique, rusty bedspring frames? Well, the first one you transform into a large marquee sign for your shop,

Rusty Bedspring Marquee Sign

and the second one you mull over for awhile until you come up with a bright solution. So, without further ado, I’m introducing the

Rusty Bedspring Coil Votive Candle Holder!

Rusty Bedspring Coil Votive Candle Holder Country Design Home

Now, I have spotted many a rusty bedspring photo with a votive tucked underneath, but I wanted to take it up a notch by adding a second rustic element: the birch log slice. This elevates the rusty bedspring into a lovely woodland mantel decoration, does it not? Here’s the how I did it:

1. Get Coach to drag out the rusty bedspring frame from behind the fence where it had been weathering over the summer.

Vintage Rusty Bedspring Frame with Coils

Have Coach cut off all the rusty bedspring coils during your freezing cold yard sale. Watch the pile ( of coils and $$$) grow.

Rusty bedspring coils in box

2. Assemble your ingredients: A rusty bedspring coil (well, you know where I got these, and I have a ton more if you need one!), a birch log slice (this one I got at Michaels for $6.99 using  a 50% off coupon, but you could certainly go into the woods and grab a log or two and slice ’em up), a votive candle-whatever style you choose as long as it fits in the bottom of the ring

Rusty Bedspring Coil ingredients

and a small clamp and screw (these I had kicking around the workshop-but if you need to purchase one, they’re in the plumbing aisle at your local hardware store. And they don’t need to be old and rusty, they’re not going to show anyway.)

Small Clamp for Hinged Coil Spring Votive Holder

3. Place your rusty bedspring coil on the log slice and arrange in a pleasing manner. These springs are not exactly round, but neither are the log slices, so its a win-win. In this case, I kind of liked the little coiled knot in the front, but you could certainly turn that to the clamp side, or the rear of this rustic piece of art.

Rusty Bedspring Coil in place

3. Attach the rusty coil to the log slice with the clamp assuring that you hold the clamp securely in place with the coil underneath the arched part-this will create a hinge effect.

Attaching Rusty Bedspring to Log Slice clamped

Now, this can be a bit tricky, because in order to attach the screw properly, you need to hold it at a 90 degree angle while you push down. So, just use the spring as a “tunnel” and go right down the middle. Remember, its a spring, so you can push it down to get a better grip on your screwdriver.

Attaching rusty bedspring coil to log slice

4. Test out your mechanism by slowly lifting the coil away from the log slice and you will immediately see the simple brilliance of this design! You’ll note that the coil does not slide off the log, thereby creating a safe cage for your votive to sit inside. So, in the event that somehow your rusty bedspring coil votive holder gets knocked over while the candle is burning inside, the rusty coil and the votive stay firmly in place : )

Lifting Hinge of Coiled Bedspring Votive Holder

5.  Decorate your holiday mantel with your new rusty bedspring coil votive candle holder and wait for the compliments! So, there you have it. A simple, quick and easy project that costs under $4 (assuming that you have a box full of rusty bedspring coils).

Rusty Bedspring Coil Votive Candle Holder Country Design Home

Now you’ll have to excuse my while I go slice up one of my precious birch logs and make a few more of these. I see many potential Christmas gifts in the works! Hope you have a sunny Sunday everyone, Susan


Weather-Proofing Your Porch!

This is a PSA for those of you who live in cooler climes…like we do here in the Northeast…and wish to “shrink-wrap” your screened-in porch before the winter hits. This most definitely will NOT be helpful for those of you in the Buffalo NY area-it’s a little too late for that! Anyway, this is a post from a couple of years ago when I was preparing to serve our Thanksgiving dinner outside. Yup, that happened. I figured if the Pilgrims could eat outside, then why not us??

The First Thanksgiving Dinner

But, even with a heater it was still a bit chilly, so we are back inside this year. So, without further ado-I give you…the shrink-wrapped porch!

“Last year Coach and I converted our deck into a screened-in porch, which was simply awesome. No more buggy nights, or rainy afternoons when we couldn’t use the deck for anything other than furniture storage! Since we had decorated it with quite a few pieces of antique wicker, I decided to “shrink-wrap” it to prevent any winter weather from ruining our newest addition. We used thin plastic sheeting and some lathing strips and tacked it up all the way around. Functional, not very pretty and it wasn’t very transparent, it flapped in the wind (which drove me crazy!) and the plastic kept ripping away from the lathing. Uggh. So this year I decided to get a more permanent wrap, something we could re-use each season. I went online to purchase a custom porch weather-proofing system, only to find the prices @ $1500.00 and up, to be a bit exhorbitant. Sooo, this past weekend’s project was weather-proofing the porch, country design home style! With this how-to video on You Tube as my guide, we began the laborious task of wrapping it up! The supplies: 20 gauge clear vinyl (heavy enough to withstand the winds and rain, clear to let in the light) and 2″ white Duck Tape Dritz 7/16″ steel grommets 5/16″ screw-eye hooks.  I measured each section, determining the placement for the grommets. Cut the vinyl, then wrapped the edges with the tape on both sides for extra stability, overlapping in the corners where the grommets will be installed. Some sections had to be taped together, since the width of the vinyl is only 54″. That proved to be the most difficult part of this project, as the unrolled edges were a bit curled. You just have to smooth it as you go. Mark the center holes for the grommets, cut out the circles and then hammer the grommet into place (this pounding away with a hammer activity is fun for anyone wanting to vent some anger or angst : ). Hanging the large panels requires 2 people to make it level and install the screw-eyes. The finished project : ) Hard, painstaking work, this easily took 20+ hours. The cost? All of the materials, with the exception of the screw-eyes ($5.19/50 @ Home Depot), were purchased at Joann’s using 60% coupons, of course! So the vinyl that normally would have been $7.99/yard became $3.20/yard and in total we will probably use 25 yards-so $80 + tax. The grommets, screws and tape totalled approximately $70, so the grand total (aside from the band-aids, the Motrin and a trip to the nail salon to repair that damage) comes to $150+ tax- one tenth of what the online estimate was! It wasn’t easy, but it looks great, the sun shines through year round AND we don’t have to pack away all of our deck/patio furniture-it just stays in place! And now we will have another functional space for the holidays- as long as you wear your winter coat and mittens : ) And remember, always measure 3Xcut once!! Susan”

So there you have it, but just a couple of side notes for those of you who are interested in doing this project on your screened porch. Since the installation, a few of the grommets have come loose, and some of the tape as well, so that needs replacing. Also, this installation needs to be done on a fairly warm day. The vinyl is quite thick and in the cold it’s very difficult to work with to get it to lay smoothly to tape the edges, and then stretch it out to attach it. Otherwise, it was a great DIY project that I am very thankful we have installed now! Have a great weekend, everyone! Susan 

A Bridal Party @ Crate & Barrel

Did I mention somewhere that our daughter is getting married next summer? Plans are well underway, and I know that what seems so far away right now will be here and gone in an instant! To date, we have secured the venue, the band, the photographer, the florist, 2 wedding dresses (yes, 2, at least for now) and an international guest list which should make for a very exciting event!  Now that our daughter and her fiancé have started their online planning journey on weddingwire.com, they have begun receiving invites from various local vendors who wish to offer their services for the newlyweds-to-be. This past Sunday, I got the call-up to attend a Crate & Barrel Wedding Registry

Crate & Barrel Wedding Registryprivate party with my daughter, as her fiancé was traveling on business and was unable to attend. At 9am sharp, 2 hours before the store opened to the general public, the doors opened and we were greeted by some very knowledgeable folks-meet Bill, everyone-

Crate & Barrel Wedding Party Registrywho took us through the ins and outs of proper wedding registry protocols and the how-to’s of utilizing the registry app. Of course, since I was not registering…

although I wanted to…

I have grown pretty weary of my 25-year-old Corelle dinnerware-that stuff just won’t break…

I stood in the background to follow the bridal goings-on, but was repeatedly distracted by the festive holiday displays scattered throughout the entire store. So many gorgeous holiday decorations and potential DIY projects!! These twigs are actually something (not sure if they were real twigs or wire or what, but I’m certain the store would have frowned upon me unwrapping them to figure it out…) wrapped in birch-log look paper. Gotta get my hands on some birch paper!

Birch Log TwigsDid you know that birch logs are a thing this year? I have three and I feel as if I am in possession of some coveted treasure. Loving these sweet log cabin holiday pillows.

Craet & Barrel House PillowHow many of you have the luxury of using holiday throw pillows in place of your regular ones? I know I would love a whole bunch of them scattered around my house, but what would I do with them after the holidays?? I have enough troubles storing all of those dishes!

Crate & Barrel Holiday Pillows

When we ventured over to the cooking section, while Kate chatted with the All-Clad rep about the virtues of stainless steel vs. non-stick cookware, I spotted these yummy (faux) cupcakes

Crate & Barrel Cupcake Displayand these adorable red striped mixing bowls

Crate & Barrel Red Stripe Mixing Bowlsand these holiday aprons and towels-I’ll take one of each, please!

Crate & Barrel Holiday Towel DisplayIn the Tree Lot, there were Christmas tree candles and soaring pines and spindly sparkly trees,

Crate & Barrel White Wire Treeresplendent in glittery ornaments

Crate & Barrel Christmas Ornamentsand twinkling lights for the upcoming holidays.

Crate & Barrel Christmas TreesHoliday dinnerware displays.

Crate & Barrel Holiday Dinnerware DisplayI have a confession to make…I’m a plate addict. Is there such a thing as Dinnerware Anonymous? I already have 6 sets of dishes, but every time I see new festive ones, I want to add them to my collection! I know, I mentioned that set of old Corelle that just won’t break-which is why we use them every single day. All of the other sets are “The Good Dishes“-preserved for holidays and special occasions. But I digress..I’m supposed to be helping pick out stuff for the bride-to-be to show her groom! But she only chose a few things, because she was waiting for him to return to the store with her to choose their items together. Sigh…young love.

Loving this dinnerware in all shades of chalky pastels. Wouldn’t these look amazing displayed in a chalk-painted antique cupboard?? Hmmm…

Crate & Barrel Pastel DinnerwareThe two hours flew by, as I know the next 10 months will, and we turned in the registry “gun” and headed out, but not before purchasing a couple of items for me to use for the upcoming holidays. You didn’t think I was going to get out of there without at least one new plate, did you?? I hope your Thursday is an eventful one, everyone! Susan

**Pie Is Love**

I Love Pie.

Pie In The Sky Postcard Chocolate, blueberry, apple, pumpkin-if you bake it, I will eat it, but I’m not always crazy about cooking the filling and rolling out the dough. So, I am ever so grateful each year around this time, when I receive this postcard in the mail from a Boston-based food service called Community Servings. Comunity ServingsThis organization delivers nutritious meals to over 1500 homebound and critically ill patients daily. Their motto: Delivering Meals. Delivering Hope “As New England’s expert in home-delivered nutrition for the critically ill, Community Servings provides meals to the acutely ill, their families, and their caregivers. Our clients live in 18 cities and towns throughout Massachusetts and battle over 35 different types of illnesses, including HIV/AIDS, breast and other cancers, and kidney disease.”  The fund-raiser they sponsor each Thanksgiving is called Pie In The Sky, a way for the community to give to those in need and enjoy a tasty pie! Pie In the Sky Pumkpin Pie The History of Pie in the Sky  In 1993, members of the restaurant community — who lost many friends and colleagues to AIDS — conceptualized and launched Pie in the Sky. Knowing how food can improve someone’s emotional and physical well-being, Pie in the Sky was an ideal way for Boston’s chefs, caterers, and restaurateurs to support Community Servings’ clients. As our mission has expanded to serve people struggling with any life-threatening illness, our friends in the restaurant community have stood by us. Through their generosity, Pie in the Sky is now the World’s Greatest Bake Sale — raising 15% of Community Servings’ private fundraising revenue! We are deeply grateful for their ongoing support and encourage you to frequent their establishments. Sweet Potato Pie Pie In the Sky

It’s Your Turn To Buy A Pie!

Ordering is as easy as pie! You go on to their website and order a pie or pies that are baked by some of the best pie bakers in Boston. And let me tell you, these are hands-down some of the most amazing pies your taste buds will ever feast on!  You can buy a pie for yourself, for your neighbors, for your friends and especially for someone in need. You get a pie, and you get a pie and you get a pie-everybody gets a pie!! Or, if you really don’t like pie, (seriously!?!?) then you can make a donation here. The day before Thanksgiving, you go to a local “pickup” spot-they are scattered all over the greater Boston area-and pick up your freshly-baked pie to enjoy on Thanksgiving. You can even take it out of the box and pretend you slaved all day making the perfect flaky crust and rich, yummy fillings! But I don’t. Because I want to keep spreading the word about this amazing organization. BUT, here’s the catch. The deadline for ordering pies this year is the 19th-only two days away!!! So please click on the links and order your pies today. If you are so very thankful for the life that you have this Thanksgiving, then this is your chance to make this one holiday just a bit sweeter for someone in need. Pie In The Sky Pecan PieThanks, now go order a pie!! Susan