New Life For An Old Cupboard-Without Paint!

When Coach first acquired this unpainted vintage glass front cupboard, my first inclination was to paint it, distress it and add some new knobs.

Vintage Glass Cupboard Before

But every time I walked past it, for some reason it tugged at my heartstrings just a bit, although I was not sure why. We don’t have anything else like it in our home, and its just a simple little cupboard…one that you would find in your grandmother’s kitchen. And then it hit me…it was reminiscent of my grandmother’s kitchen table…the same wood color, the same glowing finish. So, as an homage to time gone by and Sunday Pot Roast dinners at my grandmother’s house, I decided to clean it up, shine it up and give it new life, but to leave it unpainted. Some old furniture just screams for a coat of paint and some embellishment, but this vintage hutch quietly begged to be restored to its former quaint and simple beauty. It was quite dirty and greasy, so I cleaned it up with some household cleaner. I was left with a rather splotchy finish…it appears that someone along the way decided to add a layer of varnish or stain in a rather streaky fashion. Using some Mastercraft Poly Gel Wipe On Stain,

Vintage Cupboard Mastercraft Wipe On Gel StainI attempted to even out the overall color as best I could. You simply paint or wipe the stain on,

Vintage Cupboard Side Panel Gel Stainlet it sit for a couple of minutes, then wipe it off, leaving as much or as little as you would like.

Vintage Cupboard Front Panel Gel AppliedYou need to work quickly and in small areas, as this stuff gets tacky fast. (It is a bit smelly, so despite the below freezing temps, I had the window open and a fan running continuously.) Once all of the wood was finished, I decided to add some vintage wallpaper to the back of it to add some color…this fresh green check is simple and looks like it could have been in grandma’s vintage kitchen.


Vintage Cupboard Check Paper Background and Drawer LinerI papered the back using decoupage glue…this wallpaper was not pre-pasted, and then followed suit with the drawer as well. The hinges were dirty and in need of some cleaning,

Vintage Cupboard Hinges Varnishedso I left them, along with a bottle of brass cleaner for Coach to use, thinking that would do the trick…until he called me and said it wasn’t working. So I instructed him to try the silver cleaner…again no luck. So I took another look at them, first thinking it was rust and then finally realized that whoever varnished the piece left the hinges in place and varnished right over them! Time for the heavy duty stuff: this LIFT-OFF varnish remover does the trick,

Vintage Cupboard Lift Off Varnish Removerhas very little odor and is water-based…so not too offensive to use indoors. I put the hinges in a metal tin with the remover, waited 20 minutes, scrubbed with a little warm water and an old toothbrush (do you save yours? I always do, just for times like these…,)

Vintage Cupboard Scrubbing Hinge with Toothbrushthen buffed with a bit of steel wool and they were good to go.

Vintage Hinge Buffed with Steel WoolI love the detail on these hinges…very art deco, and matched to top crown of the piece,

Vintage Cupboard Refurbish No Paint Top Crownwhich helps to determine what time period it originated from. There were six rather beat up wood knobs,

Vintage Cupboard Knobs Beforeso I replaced the glass door hardware with some cut glass knobs,

Vintage Glass Front Cupboard with Glass Knobsthen crackled and painted the door and drawer knobs to match the green plaid paper.

Vintage Cupboard Crackled Wood KnobsFinally, I filled the finished piece with some of my milk glass collection…can this be any cuter!?!

Vintage Cupboard Finished Filled with Milk GlassIs the finish perfect? No. I would’ve had to strip the entire piece down and start fresh if that was the look I was hoping to achieve. What I wanted was a fresh piece of furniture that looked as if it had been used and loved and worn, so that it would tug at someone else’s heart strings. Then they would use it for their own collectibles and kitchen wares…and someday their grandchildren would remember it fondly.

Vintage Glass Front Cupboard FinishedBecause, alas, I have no room for it in our home, so this one is in the Barn at Todd Farm if you’re interested in taking a look. Have a fresh new week, everyone! Susan

Wedding Date Chalkboard DIY

If you have been following my blog, you know that 2015 is the “Year of the Wedding” in our family. Our daughter and her fiance have set the date and plans are well under way for what we hope will be a great wedding weekend come this August. Of course, since we are a DIY kind of family, lots of the decor will be created by yours truly, with assistance from our multi-talented family and friends. One of the first things the newly engaged couple did…other than book the venue, the band, the photographer and the florist…and buy a dress, or two…was schedule a photo shoot for their engagement photographs. Since their dog Bartlet is such a big part of their lives, there could be no photos taken without the little guy in tow. The engagement photos are courtesy of Marcy Rolerson Photography and were taken in the North End of Boston.

Bartlet Photo Courtesy of Marcy Rolerson PhotographyMy daughter requested that I create a small sign with the wedding date that she could hang around his neck or attach to his collar, so I created this Wedding Date Chalkboard Sign. It is so simple and makes a really cute addition to the engagement photos, don’t you think?

Wedding Date Chalkboard Marcy Rolerson PhotographyHere is the How-I-Did-It:

1. I found an old chalkboard kicking around my workshop, but you can purchase these at any local crafts store.

Wedding Date Chalkboard Before Sanded EdgesSince Bartlet is mighty in personality but quite small in stature, we had to make sure it was little enough so it wouldn’t hang on the ground once it was attached to his collar. I dry-brushed it white and then sanded the edges, just for a bit of rustic contrast.

2. I created the chalkboard pattern on Avery.com.

Wedding Date Chalkboard Avery.com Screen ShotThere are a limitless amount of fonts and styles to choose from on this website, typically used for designing labels and cards. Design what you would like, then re-size it to the dimensions of the surface of your chalkboard. Simply print it out on a regular piece of copy paper that has been cut to the size of your chalkboard.

Wedding Date Chalkboard Printed Pattern3. Coat the BACK of the printed paper with the chalk-rubbing with the side of the chalk all over the surface until it is covered.

Wedding Date Chalkboard Coating Reverse Side of Pattern with Chalk4. Place the chalk-covered pattern on the surface you are transferring it onto-tape it down along the edges to secure-then take a sharpened pencil and trace the lines of the pattern onto the chalkboard.

Wedding Date Chalkboard Tracing Pattern with Pencil5. Carefully remove the paper pattern from the board and you will see the transferred pattern, faint but there.

Wedding Date Chalkboard Peeling off Pattern from Chalkboard6. Sharpen your chalk…did you know you can sharpen pieces of chalk with a little pencil sharpener? No? well, now you do!

Wedding Date Chalkboard Sharpening Chalk with pencil sharpening7. Begin tracing the transferred pattern with the chalk, re-sharpening as you go until the entire pattern is clearly defined. Try not to press on the paper other than what you are tracing, otherwise you’ll have more chalk than you bargained for on the chalkboard.

Wedding Date Chalkboard Re-chalking Printed Chalk8. To clean up the edges and smudges, you will need some Q-tips and water.

Wedding Date Chalkboard Q-Tip and Water CleanupJust dip the tip into the water, then squeeze most of it out until it is damp only. Use the dampened tip to wipe away all of the smudges and unwanted lines.

Wedding Date Chalkboard Cleaning up Chalk with damp Q-tip9. I had originally added some side scrolls on the printed pattern, but decided to erase those and add some color instead. That’s the beauty of chalk-simple to erase and start over! So I used some scroll stencils to create the blue side scrolls.

Wedding Date Chalkboard Stenciling Scroll Pattern10. It’s simple to make a perfect dot! Dip the butt end of your paint brush into the paint-just the very tip-

Wedding Date Chalkboard Paint Dot

and then dot it onto the board. The bigger the brush end, the bigger the dot. Makes a perfect circle every time.

Wedding Date Chalkboard Adding Paint Dot Embellishment11. The finished wedding date chalkboard. Now at this point, you have some options. I actually drilled two holes in the top and added the raffia rope for hanging, but you won’t need to do that if you are planning on hanging it on a wall rather than a dog. If you don’t have a drill, you can hot glue the rope or ribbon to the top- this piece is super light-weight so it should be fine.

DIY Wedding Chalkboard By Country Design Home12. Also, if you want this to be permanent, then you would just need to spray it with a light coating of varnish or acrylic finish so it doesn’t smudge or erase. NOTE: You cannot brush on a top coat because it will smear the chalk. Or, you can keep the painted pattern on there and use the chalkboard again (perhaps you could update it each anniversary with a new love message : )

13. So here is Big B with his chalkboard sign attached to his collar. Apparently he was quite the rock star that day and posed perfectly for the camera. Thanks to http://www.marcyrolerson.com/ for the beautiful photographs!

Wedding Date Chalkboard Bartlet with SignAnd we’ll just chalk this one up as wedding project number one-done! Have a terrific Thursday, everyone! Susan

Being Sick (& Yummy Sea Salt Caramel Pretzel) Bites

I’ve been sick these past few+ days with some sort of flu or cold or whatever is “going around”. Sick as in I couldn’t go to work, couldn’t attend the annual neighborhood Christmas party and essentially just found myself lying on the couch for hours watching Hallmark Christmas Movie Marathons. This week so far has been a total frustrating fail for me. I kind of felt like this guy-agghhh!

Sea Salt Caramel Bites SnowmanNo big DIY projects, no blogging, no nothing, other than trips back and forth from the couch to the fridge to the pantry to open yet another can of soup or box of crackers. Coach would leave saying “my poor darlin'” and come home hours later with me still in the exact same position on the couch and say “really??”-lol-he’s not used to seeing me doing nothing, and I mean nothing-not a paint brush or sandpaper in sight-for days. But, you know, it hasn’t been all that bad. This little forced break given me an opportunity to step back and take stock of what I’m doing with this blog and the barn shop and start implementing a plan moving forward that doesn’t result in me being so run down and exhausted that I end up lying on the couch watching endless Castle reruns and stocking up on kleenex tissues whilst staring at a large, dark green evergreen in the corner of my family room.

Blank Christmas TreeThe house is not even close to being decorated, because I just didn’t have the energy to open up all of the giant bins and sort them out, never mind actually placing the items somewhere decoratively. Coach and I finally got a tree Monday night (good thing I’m not part of any of those blogging holiday house tours…) & it finally has lights but no ornaments.

Lighted Christmas TreeBUT, today marks a new day and newly inspired (and sugared up : ) by our annual work cookie swap which took place yesterday,

Cookie Swap Platter WrappedI’m on the mend and ready to add some holiday spirit to our home : ) In the meantime, I figured I’d share this yummy recipe for Sea Salt Caramel Pretzel Bites I used for the cookie swap. (And I assured my co-workers that I did not breathe on them and repeatedly washed and disinfected my hands before handling!) The original recipe for Salted Caramel Pretzel Pecan BonBons

Salted Caramel Pecan Pretzel BonBons by Baker By Naturewas via BakerByNature...but mine didn’t come out exactly as the photo (aren’t these gorgeous?!?), but they were still pretty tasty, if not a bit extra chewy! Here’s the how-to:

1. Assemble ingredients: Bag of caramels, bag of pecan 1/2’s, bag of mini pretzels (these I did not have in my pantry),

Sea Salt Caramel Pretzel Bites Ingredients from Walgreenssome melting chocolate, sea salt, holiday sprinkles (these I had on hand). I didn’t have any of the main three ingredients at home, so I ran over to Walgreens since that is the closest store to my home, and I figured they would have the basic snack bags the recipe required. Which they did, which made me happy, so I didn’t have to trek all the way to the grocery store. And they had more kleenex and cough drops too, which made me healthy (sort of). And that is why they are at the corner of Happy & Healthy. So that was a win.

2. Preheat the oven to 325 degrees. Place a piece of parchment paper on a large cookie sheet. Or a small one depending on the # of bites you wish to make. The beauty of this recipe is that you can make small batches as you go.

3. Place the number of mini-pretzels equivalent to the number of bites you wish to make. 12 makes a dozen. 24 makes 2 dozen. Simple math.

Sea Salt Caramel Pretzel Bites on Parchment Paper

4. Unwrap the caramels…meh, not fun. When my kids were little and I needed unwrapped caramels, I used to have them race to see who could open them all the fastest-worked every time!

Unwrapped CaramelsBut the only “little one” I have around me these days is a Frenchie named Bartlet,

Bartland unwrapping caramels is near-impossible without opposable thumbs, unless you want caramels with drool and bite marks. Place an unwrapped caramel on top of each mini-pretzel. The recipe mentioned above called for chocolate mixed with coconut oil and vanilla, so I skipped that step by buying caramels that were coconut and vanilla flavored. Right?!?

Sea Salt Caramel Pretzel Bites Caramels on Pretzels

5. Place in oven and bake just until they soften. Now the original instructions said 7-8 minutes, JUST TO SOFTEN. But, I left mine in a bit too long (I swear I was watching them, but then I got distracted and…they over-melted. So I scrambled to put the caramel back onto the pretzel by taking a small knife and scooping it back up.

Sea Salt Caramel Pretzel Bites Over Melted Caramel

6. Quickly place a pecan 1/2 on each one. These look pretty messy because I was placing pecans and scooping up oozing caramel lava as I went along.

Sea Salt Caramel Bites Scooping Melted Caramel Over Pecan

If you melt them correctly, you won’t have this problem. Lightly sprinkle each with sea salt. Good thing sea salt is a thing right now, because I have this giant cannister full that will probably last me forever!

Sea Salt


7. While they cool, you melt the bag of chocolate in the microwave according to the directions. These are the bags of Wilton Candy Melts you can get at your local crafts store. They have many flavors and colors, but I happen to like my chocolate dark, especially when mixed with salted caramel.

Sea Salt Caramel Bites Wilton Candy Melts Dark Cocoa

I always use a heavy bowl and cook in the microwave on high, the first go round for 30 seconds, then take it out and stir.

Sea Salt Caramel Bites Melting Chocolate Disks

Then every 15 seconds until the chocolate is drippy and all the little disks are melted.

Sea Salt Caramel Bites Melting ChocolateDO NOT OVERCOOK. OR YOU WILL HAVE A BIG SCORCHED BLOCK OF CHOCOLATE.

8. I dipped the bottom of the cooled pretzel in the chocolate, then flipped them over on the parchment to let them dry.

Sea Salt Caramel Bites Dipping Base in Chocolate9. Once dry, I flipped them back over, reheated the chocolate just enough to melt,

Sea Salt Caramel Bites Drippy Chocolate

then drizzled it over the top,

Sea Salt Caramel Bites Drizzling with Chocolateadding a few holiday sprinkles.

Sea Salt Caramel Pretzel Bite DecoratedCoconut is optional as well.

Sea Salt Caramel Pretzel Bites by Country Design Home

10. Allow to dry, then store in the fridge or a cool, dry place. Like my family room. Because we don’t turn the heat past 55. Sweaters, folks!! Unless I’m sick, in which case I got to turn it up to 60-lol! Then you share the goodies with friends and family, because you can’t eat all of them yourself. Or could you….have a sweet Thursday everyone! Susan

Thanks, Black & Decker For My Big Finish!

Recently, I had heard of a contest sponsored by Black & Decker called Your Big Finish!

Black & Decker Your Big FinishTheir goal is to get America to finish what they started-“It’s All For Done…And Done For All”! You know all of those projects you have started along the way that are in different stages of completion…like my Hall of Shame...and my mom’s thrifty kitchen makeover? Well, those were not eligible because they are still (unbelievably) in the works. BUT, there is one finished project that I am super proud of…my HI! Rusty Bedspring Marquee Sign.

Rusty Bedspring Marquee SignSo I thought, sure why not enter it? Well, I did, and guess what? My mug is now plastered on a billboard in Times Square!

Black & Decker Times Square Billboard  Times SquareWhat?!?! Now, since I don’t live in NYC, I have no way of actually seeing my face in lights  (ugh, I hope it’s not high def so you can see all those wrinkles), but I am told that it is on the CNN billboard on the corner of 46th and 47th street. So, if anyone happens to be in Manhattan between now and December 27th, could you take a peek? Just look for the giant HI! that is rotating along with the 100’s of other featured projects. You can check out some of the others here (you’ll note that the Times Square featured projects have a little green street sign in the top right corner : )

Black & Decker Project Page

Like my friend Sarah, from Little Red Brick House’s beautiful Fireplace Makeover.

Little Red Brick House Fireplace MakeoverIn the meantime, if you would like to see the now famous Rusty Bedspring Marquee Light in person, it’s hanging in the shop at the Barn at Todd Farm. But right now it says JOY.

Joy Sign in the Barn at Todd FarmBecause that’s a little of what I am feeling right now : ) Thanks to Black & Decker for sponsoring this contest and allowing everyday folks the opportunity for their 15 minutes of fame. And for encouraging all of us procrastinators to finish what we started!! You, too can enter for the chance to have your photo plastered on a billboard in Times Square, but also for some great prizes like some new Black & Decker tools and a grand prize of $10,000!! (which I could then use to buy the new cordless drill that I have been coveting-Santa, are you reading this?!?) Have a great finish to your Friday everyone!! xoxo Susan

Vintage Ski Hat Rack & Wreath

Oftentimes, Coach will come home with stuff and my first reaction is, “not one more thing-don’t buy anything else!” And I stomp off to go find something to do while I stew about the fact that the barn is no closer to being my workshop than it was six months ago. Because it’s still full of stuff…no matter how much we sell, it never seems to get emptied. So after I get over it, I go back and look at the new stuff that he has brought home…sometimes right away, sometimes a few weeks or months later. Inevitably, I discover some new pieces that I can work with. Such is the project I shall name:

The Vintage Ski Hat Rack On The White Picket Fence With The Stove Burner Wreath. 

Vintage Ski Coat Rack

As with most of the items I refurbish, I have no clue where they came from. All I know is one day they just appear on the porch or the deck or the yard or the basement, where they remain until I decide what to do with them. So here is the story of The Vintage Ski Hat Rack On The White Picket Fence With The Stove Burner Wreath. At the barn last Sunday, one of the other vendors was admiring the skis that we had in our shop. He had recently created a coat rack from a large pair and instructed me on the how-to. So, since I had a white picket fence section (doesn’t everyone?),

Vintage Ski Hat Rack White Picket Fence
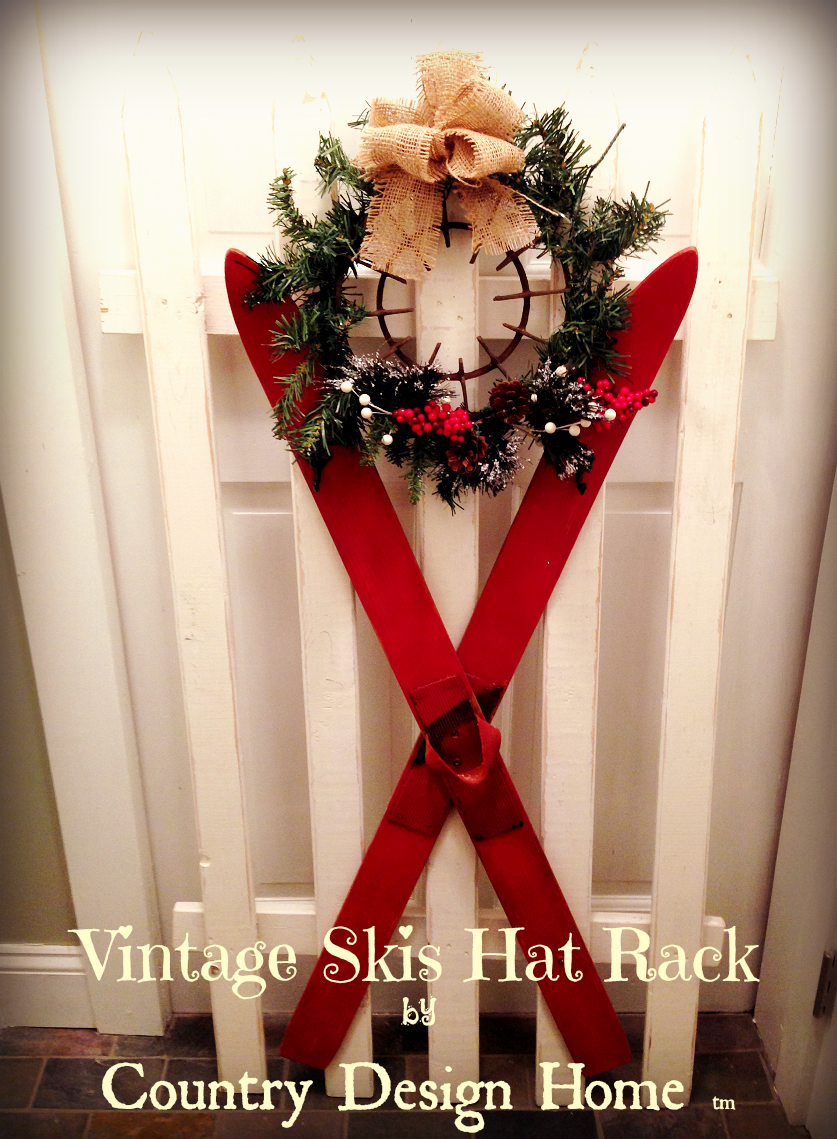
I decided to mount the skis on the fence to create a functional wall-hanging rack for caps. The skis are on the small side, so I supposed you could hang a kids jacket or two on it as well. Once I mounted the skis to the fence. I added the hooks.

Vintage Ski Hat Rack Hanging HooksBut it just looked so plain, so I decided to add the wreath.

Vintage Ski Hat Rack on Picket Fence by Country Design HomeSince I didn’t have a wreath form handy, I used the next best thing: an old rusty burner grill from a stove top. It’s round, it has little hooks for wrapping stuff around it…why not?

Rusty Stove Burner Grill

So I took some garland and wrapped it around the burner ring and secured with wire.

Wrapping Burner Grill with Greens for wreathThen I made a little garland with some berries and twigs and such and attached it to the bottom of the wreath with wire.

Wreath made from Burner Grill

Then I added a burlap bow to the top.

Burlap Bow for wreath

Then I hung it on the Vintage Ski Hat Rack On The White Picket Fence. 

Vintage Ski Coat Rack

Cute-right?! This will be at the shop at the Holiday Open House in the Barn at Todd Farm this weekend. Hope to see you there! Sue


Holiday Open House in the Barn @Todd Farm

As you might know if you regularly follow my blog, Coach and I, along with Lisa from RitaJo’sVintage,  have spent our summer and fall Sundays in the Barn at Todd Farm,

Barn at Todd Farm Postcard

a local antiques and flea market in Rowley, Massachusetts. Lots of 4:30 am Sunday mornings, hanging out with the roosters in dawn’s early light

Todd Farm Antique Truck at Dawnas we sleepily sold our wares to dealers and hipsters and Sunday shoppers searching for bargains and repurposed junque. The Todd Farm Flea Market

Todd Farm Flea Marketis split into two distinct areas: the outdoor fields, where hundreds of dealers spend their Sundays from March to November offering their treasures (at amazingly discounted prices) and the Barn at Todd Farm

Barn At Todd Farm Postcardwhich used to be primarily a junk storage facility, but is now home to various dealers and folks like us

Country Design Home in the Barn At Todd Farmwho love to recycle and refurbish furniture and collectibles. This weekend marks the 1st Annual Holiday Open House inside the Barn at Todd Farm. The barn itself is also split in two: the main barn, where our booth is located in an old dairy stall (sans cows)

Dairy Stall in the Barn at Todd Farmand the beautifully restored rustic annex

Inside the Barn at Todd Farmthat has been completely refurbished from floors to the rafters. The Holiday Open House will take place this Saturday and Sunday from 10-5 in the annex of the barn, featuring local vendors like JWrobel Studio

JWrobel in the Barn at Todd Farmand Special Guest Vendor: The Vintage Bazaar!

The Vintage Bazaar at the Barn At Todd FarmBut the vendors in the main part of the barn will all be there as well! Just wear your flannels because since apparently cows never needed heat, there isn’t any in the main part of the barn (other than our warm greetings, our JOY marquee sign and perhaps some hot spiced cider : )

Joy Rusted Bedspring Marquee SignSo bundle up and head on up to the Barn at Todd Farm Holiday Open House at 275 Main Street in Rowley.  Hope to see you all there! Susan

Candy Cane Mason Jars-DIY!

For the past couple of weeks, I have been spending lots of time working on Christmasy crafts in preparation for this weekend’s Holiday Open House at the Barn at Todd Farm. (Full details on Friday, but it is going to be fun, I promise : ). This Candy Cane Mason Jar

Candy Cane Mason Jar from Country Design Home
is one that I created last year and it was a big hit. Very simple and quick to make, it only requires a jar, masking tape, red and white paint and whatever holiday embellishments you may have hanging around. Here are the DIY instructions:

1. Clean and dry the mason jar to make sure there is no dirt or dust on the inside or outside.

2. Paint the jars an under color. In this case, these were home made red chalk paint, but you can start with white, since the stripes are the same size.

Candy Cane Mason Jars Painted Red Undercoat

3. Measure around the neck of the jar.

Candy Cane Mason Jar Measuring Neck
This one was 9 inches around the narrow part of the neck, which is where I was going to begin taping.

4. Mark off @ one inch intervals all the way around, depending on the width of the tape, which was one inch.

Candy Cane Mason Jar Measuring masking tape width


If you have different size tape, you need to figure out the math to make the stripes equidistant.

Candy Cane Mason Jar Measuring One Inch Intervals
5. Following those marks, start your tape at the rim and bring it down the jar to the base at an angle, depending on how much of a “swirl” you want to create.

Candy Cane Mason Jar Taped Jars

Make sure that you press the tape down firmly along the edges so you don’t get “bleeding” underneath. “Bleeding” is when the paint sneaks underneath the tape and creates little bits of color where you don’t want it to be.

Candy Cane Mason Jars Pressing Tape Edges
6. This is where you can change your stripes to be as fat or skinny as you would like. Just make sure you start at the top markings so the stripes are the same approximate width. They don’t have to be perfect, just close enough : )

7. Paint inside the taped stripes with the white paint, not too thickly, because you want it to be slightly transparent to allow the candlelight to shine through. On this jar I’m using Chroma Color by Cari Cucksey in a Crisp Linen White.

Candy Cane Mason Jar Painting White StripeThis is not chalk paint, but a very smooth finish latex that can be painted on any surface, then left with a shine or sanded down for a matte finish. One coat is all you need.

8. Allow the paint to dry completely.

9. Peel off the tape, and you are left with a striped candy cane mason jar…but, you’re not done yet! See all those little jaggedey edges? Those are the “bleeding” dots I was talking about. Very bad. They must go.

Candy Cane Mason Jar Tape Removed Striped

10. Take a piece of sandpaper and lightly sand the jar, exposing the raised lettering of the glass and smoothing out any rough areas and dots of paint that my have bled under the tape. The more you sand, the more rustic the jar appears and the more light shines through. Totally personal preference.

Candy Cane Mason Jar Sanding Edges

11. Decorate the neck of the jar. In this case, a bit of jute rope and some jingle bells completes the look.

Candy Cane Mason Jar Jute Rope Jingle Bells Decoration

12. When you light the votive inside the jar, it glows and shows off the mason jar raised glass lettering. The more you sand the more the light shines through. And there you have it, a pretty perfect Candy Cane Mason Jar to decorate your mantel or tabletop and light up your Christmas decor.

Candy Cane Mason Jar from Country Design Home

OK, back to my workshop to finish up for the weekend-I know how Santa’s elves must feel right about now : ) Have a sweet Thursday everyone! Susan

Easy No-Sew Fleece Tree Skirt

This past weekend, my company took part in a charity holiday tree decorating event. For the past couple of weeks my co-workers and I have been collecting ornaments and trimmings to decorate the perfect tree. Saturday morning, we met at the old school building to decorate our tree for the upcoming Festival of Trees.  And although we had enough decorations to trim not one, but two trees, we realized we had neglected to bring tree skirts! Even though that wasn’t required, the skirts give the trees a finished look that ours were lacking. So back home I went to see what I had handy in my fabric bin. I found this pretty piece of soft polar bear fleece

No Sew Fleece Tree Skirt Polar Bear Fleecewhich I thought would be perfect with the silver and white snowflake theme of tree #2. So I cut and knotted it and created a cute little skirt for the tree. Here is the HOW-I-DID-IT:

1. Fold the fleece in half lengthwise and make sure it is long enough to go around the base of the tree.

No Sew Fleece Tree Skirt Matched Edges2. Cut the unfolded end into a semi-circle, making sure the edges are even. I happen to have a round dining room table which was the perfect pattern, but you can just do the old pie plate method where you fold it in 1/2 and then cut an arc from corner to corner.

No Sew Fleece Tree Skirt Cut Circle Edges3. Starting at one end of the cut edges, cut strips of the fleece approximately 1 inch apart.

No Sew Tree Skirt Cutting FringeI typically measure these lengths to 5-6 inches, but this time I just used the scissors as my guide and did one cut to the end of the blades for each strip. The deeper the cuts, the longer the fringe.

No Sew Fleece Tree Skirt Cutting Scissors

4. Moving around the arc, you need to cheat in just a bit; the top of the cut will be a bit narrower than the edge.

5. Once the semi-circle is cut, you can start knotting. Take a top and bottom strip that match up.

No Sew Tree Skirt Fleece Matching StripsTie the ends into decorative knots I use a square knot, but you can do any type you like. I took pics of this, but their not very clear so check out this Animated Decorative Knots by Grog-any type of knot is illustrated here!

6. Knot all the way around the arc, creating the fringe effect, until you get to the other side.

No Sew Tree Skirt Fringed Edge7. Decision time! To have this skirt fit properly you can leave the folded edge as is and just drape it around the tree base to create a “blanketed” look like this. It reminds me of Linus’ blanket wrapped around Charlie Brown’s little tree.

Linus Blanket Around TreeOR you can cut a semi-circle in the middle of the folded half that is large enough to accommodate the tree base. This will allow the skirt to lay flatter on the floor. Either way is great and your holiday tree will look pretty and toasty warm.

8. Step back and admire your decorated tree : ) We did good, ladies!

No Sew Fleece Christmas Tree Skirt Logo

Total time for the skirt: 45 minutes. And, at this time of year the local craft stores stock an endless style and variety of fleece designs, so you can do anything from a jazzy zebra print to Star Wars to a Frozen theme. Have a warm and toasty Sunday everyone!! Susan

S’Mores Chocolate Pie Bites-YUM!

One of our  annual Thanksgiving family favorite desserts is chocolate cream pie. Over the years, I have baked many an apple, pumpkin or squash pie, only to see them get pushed aside in favor of the creamy-chocolate-graham-cracker-crust delight. This year, I made the chocolate pies (shhh, no one knows that I served one, but there is another one left in the fridge), but also created a new family favorite: S’Mores Chocolate Pie Bites!

S'Mores Chocolate Pie Bites from Country Design HomeThese yummy little clouds of toasty chocolate goodness were a fam favorite, and sure to become another traditional holiday treat! I originally saw these marshmallow melted cups transformed into shot glasses, but since this was a kid-friendly holiday, I decided to create the pie bites instead. Here is the How-I-Did-It:

These are quite simple to make and only require four key ingredients: Chocolate Pudding Mix… I used the Jello Cook and Serve Chocolate Fudge Pudding.

Jello Cook "n Serve Pudding

I was making the pies at the same time and planned to use the pudding as the filling, but you could certainly save some time and make the instant stuff.  Milk to make the pudding according to the box, Large Marshmallows…these Jet Puffed Marshmallows

Jet Puffed Marshmallowsare just that-large and fluffy. These misshapen sugary lumps were sent off to the land of misfit marshmallows.

S'Mores Pie Bites Misshapen MarshmallowsI figured if they weren’t straight before I toasted them, they would become melted molten messes once the heat hit them. Saving them for some hot cocoa action : )

 Keebler Graham Cracker Crumbs…

Keebler Graham Cracker Crumbsyou can make your own crumbs, but I happened to have these already crushed and ready to go. OK, ready?

1.Toast the marshmallows. If you are lucky enough to live in a part of the country where freezing cold weather is not a factor, then do this outside on your firepit or campfire. We, unfortunately, had quite a snow fall on the day I was making these, so the stove top burner it was. Mine is a glass topped burner, so I just cranked it to high.

S'Mores Pie Bites Hot BurnerWARNING!!!! Do NOT TOUCH THE HOT BURNER. THIS IS NOT A KID’S PROJECT. DO NOT ATTEMPT TO DO THIS AFTER HAVING A WEE BIT TOO MCUH SPIKED CIDER… THIS IS DANGEROUS!!!!

2. Spear the marshmallow with whatever implement you wish to use. I tried a single metal skewer but the marshmallow kept turning as the inside melted. This three-tined fork was the perfect length and the tines created heating holes that caused the inside of the marshmallow to melt more evenly.

S'Mores Pie Bites Three Tined Fork

Now, don’t ask me why, but the fork handle never got hot to the touch. Which was interesting, because the hot glow from the burner on HIGH made me feel like I was under a sun lamp!

3. Starting with the bottom, hold the marshmallow over your heat source approximately 1-2 inches above the surface.

S'Mores Pie Bites Holding Marshmallow Over Heat

DO NOT TOUCH THE BURNER. Hold it there until you see a light smoking from the marshmallow, this means the sugar is starting to melt. Time to turn the marshmallow. Look at that-a thing of golden sugary beauty!

S'Mores Pie Bites Golden Toasted Marshmallow Bottom

4. Repeat around the sides, turning when you see the pale smoke trail as you lightly brown each side until the entire marshmallow,

S'Mores Pie Bites Toasted Marshmallow Sidesexcept the top,  is a light golden brown.

…this is what happens when Coach distracts you and asks a question about the upcoming Holiday Fair in the Barn at Todd Farm.

S'Mores Pie Bites Flaming Marshmallow

5. Remove the marshmallow from your fork using another implement- DO NOT USE YOUR FINGER!! The interior of the marshmallow is HOT and melty.

S'Mores Pie Bites Removing Marshmallow From Fork

6. Place toasted marshmallow on foil to cool.  Not wax paper, that will melt. And then you’ll have a S’Mores Pie Waxed Paper Bites. As they cool, you will notice that the marshmallow centers begin to implode, but the toasted exteriors stay upright. The hot melted middles sink down, creating the cup vessel you will need to hold the pudding. So cool!!

S'Mores Pie Bites Sunken Middles

7. Make your pudding according to the instructions on the box. This is the cook-‘n serve style, so it takes a few minutes cooking in a sauce pan to get to the molten lava stage.

S'Mores Pie Bites Molten Pudding in Pan

8. Using a teaspoon, fill the toasted marshmallow cups to the top (each one will take about a teaspoon of pudding). I was a bit worried that the hot pudding would disintegrate the marshmallow cups, but they were little toasty troopers and stood up fine.

S'Mores Pie Bites Filling Marshmallow Cups with Pudding

9. Immediately sprinkle with the graham cracker crumbs. This is a sprinkle-as-you-go project…you have to add the crumbs to each one after you fill them.

S'Mores Pie Bites with Graham Cracker Crumbs

If you wait until the pudding has cooled, the crumbs will just fall off. And you cannot have a S’Mores Chocolate Pie Bite without graham cracker crumbs!

10. Cool in fridge. An hour or so should do, since each S’Mores Chocolate Pie Bite only holds about a teaspoon of pudding.

S'Mores Pie Bites Cooling in Fridge11. Arrange on pretty platter and serve. The best part is no serving implements required, just pick up with your fingers and enjoy!

S'Mores Chocolate Pie Bites from Country Design Home

I hope you all had a lovely Thanksgiving that you shared with family and friends. Now it’s time to go continue with the kitchen clean-up…hope you’re planning s’more fun today! Susan

PS: If you like this blog post and would like to receive emails containing my awesome inspired designs and DIY’s, please add your email to the subscribe button in the column on the right! We promise, we don’t use your emails for anything other than messages from me! Thanks!

Rusty Bedspring Coil Votive Holder-DIY!

What do you do when you have not one, but two giant, antique, rusty bedspring frames? Well, the first one you transform into a large marquee sign for your shop,

Rusty Bedspring Marquee Sign

and the second one you mull over for awhile until you come up with a bright solution. So, without further ado, I’m introducing the

Rusty Bedspring Coil Votive Candle Holder!

Rusty Bedspring Coil Votive Candle Holder Country Design Home

Now, I have spotted many a rusty bedspring photo with a votive tucked underneath, but I wanted to take it up a notch by adding a second rustic element: the birch log slice. This elevates the rusty bedspring into a lovely woodland mantel decoration, does it not? Here’s the how I did it:

1. Get Coach to drag out the rusty bedspring frame from behind the fence where it had been weathering over the summer.

Vintage Rusty Bedspring Frame with Coils

Have Coach cut off all the rusty bedspring coils during your freezing cold yard sale. Watch the pile ( of coils and $$$) grow.

Rusty bedspring coils in box

2. Assemble your ingredients: A rusty bedspring coil (well, you know where I got these, and I have a ton more if you need one!), a birch log slice (this one I got at Michaels for $6.99 using  a 50% off coupon, but you could certainly go into the woods and grab a log or two and slice ’em up), a votive candle-whatever style you choose as long as it fits in the bottom of the ring

Rusty Bedspring Coil ingredients

and a small clamp and screw (these I had kicking around the workshop-but if you need to purchase one, they’re in the plumbing aisle at your local hardware store. And they don’t need to be old and rusty, they’re not going to show anyway.)

Small Clamp for Hinged Coil Spring Votive Holder

3. Place your rusty bedspring coil on the log slice and arrange in a pleasing manner. These springs are not exactly round, but neither are the log slices, so its a win-win. In this case, I kind of liked the little coiled knot in the front, but you could certainly turn that to the clamp side, or the rear of this rustic piece of art.

Rusty Bedspring Coil in place

3. Attach the rusty coil to the log slice with the clamp assuring that you hold the clamp securely in place with the coil underneath the arched part-this will create a hinge effect.

Attaching Rusty Bedspring to Log Slice clamped

Now, this can be a bit tricky, because in order to attach the screw properly, you need to hold it at a 90 degree angle while you push down. So, just use the spring as a “tunnel” and go right down the middle. Remember, its a spring, so you can push it down to get a better grip on your screwdriver.

Attaching rusty bedspring coil to log slice

4. Test out your mechanism by slowly lifting the coil away from the log slice and you will immediately see the simple brilliance of this design! You’ll note that the coil does not slide off the log, thereby creating a safe cage for your votive to sit inside. So, in the event that somehow your rusty bedspring coil votive holder gets knocked over while the candle is burning inside, the rusty coil and the votive stay firmly in place : )

Lifting Hinge of Coiled Bedspring Votive Holder

5.  Decorate your holiday mantel with your new rusty bedspring coil votive candle holder and wait for the compliments! So, there you have it. A simple, quick and easy project that costs under $4 (assuming that you have a box full of rusty bedspring coils).

Rusty Bedspring Coil Votive Candle Holder Country Design Home

Now you’ll have to excuse my while I go slice up one of my precious birch logs and make a few more of these. I see many potential Christmas gifts in the works! Hope you have a sunny Sunday everyone, Susan