Vintage Butcher Block Table

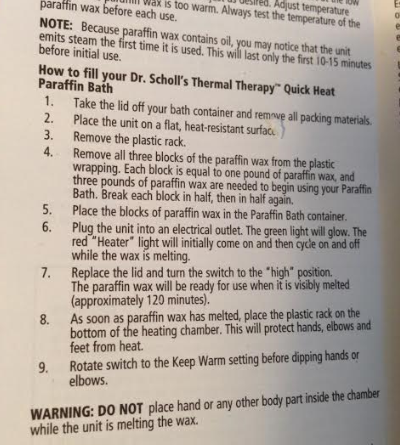
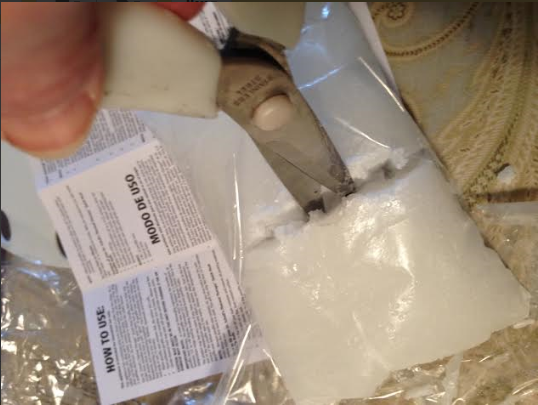
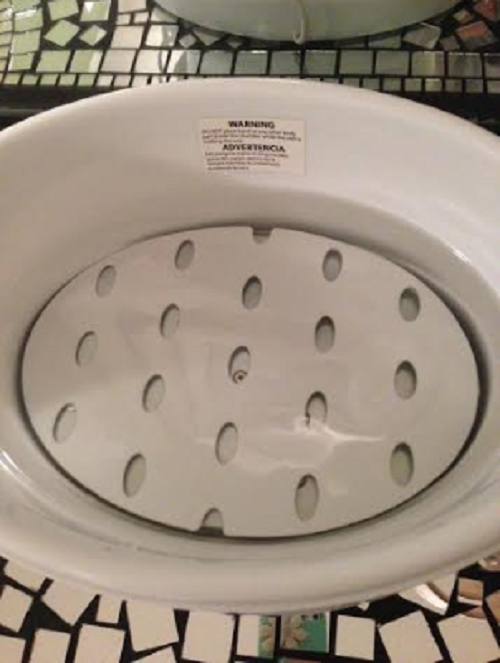
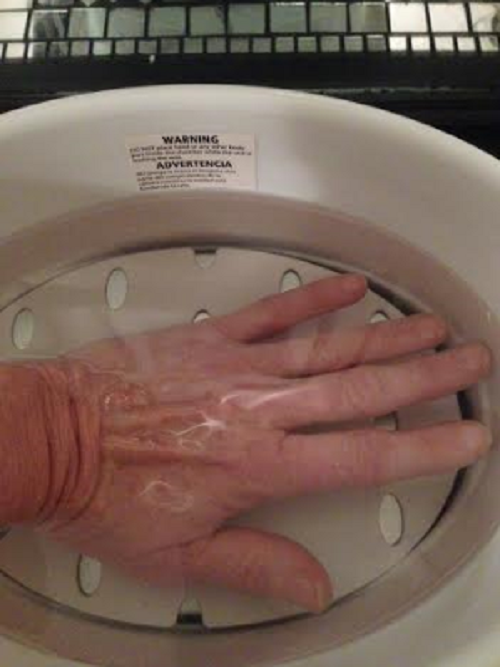
Yet another DIY project to share. This butcher block table was actually in two pieces-the bottom had been kicking around the barn loft for the past 15-20 years, and the top was a throw-away Coach picked up over the summer at a yard sale.

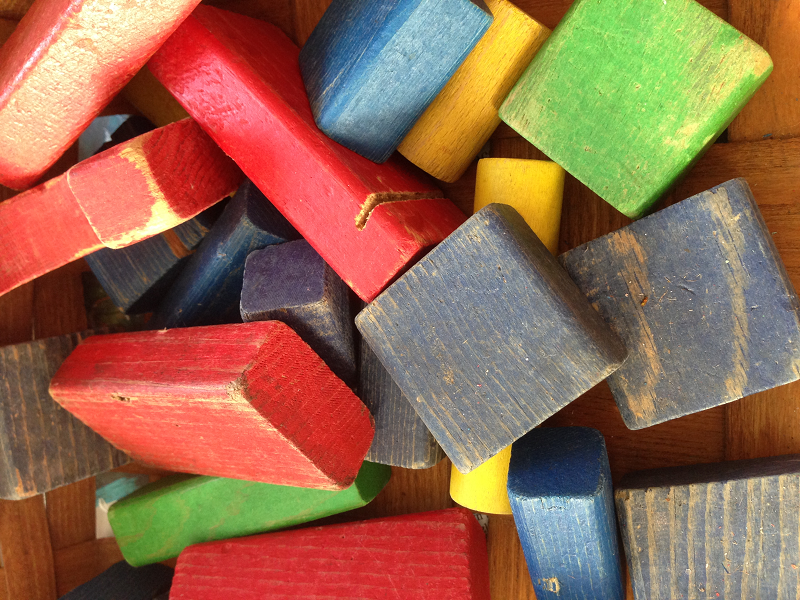
The bottom looked like this:

Butcher Block Base Before

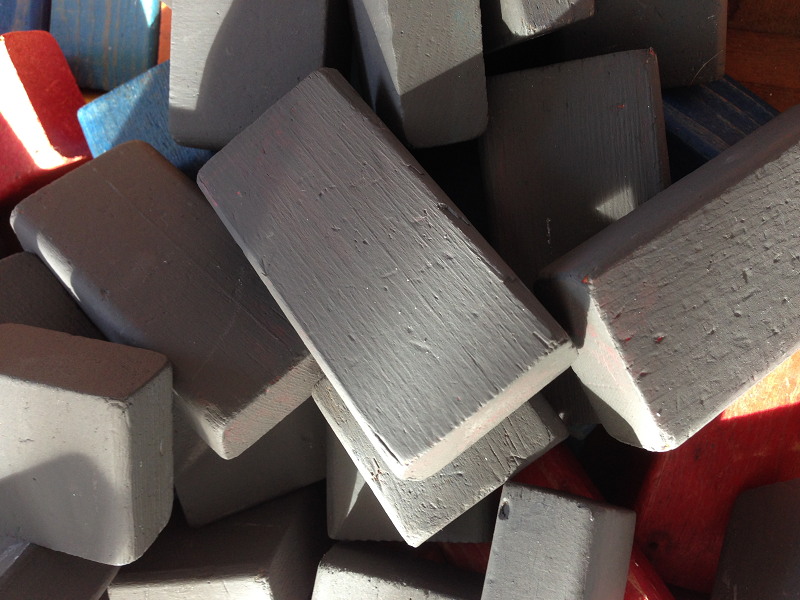
The top looked like this:

Butcher Block Top Before

And now the whole piece looks like this!

Finished Butcher Block Table CDH LOGO

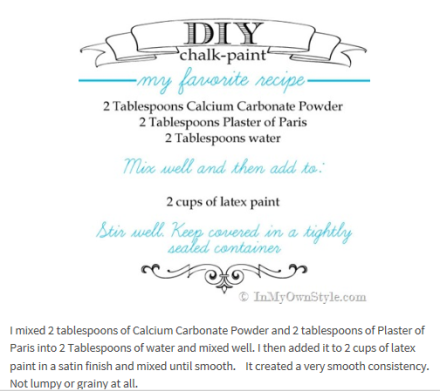
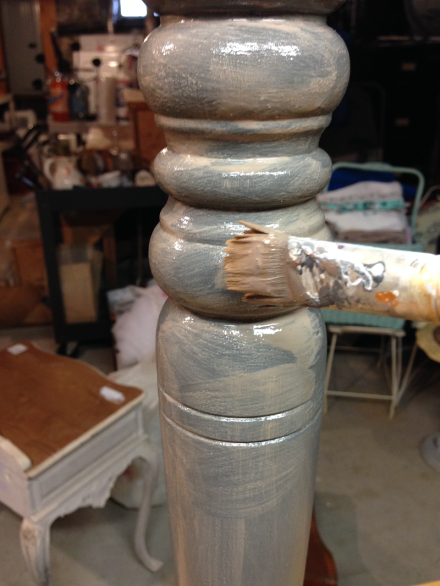
I started with the base, painting it in my favorite dark charcoal gray home-made chalk-like paint.

CDH Parisiian Gray Paint

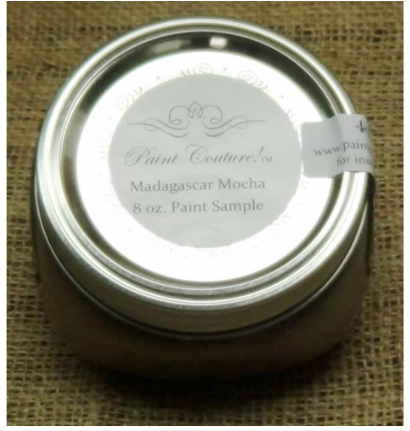
You can find that recipe here. Then I sanded down the edges, added a glaze finish with Martha Stewart Antique Glaze  mixed with Madagascar Mocha Couture Paint.

Paint Couture Madagascar Mocha

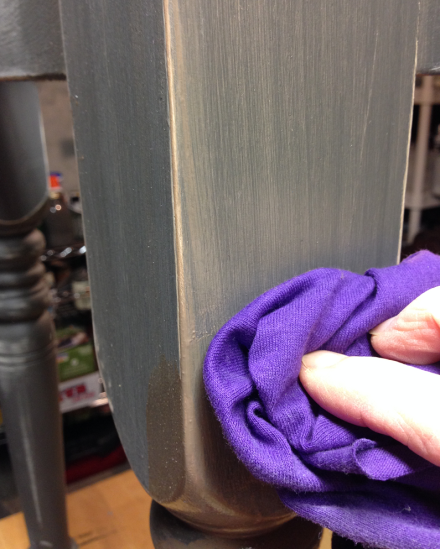
The glazing technique is so simple: Mix the glaze and paint together, paint it on your piece,

Martha Stewart Glaze painting on

then wipe it off where you don’t want it.

Martha Stewart Glaze wiping off

Allowed the entire base to dry. Finished with a coat of Fidde’s Soft Wax, which gives it a nice glowing finish.

Sanded and Glazed Leg

The top required a bit more elbow grease and some heavy implements.

Butcher Block Top Distressed

I wanted to rough it up just a bit to give it a more “antiqued” appearance, but since there will be food prep on it, I didn’t want it to be so rustic as to have holes in it where food could get caught!

Butcher Block Distressing Tools
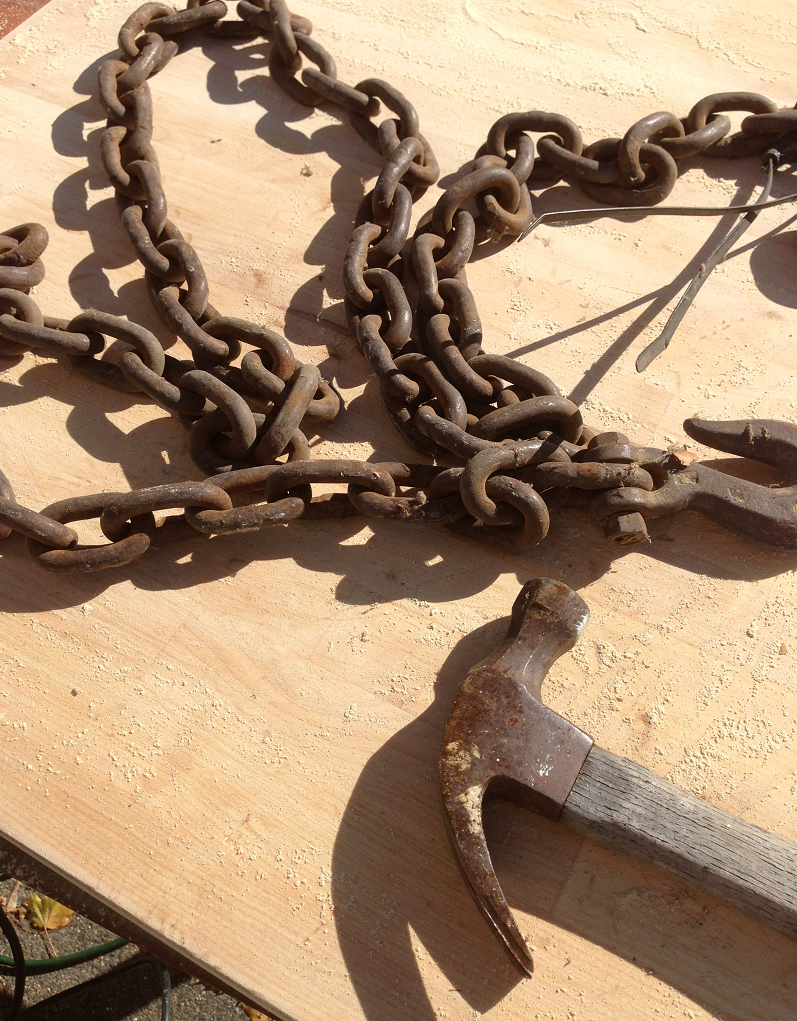
Used a chain, a hammer and a screwdriver and just banged it around a bit. (I wonder why my hands are so cracked and bleeding…) Since I wanted this to be a food safe butcher block top, but also wanted a shade or two darker, I attempted a technique I had found online: staining with brewed coffee grounds.

Staining with Coffee Grounds

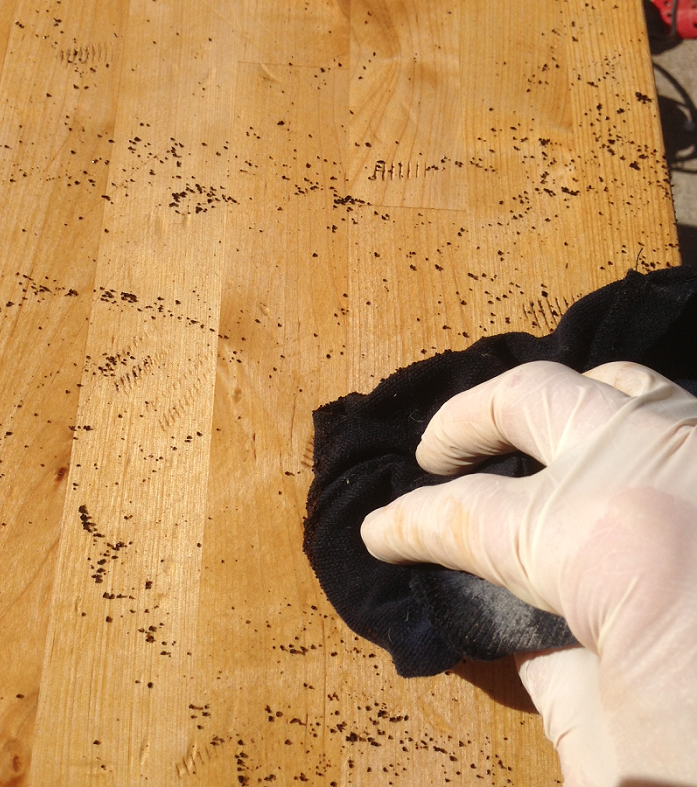
Really didn’t work out too well, but it smelled great! The butcher block top is finished with Howard Butcher Block Conditioner. This is a product that I picked up at Home Depot -its FDA food safe-perfect!

Howard Butcher Block Conditioner

To secure the top to the base, I used some old black iron decorative brackets Coach got from somewhere…(seems to be a recurrent theme, right? I tell him what I need, he finds it.)

Ornamental Brackets

The brackets were a little too black and “new-looking”, even though they are pretty old, so I sprayed them with Rustoleum Gray gloss paint,

Rustoleum Gray Painters Touch

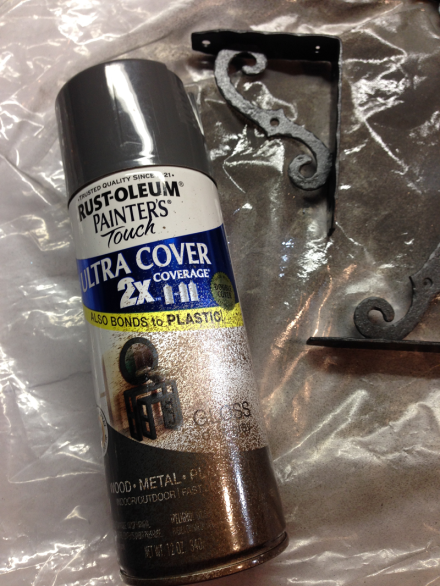
but that was a bit too shiny, so I resprayed them with Rustoelum soft flat iron black spray paint.

Rustoleum Metallic Paint for Brackets

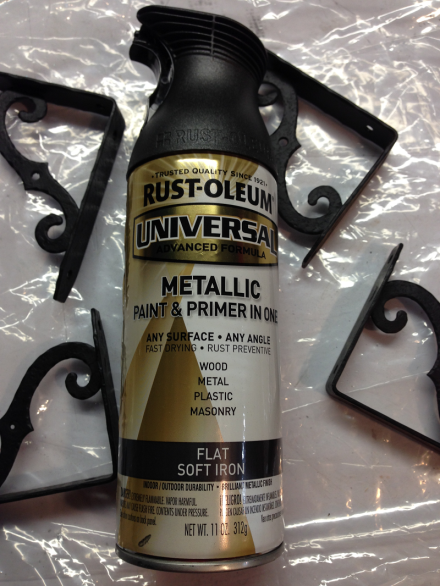
to complement the antiqued gray base color. I found that the simplest way to attach the top to the base was to place it on top, measured the four corners to ensure they were evenly spaced,

Measuring corners

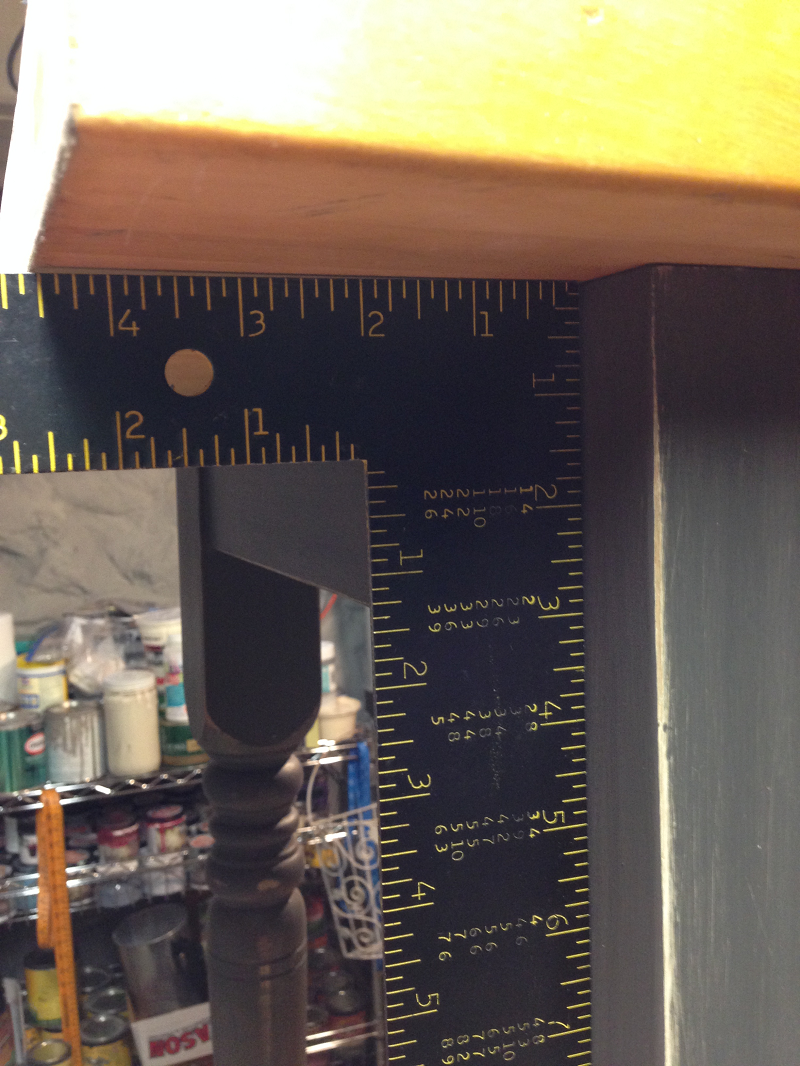
marked the holes with a sharpie, (apologies for the blurry pic-too much leftover coffee, perhaps?)

Marking holes for drilling
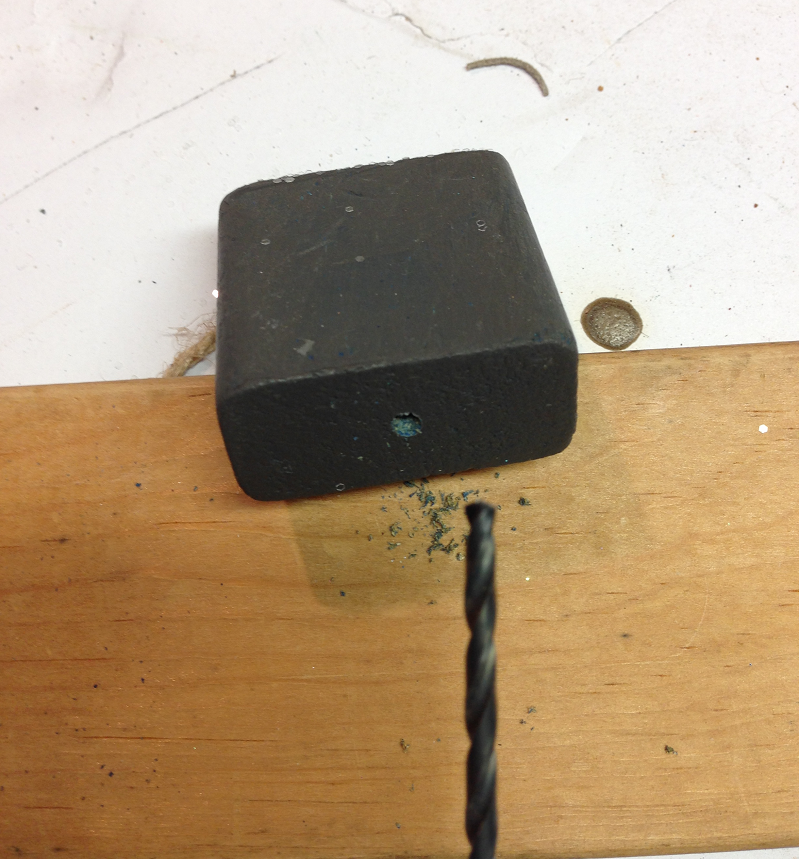
then drilled starter holes for the screws,

Predrilling holes for bracketsflipped the top upside down and secured the brackets to the underside of the top.

Brackets affixed to bottom of butcher block top

Slipped the top back onto the base and secured it with screws. For the embellishments, I added this cool, rustic, vintage, winged front piece to be used as a towel or utensil hanger.

Bracket on front of Butcher Block

I am told it was the handle to an old wood planer. These side pieces

Butcher Block Hooks

are old window lock parts.

Butcher Block Side Ring Hangers

Perfect for hanging a pot or pan with an “s” hook. Old wooden rulers are kind of a thing right now, so I added one from “A.J. Wilkinson, The Oldest Hardware Company in Boston” across the front (perfect for measuring out dough!) and secured it with some rustic corner brackets to give it industrial “old general store” kind of vibe. Then I rubbed that with the Howard Butcher Block Conditioning to finish it.

Butcher Block Ruler and Corner BracketsDone and ready for some butchering, or pie-making, or whatever. But it won’t be in my kitchen, or my daughter’s (sorry, Kate-I promise I will make you another one), because it was sold this past weekend at the Vintage Thymes Monthly Market-yay! And, if you are in the market for an old wooden ruler, drop me a line. Since I mentioned to Coach that I needed a few, he’s been on the lookout, and now I have an immeasurable amount to choose from!

Rulers

Have a “block-buster” Tuesday everyone! Susan

Wax On, Wax Off

Winter. Cold outside. Cold inside. (with oil at $3.99 per gallon, our home doesn’t reach much higher than 62 degrees-EVER). Forced hot air furnace. Dry. Dusty. Dry. I am continually washing my hands, both at work (in the medical field, sterile is key) and at home. All of the painting, sanding, cleaning and woodworking I am doing has left my hands incredibly cracked and painful and bloody.

Cracked, Dy and Bleeding HandThe other day I looked down and saw the hands of a longshoreman, not a creative DIY blogger! I have tried all kinds of creams and potions and lotions and goops, but nothing has any lasting effects that have soothed my aching and crackling digits. So, I went on Amazon.com and ordered a Dr. Scholl’s for Her (I am not sure why guys can’t use this…) Quick Heat Thermal Therapy Paraffin Bath.

Dr. Scholls Bath and Supplies

Only took a couple of days to get here, and I was anxious to give it a try. The kit, for $29.95 came complete with the unit that has adjustable heat settings, 3 pounds of scented paraffin wax, 2 thermal mitts & 30 plastic glove liners. Now, one word of caution: the included paraffin was very heavily scented. so if you have allergies, this may not be the one for you! Once it was plugged in and warming up, the entire upstairs of our home had the strong scent of orchids. Which kind of made me feel like I was in Hawaii…OK, well, maybe not. But be forewarned. Unpacked the unit, followed the basic instructions.

Dr. Scholls Instructions

Placed it on a flat surface. I would also say that you need to place it somewhere where a little splattering wax won’t harm the surface. The three pounds of wax were packaged in three separately sealed bags.

Dr. Scholls Paraffin in Bag

The instructions were to open each one, then break the wax brick into quarters. Really?! Unless you are the Incredible Hulk

The Incredible Hulk Mitts(and he wouldn’t be using this anyway because it’s for HER), I don’t see how this is possible without some sort of large, sharp implement. In this case, some old, heavy Fiskar shears did the trick-don’t use your good scissors unless you want them to be waxed and slippery!

Waxed ScissorsI used the stab and split method.

Paraffin Bath Wax CuttingPlaced the wax pieces into the unit and turned it to high. The red light indicates it is heating.

Dr. Scholls Paraffin Bath LightsThere is also a flat plastic plate with holes in it that is to rest inside on the bottom of the unit once the wax is melted. This is clearly to keep you from resting your hands on the hot elements. Smart move, Dr. Scholl.

Bottom Surface PlateNow, I realize that the name on the box says “Quick Heat Paraffin Bath“, but if you were in a hurry to smooth your rough edges before a night on the town, I’m afraid you would be sorely disappointed. The warming time is 2 hours! (the instructions say 120 minutes, I think to throw you off, but I can do the math…) So I plugged it in and went off to do more stuff in my workshop and get ready for the football game, which I determined would coincide with the precise melting point time. Fast forward…green light on…dipping time! You place your hand into the warm pretty hot wax, fingers slightly apart, dipping for just a couple of seconds, then pulling your hand out.

Dipping hand in wax bathWait a few seconds until the wax starts to harden, then dip again, each time adding another coat of wax to your hand. They recommended 5 coats, and that was just about right to create a waxy, sealed glove.

Re-dipping to for wax glove

Placed my hand in one of the baggies,

Plastic bag covering wax

then donned the terry mitt.

One Mitt OnClearly, at this point, I could not longer take pics, so I came downstairs at the start of the game and asked Coach to help me out. He had no clue why I was wearing pastel blue oven mitts, nor why I was asking him to take my photo-lol!

Mitts onDuring the first quarter, the wax slowly cooled off (as did the Colts), so after approx. 15 minutes I removed the mitts and the plastic baggies to uncover this-

Waxed hand afterthe wax had cooled but stayed somewhat soft, so I pulled that off too and I was left with a baggie full of cooled wax.

Remainder Wax After The instructions recommend discarding the wax, (you know, germs and all) but I figured, since I am the only one using it, why not recycle? What was left on my hands was a layer of lotion that I then massaged into my hands, per the instructions. Which felt great, but the scent was still quite heavy, so I ended up washing them a couple of times and then creaming them up.

Hand after wax bath

The verdict? Overall, I love this Dr. Scholl’s paraffin bath! My hands felt instantly smoother and less cracked and my knuckles were less achy too! For the time being, I am planning on making this a nightly ritual until my hands start looking less like a lumberjack’s, or until the warm weather arrives, whichever comes first. However, I am planning on purchasing some new, unscented wax to replace the orchids-if I can’t be in Hawaii, then I don’t want to be reminded of tropical breezes while the wind is howling outside here in New England.

Holiday Palm Trees

Hopefully it’s warm where you are, and just remember to do a bit of pampering for yourself today…Susan

Love you , mom.

This is a quick aside from my typical DIY blogging kind of posts. Today I receive a Facebook notification that my son had posted this video on my news feed along with the comment“oh, man this. I LOVE YOU MOM”  Just watch this Sochi 2014 video from Proctor & Gamble. If you have ever been a mom, or hope to be one, or had an awesome one who picked you up, wiped you off, cleaned you up, cheered you on, iced you down, hugged you in victory, held you & kissed your tears away in defeat, then this is meant for you.

Sochi 2014 Proctor & Gamble

http://mashable.com/2014/01/06/sochi-moms-ad/?utm_cid=mash-com-fb-main-link

PS: LOVE YOU TOO SON

143mom

Sweet & Easy Sopapillas

Here is a recipe for a simple and sweet dessert-Sopapillas!

Sweet 'n Easy Sopapillas Framed

These are a traditional Mexican dessert typically made with dough, but we are skipping the rising dough part and using store-bought flour tortillas instead. Perfect for a quick sweet treat, dessert or brunch. They only take about 30 minutes from start to finish, and require just a few ingredients you would most likely have in your pantry. Here is the how-to-do-it:

1.Ingredients you will need: Vegetable Oil, Honey, Sugar and Cinnamon, 6 inch Flour Tortillas.

Sopapilla Ingredients

2. Preheat oven to 400 degrees. Cut 6 inch flour tortillas into quarters. Set aside.

Sopapilla Tortilla Triangles

3. Heat oil in skillet on medium-high heat until at “water sizzling” temp. (This is when you drop a tiny bit of water into the hot oil and it bubbles and sizzles.)  Don’t overheat as you will burn the oil and the Sopapillas!

Sopapilla Oil in Pan

4. Drop the tortilla quarters into the hot pan, one at a time and not overlapping. Cook until lightly browned on the bottom. This only takes about 15 seconds so watch carefully!! Flip over and brown the other side. They will puff up in the middle too, similar to a piece of fried dough.

Sopapilla Golden Brown

5. Once golden brown, remove from heat with tongs (careful, this is hot stuff!)

Sopapilla Using Tongs

or slotted spatula and place on paper towel to drain.

Sopapilla Draining on Paper Towel

Once drained, place all of the chips into a large roasting pan.

Sopapilla In Roasting Pan

6. Once all of the tortillas are done and in the roasting pan, melt a stick of butter in a clean skillet.

Sopapilla Melting Butter for Topping

Add 1 TBLSP of honey and 2 tsp. cinnamon and sugar mix and stir just until melted and mixed. Do not overcook!

Sopapilla Butter & Honey Topping

7. Drizzle the honey butter mixture over the tortilla chips in the pan.

Sopapilla Drizzling Honey Mixture

Toss to coat thoroughly.

Tossing Sopapilla in Pan with Topping

Place in 400 degree oven for 10 minutes, tossing mid-way through, just until warmed and all the pieces are coated.

8. Remove from oven and sprinkle with additional sugar and cinnamon to desired taste.

Sopapilla Sugar and Cinnamon Topping

You can also sprinkle with a dusting of sifted confectioner’s sugar.

Sopapilla Sprinkled with Confectioners Sugar

9. Cool slightly and serve with drizzled honey or caramel sauce.

Sopapilla Drizzled with Caramel Sauce

Of course, serve them plain as well,  but I usually have a jar of Hot Fudge and Caramel Sauce in my fridge (in case of a sweet tooth emergency : )

Sopapillas with Hot fudge and Caramel Sauce

A quick, delish dessert for little $$ and time. Perfect for a light dessert. Hope you all had a sweet weekend… Susan

PS: I have a very sweet announcement to kick off the New Year! Check back 12/31 for details…

Snowflakes and Sopapillas

In the weeks leading up to Christmas, I was finishing one project after another in record time, but with no time to actually blog about them! Snowflake Blocks and Sopapillas+++ were two of my favorite projects. The blocks were a fun DIY project I had seen on The Cottage Market Blog. The Sopapillas were a yummy treat! But blocks first before dessert. This past summer Coach had dug up a basket full of old kids’ wooden building blocks.

Blocks Before

They were pretty dirty and looked like they may have had more than a few knock-downs. After a thorough cleaning with some bleach and soap, I came up with a new purpose: snowflake blocks! Each one hand-painted, no two alike-they are snowflakes, after all. But easy enough for even a novice painter to try. They are small, portable and stackable, perfect for a windowsill or mantel. Oh, and you can add some twine and make them into ornaments or gift tags. Here is the how-I-did-it:

1.Found some pen and ink style snowflakes online. The Graphic Fairy  supplied the images, thank you very much.

Black Chevron Black Squares

BLack HexagonsBlue Star

2. Painted the blocks with two coats of the base color.

CDH Paris Grey Paint

My choice was a deep grey that I have made into a chalk-like paint using some flat latex paint. I discovered the recipe on a blog called “In My Own Style”. You can transform any can of paint into a matte, chalk-like finish. Recipe here:

DIY Chalk Paint from In My Own Style

3. I printed out pen and ink snowflakes of various shapes and styles onto regular printer paper. Cut them each out so they were the size of the blocks.

Printed Snowflake Pattern

4. Using my chalk-it-up technique, I rubbed the chalk all over the back of the snowflake prints.

Chalking the pattern

Then placed the snowflake pattern on the block, chalked side down. Drew along the lines with a pen using a little pressure.

Drawing over Chalk pattern

5. Lifted the paper pattern to reveal the chalk outline image.

Chalk Pattern on Block

6. Followed along the line images with a small paintbrush and paints of various colors. I used a #3 which is pretty fine. The finer the brush tips, the thinner the lines, the more delicate the snowflake. I was going for a pastel look so it was white and pastel blues.

Snowflake Block Painting Lines

7. For the dots, I simply used the other end of the paint brush, dipping the tip into the paint

Dipping Paintbrush end in paint

and then dotting it wherever I wanted a dimensional dot along the lines.

Adding Paint Drops to Snowflake Outlines

8. After they were dried, first I coated them with the matte finish Decou-page and allowed to try. Then I added a bit of glitter by dotting the snowflakes with Americana Decoupage

Americana Decou-Page

and then shaking on the glitter. Allowed to dry. Cute!

Snowflake Blocks

9. For the oblong blocks, I painted over the grey with some pastel aqua, then added the snowflakes. For the words, I initially attempted to hand paint them, but that was a big FAIL. Nothing worse than attempting to paint something very fine when you are stressed and hurried. So I used some adhesive scrapbooking stickers that said HOPE, FAITH, JOY, etc. I affixed them, then added a coat of matte varnish to the entire block.

Snowflake Blocks HOPE JOY SNOW

10. For the ornaments/tags, I drilled a small hole in the tops of the snowflakes,

Snowflake Block Drilling Hole

then added a drop of hot glue.

Snowflake Block Hot Glue

Using a pencil tip, I inserted the ends of a cut piece of twine into the hole. Allowed to dry.

Snowflake Block Pencil Pushing

11. For a finishing touch, I brushed the tops of the blocks with the Americana Decou-page glue,

Snowflake Block Glueing Glitter

then sprinkled them with some colored glitter. Instant bling!

Snowflake Block Glitter on Top

The finished blocks looked great as tags for the Jelly Jar Soy Candles I presented as gifts this holiday season.

Snowflake Blocks with Candles.png

So if you have some old blocks laying around, or anything you can cut into blocks, this is an easy-peasy project (even for kids!) that will add some sparkle to your winter landscape. Hope you are all finally recovering from the crazy holiday week! Susan 

+++Oh, right, I was supposed to give you a recipe for Sopapillas too! Well, that project will have to wait another day : )

Rustic Wooden Wreath

Ok, so I realize that most of you don’t have an old small green barrel hanging around in your barn, but you could definitely re-use or recycle any other type of old wood like shutter slats, shims or lathing to create this rustic wooden wreath.

Country Wreath on Door PM

This is my kind of greenery-the kind that will last forever-despite my desperate lack of a green thumb. Case in point: this woeful poinsettia has been in my house for just a few days…

Dead Poinsettia This small barrel was in pieces, and short of tossing it in the trash, I needed to come up with some useful way to use the wood.

Old Barrel Staves for Wreath

Since it was green anyway, I figured “what the heck, I’ll make a wreath!” Here’s the how I did it:

1. The iron ring that was holding the barrel together (until it wasn’t holding the barrel together) was the perfect circular form for the wreath base. The staves had little slits at the bottom that the ring fit into. I laid them out in the circle pattern that I liked.

Barrel Staves with Wire Hoop

2. Used my trusty electric stapler to secure the ring into the slots all the way around on the back side of the wreath to form the circle.

Wreath Fixation with Staples

3. Filled in the slits with hot glue all the way around, securing the iron ring into place in the slits. If your wood pieces don’t have slits, just glue into place.

Barrel Stave Wreath Adding Glue to Slots

4. To neaten the appearance, I cut small pieces of black foam core board and glued them into place over the glue-filled slits.

Barrel Wreath Fiberboard Backing

5. Since the wood pieces did not entirely cover the iron ring, I needed something to cover the gaps. Cut some burlap into small pieces and knotted in between each stave all the way around.

Barrel Wreath Burlap Bows

6. Created a bow with some more burlap cut into strips, along with a swag of greens and bright red berries to contrast the green wood.

Rustic Wreath Burlap Bow

7. Added a wire ring on the back for hanging.

Rustic Wreath Wire Hanger

8. Hung the wreath on the front door. Took a photo of the wreath on my front door.

Country Wreath on Door PM

Took the wreath to the Vintage Thymes Market, sadly leaving my front door blank. Sold the wreath at the market.

Barrel Wreath At Vintage Thymes Market PMNow I have to make a new wreath. Sigh. Susan

Country Christmas Santa-scape

This holiday season has been flying by! So much to do, so little time. Because I had been spending so much time decorating my booth for the Christmas market,

Cupboard Stocked Open DoorsI have not had much of a chance to decorate my own home for Christmas! So what I am doing, I am doing in bits and pieces. Open a storage bin, pull out some stuff, set it up-decorating on the fly. Tablescapes are a quick, simple way to add some holiday cheer to a tabletop, cupboard or hutch. The trick is in the layering. This is my little storage cupboard in the kitchen. Before…

Red Hutch Before

After…

Jingle All The Way Tablescape

Here is the how-I-did-it: Started with a base. In this case, a white sparkly runner from HomeGoods to brighten up the top of the cabinet, which is dark red.

White Snowflake Runner on tablescape

Added a backdrop. I had this aged, chippy piece of wood (I believe it is an old cabinet door, sans cabinet, so I painted the raised panels with chalkboard paint so I can write whatever I want, depending on the season or holiday.) I just stood it up against the wall, no need to hang it.

Santa Tablescape Door BackgroundAdded the swag-this sparkling BELIEVE sign on a jute rope was the perfect size to hang from each corner.

Santa Tablescape Believe SignNext comes the plant or flower. I like to have something flowering on one side and then a candle or lantern on the opposite side to create a full vignette with the background. The heights don’t need to be the exact same size, but you should have some balance between the two sides. In this one, I used a poinsettia in an old raspberry jam bucket we picked up at a consignment shop over the summer. Loving the bright red colors!

Raspberry Pail with Poinsettia

Added an old Santa and the red lantern on the opposite side, which provides the height and color balance I was looking for.

Santa Tablescape Santa and LanternPlaced the reindeer next to the poinsettia in the bucket.

Rustic ReindeerSince I was going with a Santa-themed vignette, I decided to write some fun Christmas lyrics on my chalk board. Very simple process: go to Avery.com and find whatever size template fits the space you are going to write on with chalk (in this case, I used an 81/2 x 11) Choose your words, choose your font and print. (My printer is just about out of ink, so the print was very faint, but I only needed the outline so no worries there!)

Santa Tablescape Tracing DesignFlip over the paper to the reverse side and “chalk it up” rubbing the entire paper with the side of a piece of chalk.

Santa Tablescape Chalking Paper DesignFlip it over, tape to the chalkboard, then trace the edges of your design with a pencil.

Santa Tablescape Design OutlineRemove the paper and voila-you have a chalking template in place!

Jingle All The Way ChalkboardNow you just fill it in with your sharpened chalk and you are done.

Santa Tablescape Sharpening Chalk++TIP++ keep a damp Q-tip nearby as you chalk so that you can easily clean up any edges or marks.

Chalking the outline Jingle All The Way

Looks so festive, right?! Added the greens, just weaving them in and around the items on the tabletop.

Santa Tablescape Rustic Reindeer and SantaSprinkled on a bit of fake snow for some sparkle

Santa Tablescape Fake Snow Sprinkles

and some twinkle lights to give it that holiday glow. Done. 30 minutes from start to finish. Really gives the kitchen a holiday feel.

Country Design Santa DisplayNow its time to start baking for our cookie swap! Only 9 days left everyone! Keep HoHoHoing! Susan

The Stockings Were Hung…

At the Vintage Thymes Monthly Market! Just a few pics of this weekend’s market, today, Saturday and Sunday.

VT Merry Christmas Box with Greens

Some of the most beautiful and creative items I have see yet! My booth is chock full of vintage items including this antique buggy bench-which I love.

VT Buggy Bench

I have been working on the cupboard since the summer, when I purchased it at a flea market in Maine. Somehow I managed to get the whole thing in the car and take it home. Now it’s your turn : )

Cupboard Stocked Open Doors

This antique jewel-encrusted dress form is astounding!

VT Jewel Encrusted Dress Form

The artist, Nancy Rafi, reports that it took her 100 hours of construction, using pins, buckles, belts and buttons from all over the world. This is a truly one-o-f-a-kind piece. Simply Amazing.

So many cute vintage signs,

VT Merry & Bright

and if you don’t have a tree yet, you might like one of these! They are not real but they are so fun! These are glittery shabby chic.

 VT Shabby Chic Trees

This one’s wrapped in red plaid ribbon and already lighted

VT Red and White

And this one was created using old book bindings-so creative!

VT Bookend Tree

There are plenty of stocking stuffers,


VT Hand Painted Snowflake Blocks

vintage wreaths (this one was created from old barrel staves)

VT Barrel Stave Wreath

and perfect gifts for everyone!

VT Vintage Picks by Jen

So come on down to the Vintage Thymes Market

VT Vintage Vignette

and stop in to my booth at Country Design Home to say hello!

VT Candy Cane Vignette

If this doesn’t put you in the holiday spirit, I don’t know what will! Happy holiday shopping everyone! Only 12 more days til Christmas! Susan

Rustic Glam Reindeer

Musical Deer CloseupOne of the my favorite holiday projects I’ve been working on this season is a pair of decoupaged reindeer using antique Christmas carol sheet music. I had fallen in love with some similar to this in an Orvis holiday catalog I recently received. But they were glass and glitter and cost a pretty penny. AND, they are sold out!!

Glass-Glitter-Trimmed Deer OrvisTime for a little DIY. This is a simple, somewhat time-consuming project, but with a bit of patience you can make these beautiful deer too for a little $$$! I found two papier mache deer at Joann’s for $6.99 each, but they were on sale for 40% off. (well, actually there were three, but one of the little guys just kept falling over- too much spiked eggnog perhaps-so he was returned?!).

Decoupaged Deer Before1. Along with your deer, you will need decoupage glue ( am using Modge Podge here, but there are so many brands to choose from now), some decorative paper, hot glue, glitter, jute twine, some bells and fluff. Here is the how-to:

Deer Supplies2. I cut most of the sheet music into strips and bits before I began, the rest as I went along. There were quite a few curves and crevices to work into, so I used varied sizes of cut paper. If you don’t have sheet music, you can use any light weight paper, like wrapping paper, or even the newspaper! Working in small areas, one section at a time, brush on some decoupage glue to the deer, then onto the reverse side of the paper piece you are using.

Decoupage Deer Sheet Music

Place the paper onto the deer, then smooth it with your finger or brush. Repeat, overlapping as you go, until the entire deer is covered in decorative paper.

Glueing Sheet MusicI created a bridle with the border of the musical paper.

Decoupaged Deer Holly BridleI left the antlers clear because I wanted to decorate those differently. Allow to dry.

Decoupaged Deer Completed4. Glitter time! Paint the papered sections of the deer with decoupage glue, then sprinkle with clear glitter all over, making sure you get into all the cracks and crevices. Shake or tap it to allow any loose glitter to fall off. ++TIP++ I always place a piece of wax paper under my projects before I begin sprinkling. Once you are finished, you pick up the wax paper, fold in half to created a “luge” and pour all of the leftover glitter back into the bottle. Saves a lot of glitter! If you notice you have missed a spot, then just add a little more glue and re-apply glitter.

Glittering the decoupaged deerI left the antlers and hooves dry, as I wanted those to be wrapped in a rustic jute to contrast the sparkly mane, but you can glitter the whole thing if you would like. Allow to dry.

3. Decorate the hoofs and antlers. Using jute, start in a hidden area and use a spot of hot glue to anchor the twine.

Anchoring twine to antler with glue gun

Paint the remainder of the area with the decoupage glue.

Applying glue to antlers of decoupaged deer

Wrap the twine around until the area is covered. Tuck in end and add another spot of hot glue to anchor in place.

Anchoring the twine with glue gun

5. For the collar I used some white feather boa I had available to mimic the ones in the Orvis ad.

Decoupage Deer with feather boa trimCut enough to wrap around twice. Anchor the end under the chin with a spot of hot glue.

Anchoring feather boa with glue gunWrap the feather boa around twice, cut and secure back under with the hot glue. Make sure you don’t get glue on the feathers or they’ll lose their fluff-a-bility!

6. For the collar, you will need thread, a little bell and a pushpin and a decoration of some sort.

Snowflakes and Thread

I used a push pin decorated with a sparkly snowflake for the anchor.

Snowflake Pushpins

Glue a rhinestone to the snowflake for a little added bling.

Glueing Rhinestone to Pushpin

Take the pushpin and tie the bell with thread to the plastic part above the ridge. That will prevent it from slipping off the pin. Or you could glue it.

Threaded bells

Then push the pin into the neck area, through the fur. The pin will not show through the fur, so no worries there. Dazzling deer!!

Deer Bling Collar with Bell

7. Done! Are these exactly like the ones in the ad? Nope. But I love my deer with the antique Christmas carols and furry collars.  Such a pretty holiday decoration for a dreamy, sparkling, snowy mantel or console tablescape!

Antique Music Deer Pair CDH

Now if only someone had a decoupaged deer on their Secret Santa list….only 18 days left everyone-oh, deer, better get shopping! Susan

Glen Magna Designer Showhouse

I have been to many designer showhouses over the years, hosted in mansions by the sea and ancient monasteries, but none more personal or meaningful to me than the Glen Magna Farms Designer Holiday Showhouse in Danvers, Massachusetts.

Glen Magna Farms Endicott Mansion PMYou see, I was raised in this north shore town, not very far from the grounds of this old magnificent estate, and as a child my wish had always been to have the wedding of my dreams there. Which I did, so very many years ago. (and, yes, hats were a thing back then…)

Wedding Image Glen Magna

The Endicott Mansion has been the site of many beautiful weddings and historic events over the years, but lately, according to Danvers Historical Society president Wayne Eisenhauer,

Wayne Eisenhauer

Wayne Eisenhauer Danvers Historical Society President

had started to show its true age. Many of the mansion’s period rooms had lost their luster and were in dire need of updating and refurbishing, without sacrificing the integrity of the magnificent home and its history.

The Peabody Parlor

But, extensive renovations are prohibitively expensive on such a grand scale. The Designer’s Showhouse seemed the perfect solution: each interior space would receive a floor-to-ceiling makeover, painstakingly preserving the existing architecture. The proceeds would benefit the Historical Society and provide funds to refurbish the 1792 Derby Summer House,

Derby Summer Housewhich is also on the grounds of the Glen Magna Farms. On Thanksgiving eve, I had the opportunity to tour the mansion with Wayne Eisenhauer, the Historical Society president and met several of the designers, including the Showhouse Chair, Sandra Biondo of Sandra Biondi Interiors of Danvers. The completed works of the collective group of incredibly talented designers is impressive. Room after room, once faded and dated,

Bride's Room Endicott Estate

Photo courtesy of Benoit Photography

have been stripped of the old layers, and redesigned displaying touches unique to each designer. Above is the before Bride’s Room, used primarily as a dressing room for the bride to be. The redesigned suite by Linda Hentschel of I-Design Interiors (the bedroom) and Diana Kennedy of Diana Kennedy Interiors (the adjacent Bride’s Bath) is so very lovely in shades of rich creams and whites. The bedroom features a hand-carved mahogany four poster bed from the society’s collection and a mirrored console table- brilliant touches of old and new. The Endicott Library with its extraordinary curved bookcase spanning the length of the room, has been transformed by William Ralph Fine Antiques & Design. The room now features a desk dating to the 1600’s and an exquisite antique highboy acquired from the historical society’s private collection.

Endicott Library c.1900

The challenge was updating the spaces while staying true to the estate and its place in history at the turn of the century, while oftentimes preserving existing paint colors and architectural details at the behest of the Historical Society.

Glen Magna Farms Renewal

This is the grand foyer back at the turn of the century

Endicott Estate Grand Foyer

The Drawing Room, designed by Donna Terry, of Boston Design and Interiors boasts this magnificent carved fireplace

Glen Magna Drawing Room Fireplace

which is the focal point of the room. This is the original room as it appeared prior to the transformation.

The Drawing Room

This is Donna’s inspired rendering of the space,

Glen Magna Drawing Room Donna Terry Rendering

which was decorated in the Art Deco Style with Neoclassical/Egyptian Revival roots. The finished room is nothing short of spectacular! Of course, you will have to attend the showhouse to see for yourself the amazing transformations of all the spaces. It opens today, December 1 and runs through the 15th. The self-guided tour hours are 10-4 daily, and the tickets are $20 either online or at the door, all to benefit the Danvers Historical Society. For a complete listing of all of the talented designers and contributors to this project, click here. I hope you all have a chance to visit the Endicott Mansion at Glen Magna Farms. It is inspired decorating at its best and it is for such a great cause! Have a wonderful post-turkey, three weeks to Christmas weekend everyone! Susan