French Lavender Side Table-Ooh-la-la!!

Writer’s Note: I am excited to share that my little French Lavender Table Transformation was featured as an Editor’s Pick on BlogHer!! To view that post, click here:

As featured on BlogHer

As featured on BlogHer

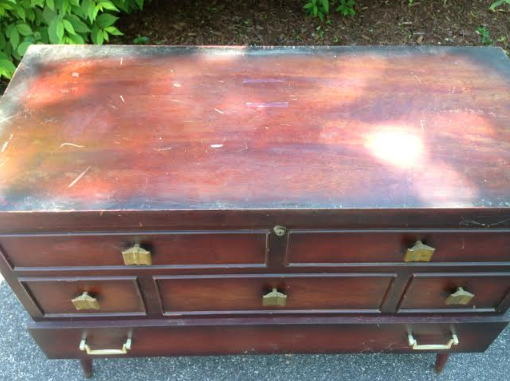
Now, onto the transformation! With some pieces of old furniture, I choose the style and color of the makeover according to my needs. Some pieces tell me what they need to be. This little table needed to be the center of attention in a lovely lavender French boudoir.

French Lavender Side Table Completed PM
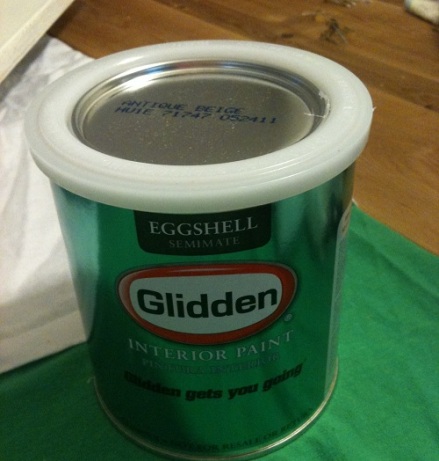
We purchased it at auction and I could have chosen to paint it red or black or green, but Behr Lavender Lily seemed to be just the perfect, soft color for this delicate little beauty. Here is the how-I-did-it:

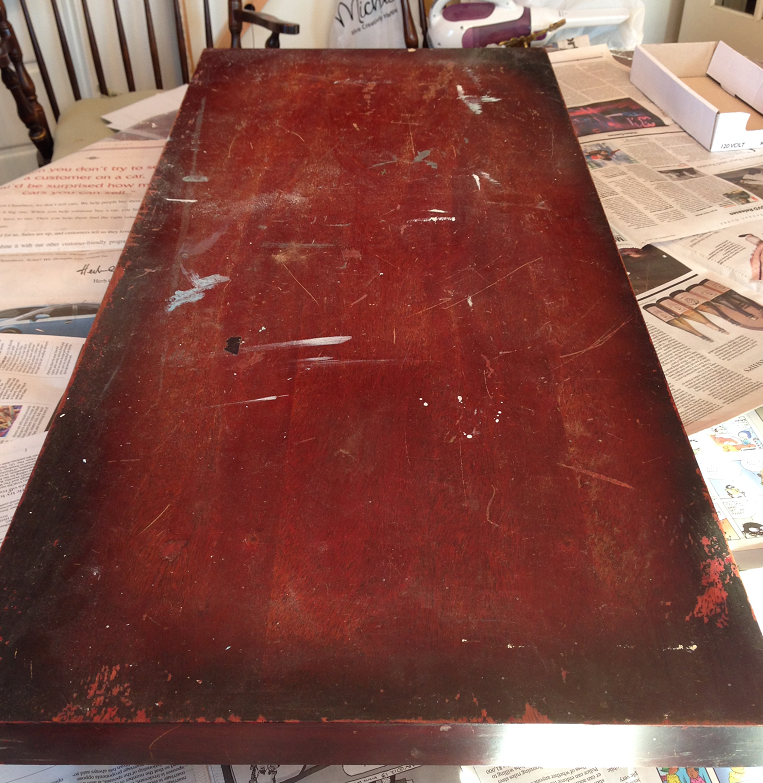
1. Cleaned and lightly sanded the entire piece. It was pretty dusty and dirty and topless-must have been a long, crazy trip from Paris!

French Lavender Side Table Before
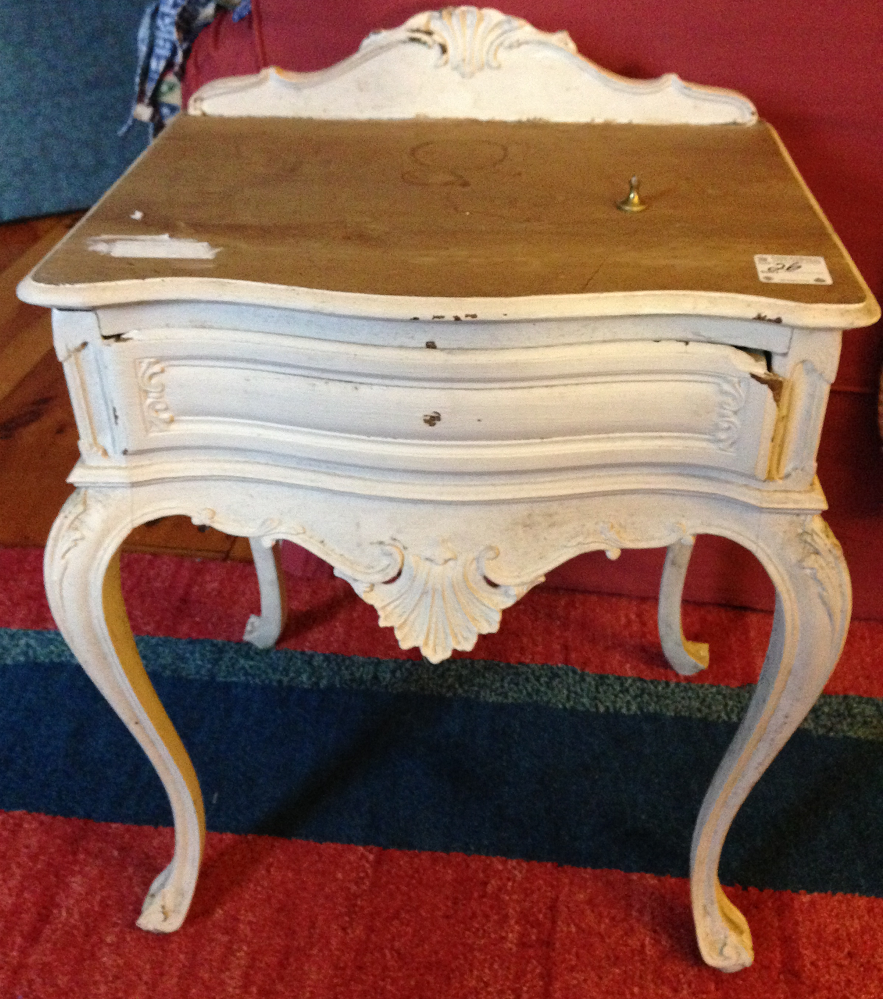
2. The base coat of paint was quite adhered and sturdy other than a few chipped edges, so I just sanded them, added a primer for the top and simply painted over it. Look at the sculpted details here!

French Lavender Table Before

French Lavender Table Behr Lily Lavender First CoatFirst 2 coats, Behr Lily Lavender.

French Lavender Table Behr Lily LavenderSo soft and pretty!

French Lavender Side Table Behr Lily Lavender Sample Pot
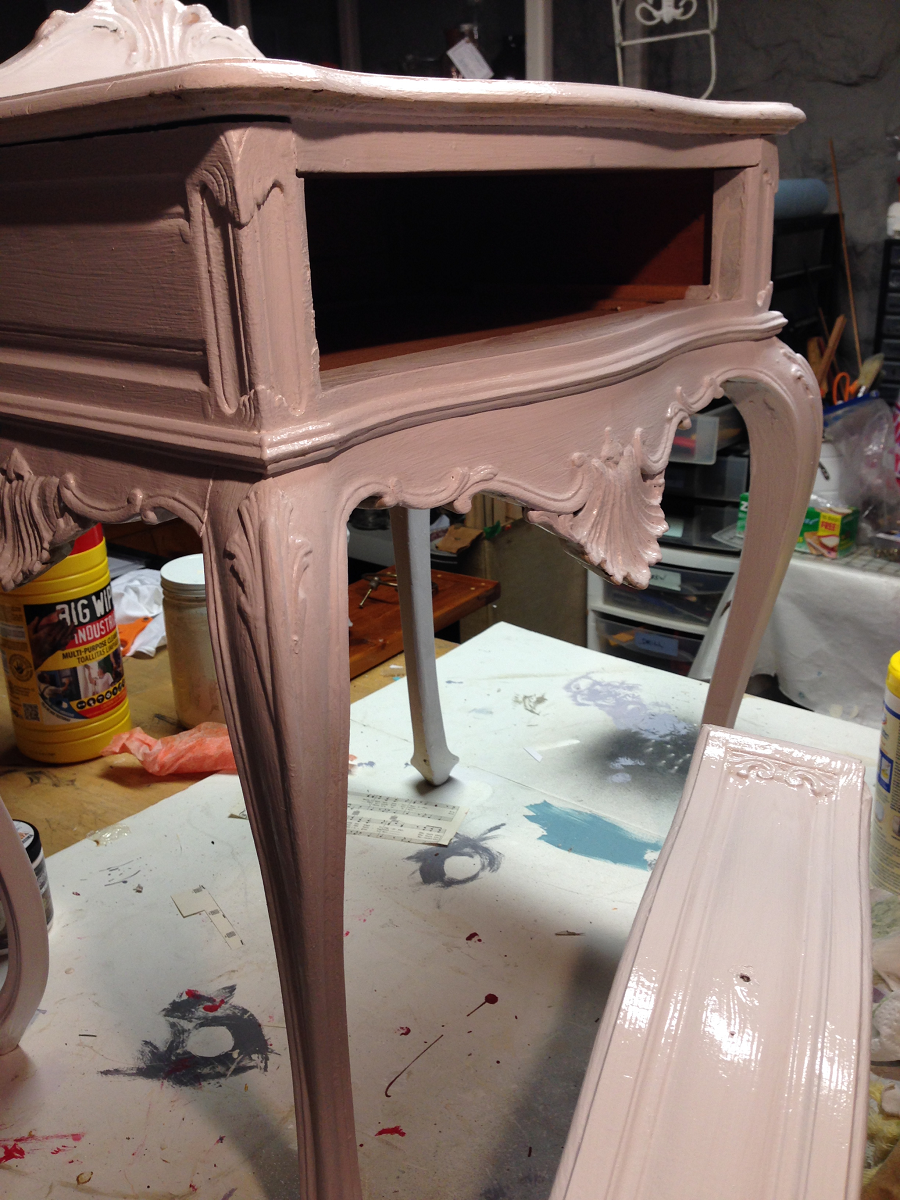
3. Added a glaze of Behr Ridge View paint mixed with Martha Stewart Glaze Effects to highlight all of the exquisite detail on the legs, drawer and back.

French Lavender Table Martha Stewart Glaze Effects
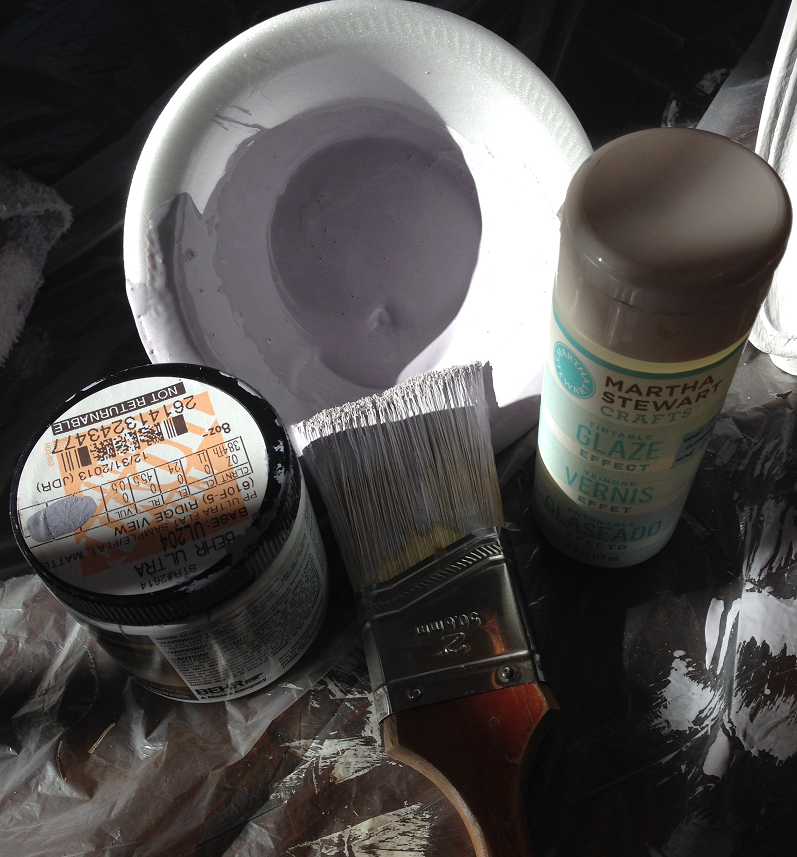
I mixed it together in a 4 to1 ratio (glaze to paint) then painted it on (working in small sections because it dries pretty quickly),

French Lavender Side Table Paint on Glazethen wiped it off, leaving the glaze where I wanted it to remain as a highlight.

French Lavender Side Table Drawer Detail GlazedAllowed the piece to dry.

French Lavender Table Detail Glazed4. In the past, I have used waxed paper for my transfers, but this time I tried freezer paper instead.

French Lavender Table Freezer Paper for Graphics Transfer
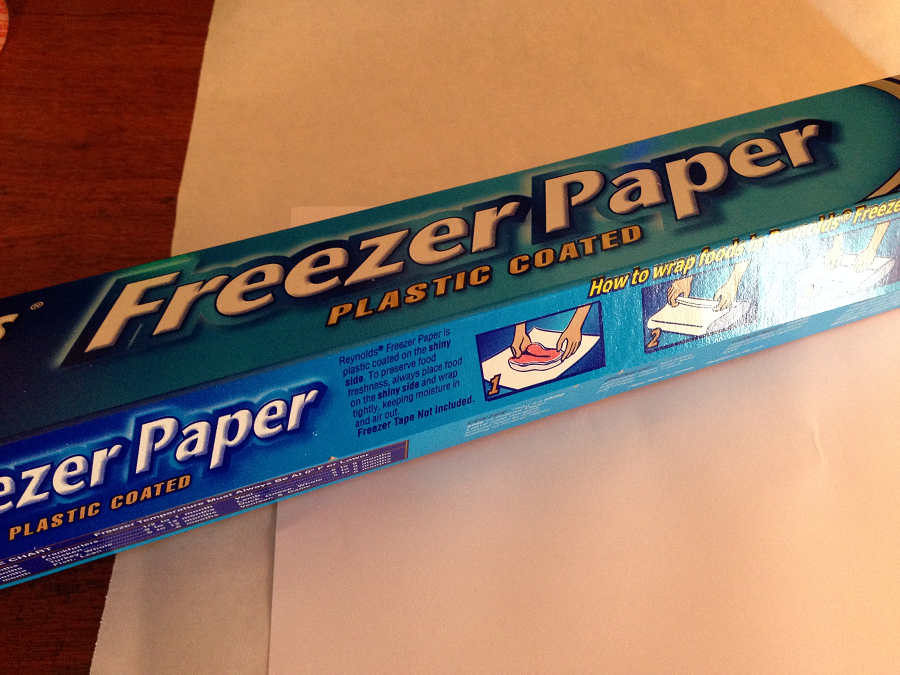
The freezer paper is a little heavier and easier to work with than the waxed paper. There are two sides, a matte side and a shiny “plastic-coated” side.

French Lavender Side Table Transfer Reverse Printed
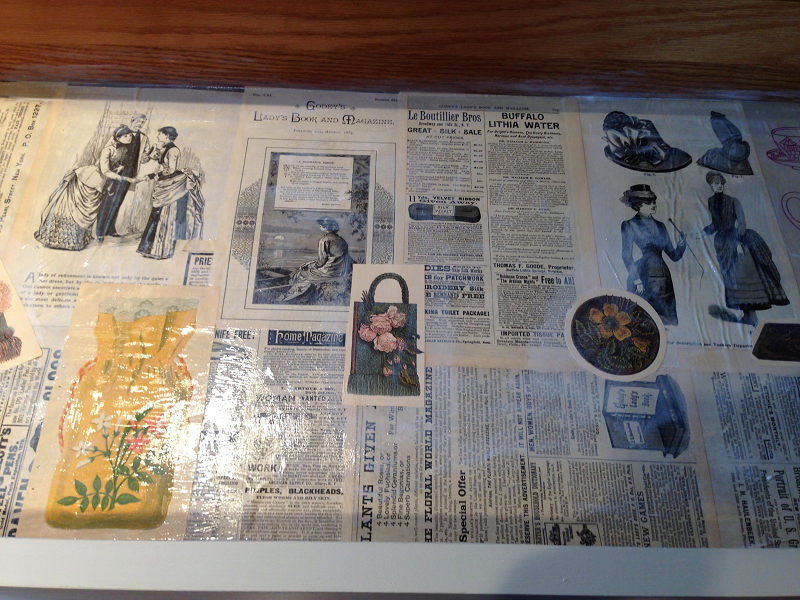
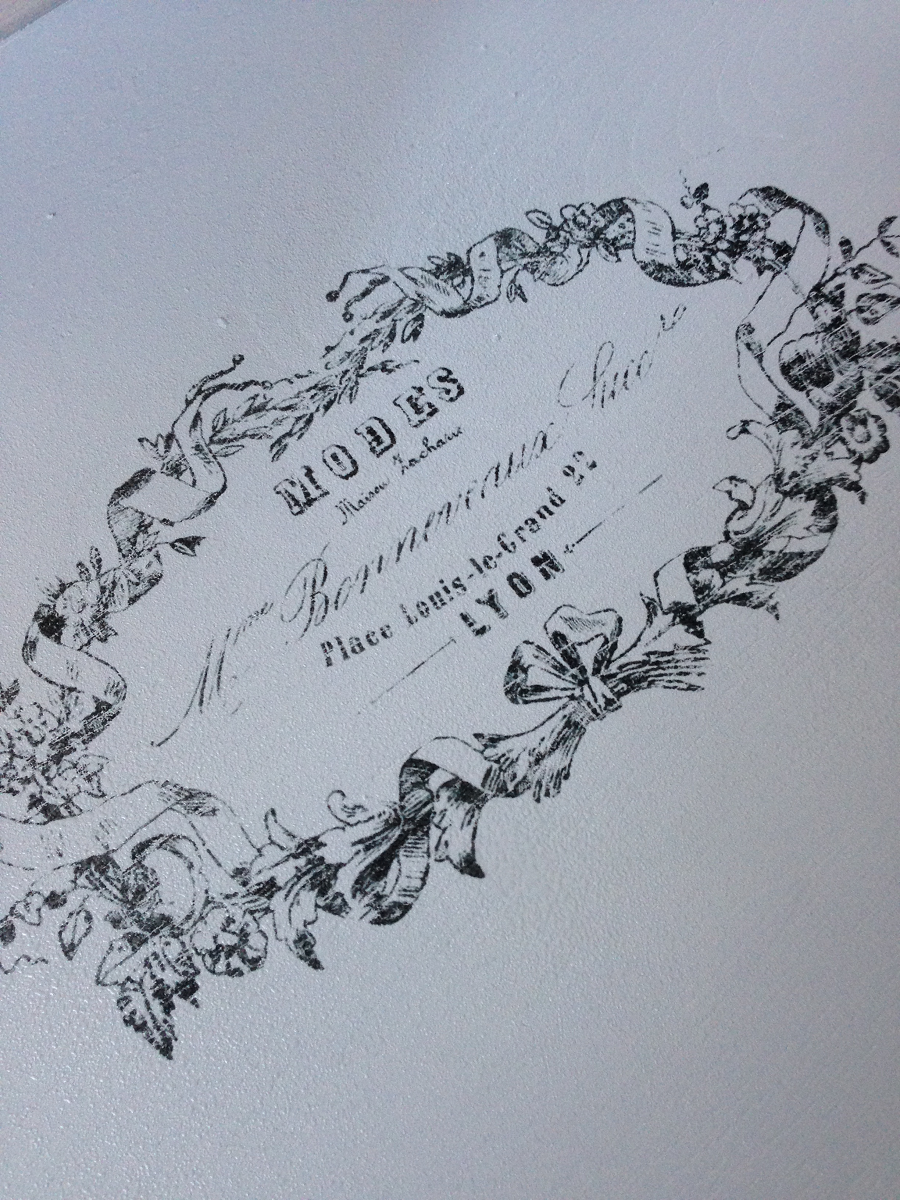
You want to print the graphic (thanks, Graphics Fairy : ) on the shiny side, in reverse! In this case, I wanted to use a small graphic to decorate the center of the table top, so I would be able to place things on it without completely hiding the picture.

French Lavender Table Printing with Freezer Paper5. Once printed, allowed to dry for a short time. DO NOT TOUCH IT or it will smear. Lightly dampened the painted surface.

French Lavender Side Table Dampening with SpongeDO NOT OVER-DAMPEN

French Lavender Side Table Too Wetor the graphic will come out all smeary and then you have to wipe it off and repaint it and start over again. Ok, well, that happened to me. More than once. So DON’T DO THAT.

6. Gently and carefully placed the graphic straight down onto the surface, then affixed with painter’s tape to create a “hinge” at the top.

French Lavender Side Table Taping Design for TransferThis allows you to check your progress without moving the graphic around and messing up the picture. WARNING: you only get one shot at this. If you attempt to moved the transfer around once it has touched the painted surface, you will need to start over. Ok, well that happened to me too. More than once. So DON’T DO THAT.

7. Once the transfer had successfully landed on my piece, I used a blunt object to rub the surface using firm pressure. I used the back of a spoon but I have seen others using credit cards (I prefer to use those at HomeGoods).

French Lavender Table Transferring with Spoon RubThis takes a minute or so to complete the transfer. Just keep rubbing all over, and check periodically by lifting the corner and then placing back down in the exact same spot. Hence, the tape hinges. Removed the paper from the design once I was happy with the transfer. Allowed to dry.

French Lavender Side Table Transfer Completed
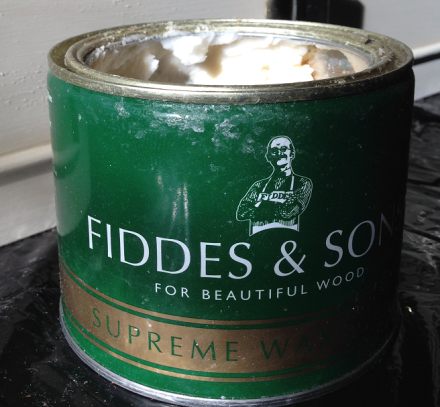
8. Once the piece had dried, I applied a coat of Fidde’s Supreme Wax

French Lavender Side Table Top Waxto protect the entire piece and provide a nice, glowing finish. Wiped it on, buffed it off with a soft cloth.

French Lavender Side Table Buffing Wax9. Drilled the hole for the antique brass pull

French Lavender Side Table Drilling Knob Holeand Ooh-la-la!

French Lavender Side Table Completed PMMy new precious French Provincial side table is magnifique!? Oui? This technique is pretty fool-proof as long as you allow time to dry between steps and follow the transfer instructions. But, before you transform a piece, make sure you really look at it to decide what it needs to be. Have a Bon Mardi, everyone! Susan


Friends of the Heart

Many years ago, in a college psychology class, I participated in a group discussion regarding friendships: how we enter into a friendship, how we maintain it and how friendship fades away, despite the best of intentions. Although much time has passed, an observation that one of my classmates made has remained with me to this day. That there are essentially two types of friends: Friends of the Road and Friends of the Heart. What does that mean, exactly? Friends of the Road are those that we encounter along the way while being busy with life. A childhood neighbor, a classmate, a co-worker, a teammate or dorm-mate, these friendships are formed due to time, place and circumstance. At that moment, the friendship appears to be unstoppable, an unbreakable link formed from a common bond that you promise will last forever. But once you change jobs, move away or graduate from school, the friendship, despite your most ardent efforts to keep in touch, fades into fond memories and Facebook reminders.

Friends of the Heart PM

Ah, but Friends of the Heart. Those people you meet along the way whose paths are forever intertwined with your own. They are not your family, but these are the friends you can turn to in a moment’s notice, in joy and in sorrow, in illness or trouble. They are your people. Your back door friends. The “I-don’t-have-to-clean-up-the-house-because-I-am-having-company” kind of friends. Because they see you, know you and love you just the way you are. I have been so very blessed, in my life, to have found a group of friends of the heart. We started out as neighbors, bonded by our children who shared classrooms and ball fields. The dads coached, the moms cheered on, brought the water and snacks and patched up skinned knees. As we proudly watched our children grow and thrive, we stood side by side on the sidelines, in the bleachers and auditoriums and cheered them on, comforted their sorrows, rejoiced in their victories, agonized over their defeats. And while that business of life was happening, our friendships became those of the heart: strong, unstoppable, unbreakable bonds. And then, once our children were grown and happily on their own, our friendships did not waver, but instead, grew stronger. We traveled around the world together, planned birthday parties and weddings and showers together and spent many an evening over dinner and drinks just enjoying each other’s company.  Recently, I lost one of my dearest friends of the heart after a much-too-short battle with pancreatic cancer. She was the youngest of our group, so much fun, full of life and eager to see whatever the world had to offer. Now, each passing day brings a fresh reminder of how very fragile and sometimes too short life can be on this earth.  If I could tell her one more time, if I could show her one more way, if I could only have a few more precious moments with her, I would let her know again just how special and truly blessed I was to have her in my life. Now, if you are fortunate enough, like me, to have a friend of the heart, choose today to tell them you love them. It doesn’t need to be a holiday or special occasion. You don’t need chocolate or fancy flowers, greeting cards or expensive gifts. Just text them or tweet them or Facebook message them or call them or even send them a copy of this and tell them how much they mean to you. It may be weirdly out-of-character, feel funny or awkward, but do it anyway. Because you never know when it may be your final chance to let them know how you feel.  And so, I would like to say to all of my dearest friends of the heart, I love you. You have enriched my life in immeasurable ways, and life will never be the same without all of you in it.

XOXOXO Susan 

Paint Night Boston

Well, so much for my 14 days of Valentine’s blog posts! Instead of feeling inspired, I am feeling tired and sick with a touch of the flu. Yech.

Crossed Out HeartSo, while I was laid out on the couch drinking tea with honey and lemon and watching a “Castle” marathon (and NOT blogging about Valentines), my family was busy sipping wine and painting at Clery’s Bar in Boston with The Next 26. (this pic just reminds me of finger painting in elementary school : )

Paint Night Paint Gallon JugsIf you are not familiar with The Next 26, they are a non-profit who has spent the past year in the aftermath of the Boston Marathon bombings hosting 26 cultural and charitable events in hopes of keeping the Boston spirit alive until this year’s Marathon Monday.

The Next 26 Founders Chris Mathison & Nick Leydon

The Next 26 Founders Chris Mathison & Nick Leydon

To read more about them and join the fun-they still have more events to go-click their logo below.

The Next 26.

Don’t know about Paint Night?

Paint Night LogoWell, essentially you go to a restaurant or bar where they set up multiple easels side by side, and then provide wine to drink as you are painting (hmm, that seems rather counterproductive…)

Paint Night @ ClerysThere is an art teacher at the head of the class who provides step-by-step instructions to art students at all levels of expertise.

Art Instructor, paint night, cleary's bar, the next 26Everyone paints the same picture, in this case the Boston Skyline at dusk, but each one is unique. Loving The Next 26 blimp over Boston.

The Next 26, Paint Night, Clerys Bar,Coach came home with two paintings, of which he was quite proud. One was his,

paint night painting, the next 26the other, my daughter’s. Same subject, different styles. Do you have a favorite?

Paint Night, The Next 26And here is the Next 26 team showing off their creations. True works of art, no?

The Next 26, Paint Night, Clerys BarSo, sorry about the whole Valentine blog post thing. If you need some Valentine’s inspiration, check out my Pinterest “Be-Mine-Valentine” page. Everything from decadent chocolate desserts to print-from-home Valentines and home made decorations, like this cute Valentine Mantel by OneKriegerChick.

Mantel Styling by OneKriegerChickAnd, hopefully, I will be back on my feet shortly and able to join in the next Next 26 event!! Have an artful Wednesday, everyone! Susan

LOVE-ingly Restored Hope Chest

      Back when I was a little girl, hope chests were a thing.

Hope Chest Completed Logo

The only company I was aware of that built them was Lane-they made cedar hope chests in different furniture styles as the trends changed, but the interiors remained the same. They were deep, cedar-lined chests where a girl could store her “betrothed” collection.

Hope Chest Cedar Interior

After all, hope chests were used to gather and store a young woman’s wedding dowry- you know, that whole love and marriage thing. The definition of a hope chest, according to Wikipedia: A hope chest, dowry chest, cedar chest, or glory box is a chest used to collect items such as clothing and household linen, by unmarried young women in anticipation of married life” As a high school graduation gift, each girl in my school received a miniature hope chest-apparently our goal was to find a prince charming and get married.

Photo Courtesy of  Allee Willis Museum Of Kitsch

Photo Courtesy of Allee Willis Museum Of Kitsch

The heck with that college stuff! How times have changed, fortunately. Fast forward a few decades, when I discovered this now un-used and un-loved, divorced-from-its-owner, Lane Mid-Century-Modern Style Hope Chest at our local Salvation Army.

Hope Chest Full BeforeIt had definitely seen better days, and reeked of stale cigarette smoke. Back in the 50’s and 60’s, everyone smoked, so pretty much any vintage pieces from that time period will likely have that lovely Eau Du Lucky Strike Scent. “It’s Toasted” is an understatement…

Lucky Strike Poster via JVoyage Etsy

Lucky Strike Poster via JVoyage Etsy

This piece took quite awhile to transform, as I pretty much had to prep every surface, both inside and out. Here is the how-I-did-it:

1.Removed top from base. The top was in the worst shape and needed a complete stripping and refinishing job.

Hope Chest Top BeforeThe plan was to paint and glaze the base, but to refurbish the top back to its original glowing cherry finish. I used this Motsenbocker’s Gel Stripper (yet another water-based, green product for us DIY’ers : )Water Based Hope Chest Paint Stripper GelAccording to the directions, you paint it on, wait 5-10 minutes then scrape off the old paint or varnish. Repeat if necessary.

Hope Chest Stripper ScraperIt took three coats of this, then a damp sponging before it was completely cleaned and prepped for a new finish. But it was well worth the wait. The wood was absolutely stunning!

Hope Chest Top Stripped Wood

For the finish, I used General Finishes Water-Based Brown Mahogany Wood Stain

General Finishes Water Based StainPainted it on with a sponge brush, wiped it off with a rag.

Hope Chest Staining Top

Two coats for the proper depth of color. Look at the richness of the color!

General Finishes Mahogany Brown StainFor the top coat, I used General Finishes Satin Poly-Acrylic Blend.. Three coats, with a light sanding with steel wool in between. The more I use them, the more I love these General Finishes Water-Based products. Easy application, much less odor, gorgeous durable finishes, dries fast, super easy to clean up and safer for the environment. Win,win!  I also used this to paint any unsealed exterior wood to make sure the stale smoke scent was gone.

Hope Chest General Finishes Poly-Acrylic TopCoat2. The base required a good cleaning and light sanding just to remove any loose particles and dust. I painted it with two coats of paint: Behr Ashwood

Behr AshwoodThis is a very pale greenish taupe color, in keeping with the 50’s when avocado green was all the rage. I then added second, lighter coat of the Ashwood mixed with some Glidden Antique Beige. This is another “go-to” neutral I keep on hand to use as a base color or to mix with other colors. It is a soft, creamy beige with a hint of pink. Pretty.

Hope Chest Painted Behr AshwoodTo define the insides of the trim squares, I added a glaze of the slightly darker Behr Ashwood mixed with Martha Stewart Glaze Effect. You mix them together in a bowl, using a 5 to 1 ratio of glaze to paint. The more paint, the darker the glaze, so you can adjust it according to your needs.

Hope Chest Martha Stewart Tintable GlazePainted it just inside the squares

Hope Chest Brushing on Glazingthen wiped it off to the edges to just leave a hint of color behind to enhance the trim.

Hope Chest Wiping Off GlazeThen the entire base was finished with Fiddes & Son Superior Wax.

Hope Chest Fiddes & Son Superior WaxI find the simplest way to use this product is to brush or wipe it on, allow to dry for a few minutes. Then I take my little Black and Decker Mouse Sander (without the sand-paper!) and then buff it using a pad of folded soft fabric.

Mouse Sander Buffer

Quick and easy on the elbows and leaves a perfectly smooth finish.

3. The lining inside the drawer was some old rotted, smelly green felt. I just wet it down, then scraped it out.

Hope Chest Removing Drawer LiningIn its place went some vintage ads and news articles

Hope Chest Americana Deco-Page for Drawer InteriorI affixed with Americana Deco-Page Matte Finish Gel.

Hope Chest Drawer Interior Vintage Newspaper Clips

4. The drawer pulls were dark and tarnished, but they were solid brass. I just didn’t have the heart to paint them, as I had originally intended! So I soaked them in acetone (that’s nail polish remover, folks)

Hope Chest LOVE Removing Tarnish from Hardware

to remove the lacquer coating, scrubbed with some steel wool and then cleaned them with Brasso polish. Gorgeous and shiny again, they are shaped like little bows and now pop against the Ashwood paint.

Hope Chest LOVE Handle Polished

5. The little brass feet on the bottom of the legs were also quite tarnished. For this I dipped the steel wool in some acetone and wiped until they were clean, then polished them as well.

Hope Chest Polishing Brass Feet with Brasso

(Note the heavy rubber gloves. Also note that I am not working in the basement, but in a well-ventilated dining room with the window open and the fan blowing. Which is better for my health, but let’s just say that my dining room is no longer suitable for dinner guests-takeout, anyone?)

Hope Chest Dining Room Workshop6. Amazingly, the interior of the hope chest was in perfect condition, even down to the little key. You can see by the sign that this one was built in 1957, true Mid Century Modern style, and comes with a $500 moth damage guarantee! I wonder if that is still in play…

Lane Hope Chest Mid Century ModernSo now, the little Mid-Century Hope Chest that looked like this

Cedar Hope Chest Top View

looks like this-not bad for 50 years old!

Hope Chest Completed LogoIf you are interested, you will find it at the Vintage Thymes Monthly Market today,

Mid Century Modern Hope Chestawaiting some love-struck young bride-to-be to fall in love with it and bring it home to start her dowry-which nowadays is more likely to include an MBA and a 401K than a linen tablecloth and lingerie.  But it would make a great storage chest or console table as well! Since this is LOVE post #7, and it is actually day 8, I will be sharing another project later on today. In the meantime, have a hopefully fun-filled weekend, everyone! Susan

LIVE, LOVE, JUNK @ Vintage Thymes Market

Vintage Thymes Chalk board Sign              This is post #6-sorry I am running late but I spent yesterday running back and forth to Norwood to set up my booth at the Vintage Thymes Monthly Market! This month’s market is all about LOVE. From the lovely vintage hot chocolate stand,

Vintage Thymes Hot Cocoa Bar

to the transformed vintage tin ceiling panel turned LOVE sign

Vintage Thymes Ceiling Tile Love Sign

and even an “Over You” Voodoo Doll or two-so funny!

Vintage Thymes Over It Voodoo Dolls

There are gorgeous painted pillows and button pillows…

Vintage Thymes Valentine Pillows

and more LOVE pillows-each one unique, just like our LOVE (ew, too corny?)

Vintage Thymes Love Pillow

And signs, lots of signs! One of my favorite James Taylor songs

Vintage Thymes How Sweet It Is Sign

and this sweet little tray would make the perfect gift for your favorite Valentine.

Vintage Thymes Cherry Sundae Sign

These are some of the prettiest mason jars I have seen yet-gotta PIN those to my A-Mason Jar Collection.

Vintage Thymes Mason Jar Vases

A harbinger of spring things to come-happy, happy daffodills: )

Vintage Thymes Dafodill Mason Jars

In my booth you will find the Antiqued Mirror (hmmm, it looks pretty nice on that commode, maybe it won’t sell and I can redecorate a room around it…)

Vintage Thymes Mirror and Consol

and this mid-century-modern Lane Hope Chest that I just refinished. DIY blog to follow.

Vintage Thymes Mid Century Modern Hope Chest

My sweet little lavender table- remember the before?

Vintage Thymes Lavender Table Before

So this is the after. In a nod to Pantone’s color of the year, Radiant Orchid, I added my own touches of lavenders.

Vintage Thymes Lavender Table

Every time I walk through the market prior to opening day, I am always blown away by the talent and creativity of the collective artisans who share this space.

Vintage Thymes Vignette

And I have been so happy and proud to be a part of such an amazing group. But, alas, this LIVE, LOVE, JUNK market will be my final one at Vintage Thymes. You see, Coach and I are really, really tired (we are kind of old…) of lugging furniture and packing and sorting and tagging and oh, did I say, lugging furniture back and forth. This was yesterday’s mileage: A collective 3.5 hours of driving.

Vintage Thymes Odometer Reading

And you won’t believe what the inside of my poor car looks like : (  Not sure what we are going to do with the barn full of stuff I have waiting to be transformed. Hoping to find a venue a little bit closer to home sometime soon. But that doesn’t mean I won’t be heading back down to Vintage Thymes the second weekend of every month to FIND WHAT YOU LOVE AND LOVE WHAT YOU FIND-love that sign!!

Vintage Thymes Find What you Love Sign

So hurry on over to Vintage Thymes- we open at 9! Hope you have a “find what you love” kind of Friday, everyone! XOXOXO Susan

Vintage LOVE Sign

In this month of openly-proclaimed all things LOVE, I am celebrating by posting a new LOVE sign or picture each day until February 14th, Valentine’s Day. Some will be images and ideas I have found on the web that I would love to share, some are my own creations, like this reclaimed wood plank with LOVE letters spelled out in shutter slats and the “O” from an old mason jar top. Hope you love it!

Country Design Home Vintage Love Sign

I created this using a reclaimed wooden plank, some paint, glue, reclaimed vintage shutter slats and an old mason jar lid. Here is the “how-I-did-it”:Painted two coats of Annie Sloan French Linen chalk paint. This is my go-to neutral that I use for so many projects!

Annie Sloan French Linen Base CoatStenciled the background with Behr Gulf Winds

Behr Gulf Winds Paintin an all-over stencil pattern to give the piece a “wallpaper” effect.

LOVE sign stenciled backgroundThe blue I chose matched closely to the hue of the mason jar top. Isn’t it just the soothingest color?

LOVE sign Stencil Color Gulf WindOnce the paint was dry, I sanded everything to distress the top and edges

Vintage LOVE sign distressed edges

and then added a coat of Fidde’s Paste Wax to give the board a glowing effect.

 Fiddes and Son Supreme Wax

Cut the shutter slats into the letters necessary to spell out LOVE-without the “o”.

Antique Shutter Slats for LOVE signCoach initially cut them with the chop saw, but I discovered that these are easily cut with just a razor box cutter. They are pretty old and brittle, so it didn’t take much effort at all.

Vintage LOVE sign cut letters

I glued the letters to the board with Gorilla Glue. Just as an FYI, their label was one of the few I looked at during my freak-out session while writing “The Dangers of DIY” that says their product is non-toxic and has no harmful chemicals or odors.

Gorilla Glue LabelHigh five, Gorilla Glue!

Vintage LOVE sign Gorilla GlueJust painted the glue on the back of each piece, placed them into position and then weighted them down with some books and cans of paint and left overnight to ensure the proper bonding.

Add the “O”. Hot glue worked well for this.

Mason Jar Top O for Love SignJust glued all around the edges, pressed it down onto the board to complete the sign.

Mason Jar O for Love Sign

To hang it, I used a couple of tiny rings and some wire. The board was quite thin, so most of the screws and nail hangers I had were too long.

Screw Hook and wire for LOVE signThis worked great because the sign is very light and won’t stretch out the wire. So this is the before:

Wood plank for LOVE sign

And this is now: Do you LOVE it?!?

Vintage LOVE Sign TM

If you have a LOVELY craft, idea or recipe to share, please send it to me @ countrydesignhome@gmail.com and I will add you to my LOVE collection. Hope you have a lovely Saturday! Susan

Antiqued Mirror on the Wall

Antiqued Mirror Completed PM

Who’s the fairest (and most rustic, vintage and gorgeous!) of them all? This mirror was another “throw-away” Coach found “somewhere”. I don’t ask anymore. It’s like a magic cupboard-I need something, I open up the barn door and voila! Instant DIY subject! Today’s project was this old, dirty, chipping and peeling dark brown mahogany mirror. Despite it’s sorry, drab exterior in dire need of some TLC, the actual structure itself was totally solid and quite heavy, I might add. I transformed it from this in a few simple, easy steps.

Antiqued Mirror BeforeHere is the How-I-Did-It: 1. Cleaned the mirror and frame thoroughly with heavy duty cleanser. The mirror is not in perfect condition, but that’s fine by me. Adds to the charm, and it stills reflects the light, which is most important. Lightly sanded the frame just to remove any loose particles of old varnish.

2. Primed with Gripper by Glidden. LOVE this stuff. Seals in stains, odors, evens the color and preps the wood to accept the topcoat.

Glidden Gripper Primer3. Painted with one coat of Glidden Antique Beige

Glidden Antique Beige Can

that I added my “chalk-like-paint” mixture to. It is a nice, soft, matte finish that accepts glazes and waxes very well. That recipe here:

Antiqued Mirror Painted

4. Added the unfinished medallion to the top for detail.

Antique Mirror Unfinished MedallionI purchased this one at Michaels for a couple of bucks. Just glued it on with Gorilla Glue . You have to brush it on, then weight it down

Antiqued Mirror Glueing Downand wait until it’s dry to ensure a good solid bond. Then I painted it with the same Glidden top coat and allowed to dry.

Antiqued Mirror Medallion Primed5. Lightly sanded the whole mirror frame and detail to expose some of the dark wood beneath.

Antiqued Mirror Detail Sanded 26. Painted on this Antique Wax in Scrub Pine from General Finishes. I like this one because you don’t have to work it in with a rag. You literally paint it on!

Antiqued Mirror Scrub Pine Antique WaxBrushed it on with a foam brush, then wiped off with a rag, leaving the dark wax in places to enhance all of the crevices and lines and detail.

Antiqued Mirror Glazed and Sanded

It leaves some color, but it also adds a nice matte finish to the entire piece. Allowed to dry.

7. Scraped off the excess paint and stain insdie the frame of the mirror. Cleaned the mirror.

Antiqued Mirror Scraping Glass8. Here is the finished closeup of my antiqued mirror. I love it, but what do you think? Should I have left it alone or did I give this piece some love? (BTW, if anyone knows the trick to photographing mirrors without me being in the shot, I would love to hear it!!!)

Antiqued Mirror Top Details

This is a very simple DIY project, it just takes some time and a little patience to allow each layer to dry before adding the next. If you are thinking of trying this process, test it out on a sample piece of wood before taking on a big, detailed mirror or frame. But remember, it’s supposed to look old and messy, so perfection is not an option! Sometimes a little messy is a good thing… Hope you have a reflective Thursday, everyone! Susan

Hearty Oatmeal Jam Squares

Oatmeal Jam SquaresI have been making these super easy, delicious Oatmeal Jam Squares forever! This recipe was from an old, dog-eared Quaker Oats Wholegrain Cookbook.

Oatmeal Jam Squares Quaker Oats Cookbook

They only take a few moments to prep, make minimal mess because you mix it all in one bowl with mostly (I would guess) stuff you already have in your pantry and fridge, 25 minutes to bake and done. Delish! Here’s the how-to:

Preheat oven to 350 degrees. I have an electric oven, so I always set it 25 degrees less as I feel it cooks faster and hotter than gas, so mine was set at 325. Grease 13 x 9 pan and set aside. This pic looks a little weird, because I used cooking spray and it squirts out rather than lightly sprays. Whatever works…

Oatmeal Jam Squares Grease Pan

Ingredients:

1 3/4 cups all-purpose flour

2 cups quick oats

1 cup brown sugar, firmly packed (you can use either light or dark brown, but I feel the dark brown gives the bars a richer flavor)

2 sticks (one cup) butter or margarine, softened, not melted

1/4 tsp salt

1 tsp ground cinnamon

1/2 tsp baking soda

1/2 cup chopped walnuts (Optional)

1 1/2 – 2 cups jam or jelly or preserves, any flavor Note: The original recipe called for 3/4 cup. You can use as much or as little as you like. The more jam, the gooier the bar : )

Measure out all dry ingredients, set aside.

Oatmeal Jam Squares IngredientsPlace softened butter in large mixing bowl (I used one margarine, one butter. Not sure why, I just do that)

Oatmeal Jam Squares Softened Butter

and mix just until sticks are broken apart, not creamed. I used dough hooks in my mixer, you can use those, or mix by hand with wooden spoon.

Oatmeal Jam Squares Blending Butter

Dump in all the dry ingredients on top of the butter in the large mixing bowl.

Oatmeal Jam Squares Ingredients in Bowl

Mix with dough hooks, or by hand with a wooden spoon, until mixture is crumbly and well-blended.

Oatmeal Jam Squares Dough Hooks

Remove and reserve 2 cups of mixture, set aside.

Oatmeal Jam Squares Mixture

Place remaining mixture into prepared pan and pat down until firm crust is formed.

Oatmeal Jam Squares Crust in Pan

Do not compress too much, but make sure there aren’t any errant chunks scattered around.

Oatmeal Jam Squares One Cup Jam

Spoon jam onto crust

Oatmeal Jam Squares Jam in Pan

and smooth out to the corners, completely covering the crust.

Oatmeal Jam Squares Jam in Pan Smoothed

As you see here, I am using two types of jam,

Oatmeal Jam Squares Jam Jars

but you can use whatever you happen to have available. I have used everything from orange marmalade to grape jelly, and it all tastes great! Sprinkle remaining topping over the jam, evenly spreading to corners. Bake for 25-30 minutes until jam is bubbling around the edges, the crust is light brown and set.

Oatmeal Jam Squares Baked

Remove from oven before crust over-browns! Over-browning is bad. Makes the bars crunchy instead of gooey. And I like gooey. If you like crunchy, then leave them in a bit longer. Cool completely. Cut into squares and serve.

Oatmeal jam SquaresThese are delicious (and nutritious) enough for breakfast and snacks but sweet enough for dessert. Have a yummy Wednesday everyone! Susan

Tagged by Tagxedo

Tagxedo Logo

Every once in awhile I happen upon a fresh new idea or website that’s just fun and creative and easy enough for anyone to try (and there is no sanding and painting and glazing and waxing to do : ) Well, hello, Tagxedo! This website creates “clouds” of words that you can personalize in a million different ways to print or save or have printed on shirts or whatever you would like to do with them. AWESOME.

Tagxedo Front Page

I went to the home page, where you can add essentially anything you wish to create a cloud-I just entered the URL of my blog and this happened in, like, 2 seconds:

Tagxedo Country Design Home Cloud

Here is their Facebook page where you can get ideas-and there are so many! I love this reverse print HORSE.

Tagxedo Horse

Just for fun, I typed in Sochi Olympics and this is the result-a large snowflake puzzle piece!

Tagxedo Sochi Olympics

I mean, seriously, I could sit here all day and play with this (well, I really can’t, I have rocks to climb with The Next 26).

The Next 26 Boulders for Boston

But this would be a fun way to spend a snowy afternoon, with your kids too!

Tagxedo Snowman


And, for the perfect Valentine for your very special loved ones…

Tagxedo LOVE

So, if you are looking for some simply creative fun, check out Tagxedo. Here’s hoping your Sunday’s not a uphill climb!!

Brooklyn Boulders Somervile

And if you’re looking for me, I’ll be on the top of a rock wall-NOT! Susan