Ahhh…Coffee…

Every morning, no matter what the hour…whether its 2, 6 or 9 AM, I find myself in need of a caffeine fix. So, I stumble down the stairs, hit the Keurig “on” button and wait a moment while it rumbles into action. Then I open up the pantry and reach in to grab one of the many, MANY, pods I have stashed for my morning coffee ritual.

K Cups

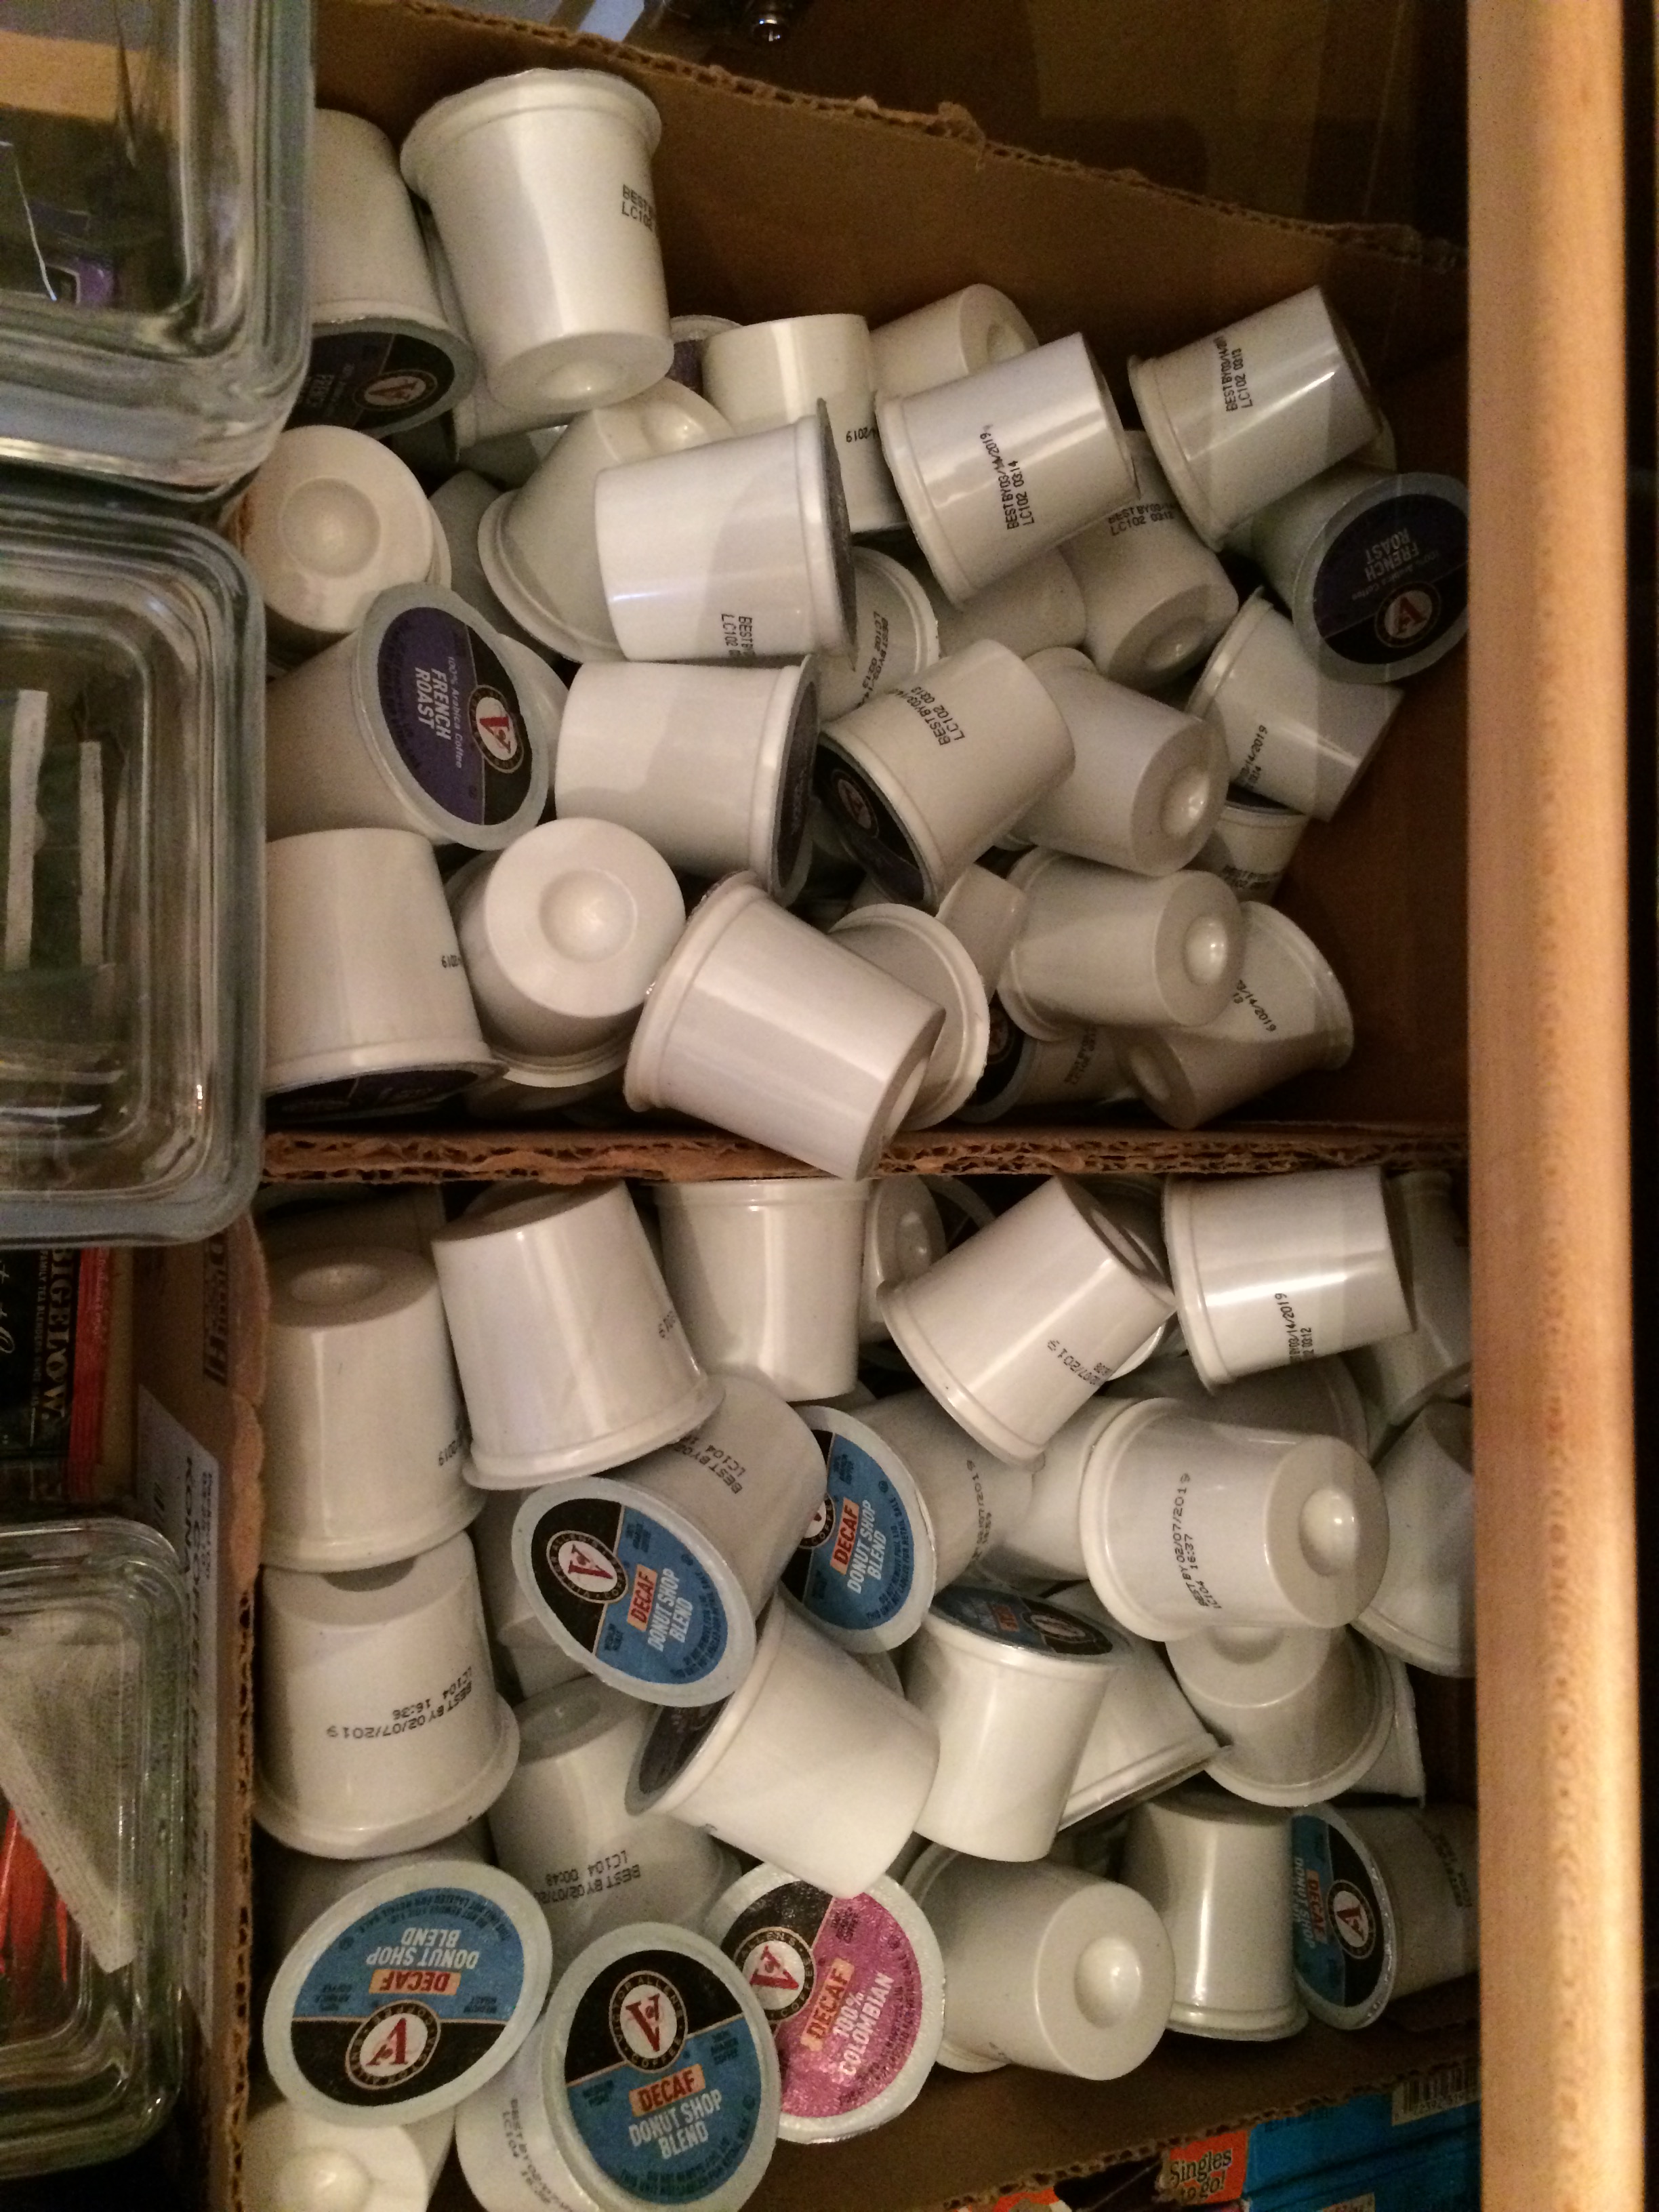
I know- this is really bad, right? Every morning when I slide open that pantry drawer, I feel a pang of guilt. Because I know that those little K-cups that help me to function with that morning burst of caffeine end up in a land fill somewhere. Sitting there for years and years, never decomposing…it almost makes me want to give up coffee…well, not really…but it does make me a wee bit sad. I know there is a better way to enjoy my morning brew without compromising nature’s fragile ecosystem quite so callously. Enter DeliBru re-useable single-serve brewing cups!

DeliBru cups


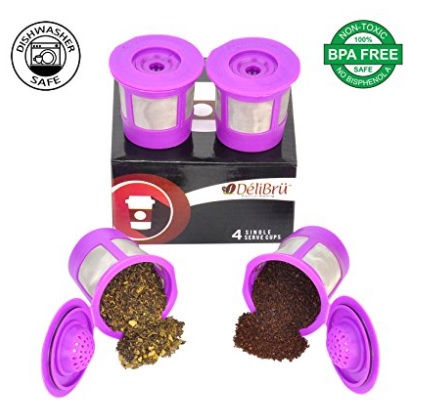
You simply fill the cup with your desired brand of coffee- for me its the darkest roast I can find- close the top and place into your Keurig-just as you would one of those disposable K-cups! Once your morning brew is brewed, you remove the K-cup and rinse it out- ready to use over and over again. And the coffee-well its the same deliciousness that I get with the K-Cups, but I have the choice of whichever flavor strikes my fancy that morning- Kona, Breakfast Blend or my favorite, favorite: Santo Domingo Café

Santo Domingo Coffee

( I discovered this one on a trip to the Dominican Republic a few years ago…but I’m almost out- perhaps time for a trip back to pick up a fresh supply?!) You can purchase these DeliBru cups on Amazon.com. The DeliBru cups are BPA free, are useable with any Keurig model and they’re dishwasher safe- so you brew your coffee, then wash and repeat- no more adding to your local land fill! Have a happy and caffeinated Monday, everyone…we are going to need that extra cup on this dark, dreary morning.

Peace & Love, Susan

Compensation Banner 500


We’ve Moved! (but not far…)

This past couple of months, Coach and I have been working really hard to create a new fresh look for our space in the Barn at Todd Farm. Well, actually, its my new space…but I didn’t move far- just across the aisle! Our friends and barn co-inhabitants from The Laughing Cottage moved down to the front entrance of the barn, leaving their space available. So, Coach and I decided that because of its size and orientation (it is wide rather than deep) it made sense for me to make the move to give us a lot more wall space to hang our artwork and decorative stuff. We moved into a blank slate, basically plywood walls and floors, and set out to create a warm and welcoming space with a slightly nautical theme. We painted the back chipwood wall, first with an undercoat of white,

Barn Booth painted wall

and then I dry-brushed over it in shades of grays and blues. (woops, I forgot to take the after picture, but if you look real close behind the whales, you can see the finished wall).

Barn Booth Back Wall Styled

The bookcase wall, which had been covered with rustic shutters, took on a mid-century modern look once I painted random squares with pops of color and stained the rest.

Barn Booth Painted Shelving

Then, we filled it with all sorts of curated items, hung a ladder and some fish net and patio lights for ambiance. So cute!

Barn Booth Bookcase Wall Lights

Then, the floor! Well, what was once a dusty, plain brown plywood

Barn Booth Plywood Plank Flooring

is now a striped and stenciled masterpiece that continually draws customers’ attention and comments-who just love it!

Barn Booth Old Trunk

The painted floor stripes were simple to do-measured, then taped off, followed by painting alternating stripes of General Finishes Milk Paint in Coastal and Federal Blue. You can see in the photo below that I did create more of a paint-washed look rather than a solid color. I wanted it to look old and worn, not shiny and new, so I used a brush rather than a roller- an arduous task, but worthwhile in the end.

Barn Booth Painted Stripe Flooring

By the time I was finished with the stripes, they were already dry and ready for the stencils! I created a large pattern on my handy-dandy Cricut machine and cut it-so large, that I had to piece it together with tape!

Barn Booth Cut Stencil

Stenciling was done with a large sponge and some random acrylic paint I mixed together in a pale chartreuse.

Barn Booth Spacing Stencils

Spacing was a bit tricky- I started in the middle in front of the beam (which I thought was centered, but not quite) and worked to the left and right. Along the way, I gave up the measuring tape and just eyeballed it to make sure I could fit it all in. As is sometimes the case (but not always), the stenciled design fit perfectly! So now my space is filled with pieces that I have refurbished and lots of cool junk that Coach has picked along the way. Actually, quite a few of these pieces sold on our flea market opening day this past Sunday- but there are plenty more where those came from!

Barn Booth Styled

If you haven’t been up in awhile, or have never been to The Barn at Todd Farm, come on up and visit us in our sweet new space.

Barn Booth Bookcase Wall

(and Coach is now in my old space with the rusty bedspring light)- with a new name- American Vintage GoodsRusty Bedspring Marquee Light In Shop PM

So stop on by and say Hi!! And have a wonderful (albeit WET) Wednesday! Susan xoxo

DIY Aha Moment

With all of the painting and staining and top-coating I do on a daily basis, you would think that I know all the tricks of the trade. And I do…kinda…sorta, well, for the most part. Except every once in awhile I have an “aha” moment where I think- “geesh- why didn’t I think of this before?!?”

Do you ever open a brand new can of paint and think, “oooh, how pretty!?” Well, I do, every time, because I love the potential and promise that a fresh new paint color brings to any project. So, I use the paint for that project, then slap the lid back on until the next time…and then I pry it off (because now it’s kinda stuck to the rim because of the left- over paint from the last time) for the next project. And so it goes, and with each project the rim becomes more caked and coated with dried paint (that break off into little tiny micro-chips..which eventually fall into the can and leave lumps while I am painting.) And eventually, I can no longer get a nice snug seal on the paint can and the remaining paint becomes dried and unusable. Ugh.

Annie Sloan Old White Can Edge

So, the other day, after I opened my can of Annie Sloan Greek Blue Chalk Paint (oh, my goodness, this color is swoon-worthy…) I vowed to make sure the cover and rim were clean and clear when I was finished for the day. But here is the issue: there is that second indent in the edge of the can where the lid fits- and that fills up with paint as you wipe your brush along the edge to remove excess paint during the painting process.

Paint Can Edge.jpg

It is virtually impossible to get it clean and paint-free unless you do some surgical intervention with Q-tip(s)-time consuming and messy!

I have tried using the “rubber band” method, where you place the rubber band in the center of the opening and run your brush along that instead of the can’s edge.

Paint Can Rubber Ban Method

But I can attest to the fact that since rubber bands are made out of, well, rubber, there are times when they “bounce back” and the paint will splatter around. And, its messy to remove. Plus, every once in awhile I need to stop and restir my paint and then the rubber band is in the way.

Yesterday, I was looking at the can of paint I was about to open (well, actually, I was searching for the paint can opener because I always seem to lose those), and right beside it was a roll of painter’s tape. You know, the blue kind that we use to mask off anything and everything. My AHA moment! So I grabbed the tape and created a rim guard all around the perimeter of the opening, inside that second indent where the paint typically collects.

Painters Tape Edge Annie Sloan Greek Blue

Because the tape is straight and a quart can is round, I used several small pieces, overlapping as I went along to create a paint barrier. I went to work, painting my pieces, and when I was done, I simply peeled the tape away from the edge and voila!

Removing Tape from Annie Sloan Greek Blue

Perfectly clean…no more caked edges and micro-dots of paint on my projects! Shark Tank here I come! This is a sneak peek at the pieces I am using the Annie Sloan Greek Blue Chalk Paint on- isn’t it gorgeous!?

Annie Sloan Greek Blue Painted Chair

Here’s hoping you have a perfectly mess-free Friday, everyone! Susan xoxo


Online Buyer Beware

Back in the fall, I found some amazing buffalo plaid curtain panels for a steal at the Christmas Tree Shops.

Christmas Tree Shops Plaid Curtain Panel

The ones I purchased are cream and teal, and I originally paid $16.99 for per pair, which I thought was a steal! When I decided I needed one more pair for our large window, I found the last pair in a markdown bin for $4.99- now that’s a real steal! They are hanging in our master bedroom, and every time I walk in the room, I love them again! But, you know how, when you change one thing, then the old stuff looks really old and needs to be updated? So, that happened. Time to for a spring-time spruce up! I needed to find some new bedding that would complement the curtains and the existing palette in the room. I did a lot of online searching until I finally stumbled upon this perfect set

7-piece-queen-luxury-aqua-blue-navy-and-white-comforter-set-8

on this website: www.extrablanket.com. They had lots of comforters and curtains at great prices! This particular set was marked down from $249.95 to $67.68! I know, right?! Since I had never heard of the company before, I did my due diligence (or so I thought) and checked into the website. They have a PayPal account and loads of listings on EBay and Amazon (although under different names in each case…which I thought was rather strange but I really wanted that comforter set…so I ignored the red flags). So, I ordered the set, paying for it with my credit card…and waited. I did receive a confirmation from extrablanket.com with tracking information. Then the second payment confirmation email came from PayPal, but from a company called Domestic Décors, but the email listed was from GrandLinen@yahoo.com…hmm. Another red flag. So now there are three different names being used. The PayPal payment page stated that the shipment would be within 5-7 days, and there was an order and tracking # so I figured it was all good. Then after the 5-7 days, I checked the tracking # page and it was blank. BLANK. Crap. So, giving them the benefit of the doubt, I waited some more (did I say how much that I REALLY wanted that comforter set?!) At the end of February I sent my first “Hey, I haven’t heard from you” email and waited for a response. Nothing. On March 2, I sent a “Hey, where’s my stuff, I am going to report you, blah, blah, blah” email. Again, NO RESPONSE. There is no phone number on the website, but there was one on my PayPal statement, so I called it. NOTHING. Just a ring and then a non-descript voice-mail message. Finally, reluctantly (because I REALLY wanted that comforter set) I called my credit card fraud division and reported them. The CC rep said it happens all the time-these companies open up websites and “sell” non-existent stuff, and no sooner does someone report them and shut them down, then they re-open under another name and keep on scamming consumers. The CC company refunded my money (initially I told her I didn’t want the money back because I REALLY wanted that comforter set- she laughed and said “well, that’s not gonna happen) and sent me an email stating that they had contacted the company and were waiting for a response. In the meantime, the website is still up and running and their postings on Amazon and EBay remain in place, which baffles me. How does this company remain open under all these different names on reputable websites if they are really not selling anything??? So, I am back on the hunt for another comforter set. If you happen to see anything king-sized that is teal and navy blue with some embroidered flowers, give me a shout out. (unless, of course, you spot it on extrablanket.com). Here’s hoping you’re keeping warm…under your nice, stylish comforter set…because it’s still so chilly here in Boston!! So beware! xoxo Susan

Beginning Anew & A Giveaway!

This past year has been one of great joys and great sorrows for me personally. The birth of our very first grandchild (he’s a wee bit camera shy, but suffice to say-and this is my totally unbiased opinion- that he is the cutest baby in the whole world…) followed by the incredible wedding celebration of our son to his lovely bride, were both the happiest of  occasions.

Let's Dance 2016

But, those extraordinary events were overshadowed by the diagnosis, illness and subsequent death of my mother,

Mom Green Sweater

(their beloved grandmother and great-grandmother) who passed away recently at 89 years young from cancer. To say that the events of the past year were overwhelming is an understatement. Each presented its own set of unique demands and daily challenges, and each was equally important in its own right. So, during that time, blogging was most definitely not in the forefront of my mind. Getting through each day, surviving until the next dawn broke was about all I had the time and energy for…and so it had been some time, until quite recently, since I had put “pen to paper” to write my stories. But time marches on, as they say, and life settles down, and we move forward…or in this case, backwards…to a time when I was happily painting and sawing and sanding and DIY’ing and sharing it all with you on social media.

Vintage Americana Heart Logo

In the past few weeks, I have started (and finished!) some new projects, remembered to take photos

Hail to the Whale Finished Logo

and share them on social media-which, in itself, was pretty amazing! So, I am finally beginning to re-furbish and re-love the pieces that have been lying dormant in the basement…and the barn…and the shed during this long and lonely winter. Loving this sweet little side table I recently re-did but completely forgot to write about.

IMG_0037

But I do have one problem. I recently moved my blog server back to WordPress.com (a long and frustrating story for another day). But with that move, I was not able to bring all of you, my lovely readers along with me! Those of you who had joined the ranks of my blog followers over the past few years will no longer receive my blog posts…unless we take action…so I need your help! If you wish to continue receiving email notices of my blog posts and DIY escapades (and, remember, we never, ever, EVER use your email for any other purpose : ), and I hope that you do, you need to click on this link to the home page of my blog https://countrydesignhome.com/

Blog Home Page

scroll down to the right side of the screen until you get to the line that reads “follow my blog”. Fill in the little window your email address, click send, and you will receive a confirmation email from me via Word Press. Just hit confirm, and you are done! Now, I know this is a pain in the neck and you are thinking, “well, this is a pain in the neck”, so I am going to sweeten the pot a wee bit. All of the email confirmations I receive by April 15th will be placed in a random drawing and one lucky person will win a $50 Amazon.com gift card…as a personal thanks from me to you…

Amazon Gift Card

…because we can all use a little fun news on Tax Day, right? So, thanks for understanding, and thanks for being part of my life and allowing me to share my stories with you…and I am hoping that we can now we can finally begin anew. Susan xoxo


Hail to the Whale!

Coach and I, well, we just love whales. I am not certain how it all began, but I can say that one of our very first “all day” dates took place in lovely Mystic Connecticut. In Mystic Seaport, it is all things nautical, and I suspect perhaps that day spent touring the Charles W. Morgan (the last wooden whale ship in the world!)

Charles W. Morgan

the Seaport Museum and the Mystic Aquarium, all the while basking in the glow of young love, might have sparked the beginning of a life-long passion for those majestic denizens of the deep. So, I paint a lot of whales…on trunks and planks and tables, pretty much any flat surface.

Whale Porch Table

After all, who can resist a gentle, giant creature with a hint of a smile-especially when decorated with the American flag? Recently, Coach came upon a stack of old cabinet doors (well, it might not have been recently, it’s just what has surfaced in the barn most recently.)

Hail to the Whale Before Cupboard Door

They were simply painted creamy white, or so we thought. Until he started to sand the edges and behold! This amazing teal blue emerged.

Hail to the Whale Black Background

Sometimes you have in your mind what color scheme to use on a piece, sometimes the piece dictates the palette. In this case, there was cream and teal and a country red color…perfect for an American Flag Whale! I went with a black background for greater impact and contrast to the flag whale itself. For the flag colors, I mixed paints until I came up with the exact shades of teals and reds that matched the existing colors on the frame. I have, in my workshop, perhaps 50 or so of those little Behr sample paint pots

Behr Sample Pots

that you get at Home Depot for a couple of bucks…in a multitude of colors. These are my go-to samples when I am mixing paints-economical and plentiful…and if I mix a color I really love, I just use the color match app to have them mix whatever amount I need! Once I painted the background, it was a pretty simple process-I used a whale stencil


Whale Stencil

for the overall pattern in cream, then taped off the stripes, and added the red.

Hail to the Whale Taped Stripes

Now, I know there aren’t 13 stripes- he was just too narrow and it looked too tight, so I went with a more interpretive look.

Hail to the Whale Star Field

After that, I added the star field using a stencil I cut out with my Cricut Air machine.

Cricut Gold

Do you have one of these?? If not, you need to hustle over to your favorite craft store and buy one, like now! If you do crafts, or scrapbooking, or make signs or stencils or just about anything where you need to apply graphics, this is your go-to machine. See this little square of stars?

Star Stencil

By hand, that would have taken me hours to cut…and then a few more in the ER getting stitched up from the X-acto knife thumb slice… With the Cricut, it took maybe ten minutes to design and cut the stencil. Simply incredible!

Once the whale had dried, I added the matching stars in the four corners. Upon close inspection, you can see where I allowed the faint outline of the original hardware to remain.

Hail to the Whale Hinge Detail

I think it gives the piece character to leave the blemishes there for everyone to see. After that, it was simply a matter of a topcoat…and I went with my go-to favorite: Flat Out Flat by General Finishes. **As a side-note, when you paint on this topcoat, it initially appears milky white,

Hail to the Whale FOF Wet Finish

which kind of freaked me out the first time I tried it. But, once it dried to a clear, softly glowing finish, I was sold. So, the whale is now finished and ready for his new home.

Hail to the Whale Finished Logo

This is the wall grouping that greets visitors at my back door, but alas, he’s not staying put.

Hail to the Whale Wall Grouping Logo 1

He’s migrating north to the Barn at Todd Farm where he’ll have a whale of a time with some other pieces I have recently completed. Have a “whale-y”great Wednesday, everyone! Susan xoxo


Sprayin’ It Pretty with HomeRight

I have had this little end table beside my bed for quite some time now. HR Sprayer Tented Table BeforeSince the day I purchased it, I have loved the style, but not the color or the rough-textured finish. I always had the notion that some day I would change it, but never had the time or energy to paint all those little divots in the finish! So when I was offered the opportunity through the Fab Furniture Flipping Contest to Spray It Pretty

Fab Furniture Flippin Contest Poster

to try the HomeRight Finish Max Fine Finish Sprayer, this was the project that immediately popped into my head!

So it went from this:HR Sprayer Tented Table Before

to this: HR Sprayer AfterIn about an hour. ONE HOUR. Amazing. Here’s the how-to:

  1. Received the sprayer,Home Right Paint Sprayer
  2. opened the manual and read it in its entirety. YOU NEED TO FOLLOW THE INSTRUCTIONS.
  3. HR Paint Sprayer ManualThey may seem wordy and somewhat complicated, but once you follow the steps, you will be happy that you did.
  4. Set up a mock spray tent in the basement with a large plastic tarp and some duct tape. I had no idea how far the spray would splatter, so I encircled the table and left an opening in the front.
  5.  Grabbed a mask (these are from the dollar store. Best $$ you’ll ever spend!) and donned my safety glasses. HR Sprayer Dollar Store Mask
  6. Chose this pretty Rustoleum Chalked Paint in Serenity Blue. HR Sprayer Rustoleum Chalk PaintI figured if it was going to be next to my pillow, it should be serene.
  7.  Filled the sprayer according to the instructions. I did not need to check the thickness of this particular paint, because it was pretty thin by chalk paint standards. But they show you how to do that in the instruction manual-if its too thick, it won’t spray.
  8. Tested the sprayer on a piece of cardboard (per the instructions). Note the cloudy, soft edge. This prevents that striped look you often get with spray paint cans. HR Sprayer Test Card sheet
  9. Tested one drawer- it took- I don’t know- 30 seconds!? HR Sprayer Drawers Before and AfterWoo Hoo! Off and painting. So easy, just pull the trigger and move back and forth over the piece until it is completely covered. All those crevices filled with paint in an instant. If I saw a spot that wasn’t quite dark enough, I went back over it until the entire table was finished with an even coat of paint. HR Sprayer at WorkAnd, unlike an aerosol spray paint, there was no “paint cloud” and no odor! The paint didn’t go on any surface that I wasn’t spraying directly. And NO DRIPS!! This thing is magical!
  10. I could not remove the knobs, they were somehow attached with whatever that texture paint was. But I wanted some sort of contrast, so I added some Martha Stewart Metallic Pearl paint to the knobs. HR Sprayer Table Metallic Knob
  11. Cleaning time! This is super important! If you don’t pull it apart per the manual and clean out all of the pieces, the paint will dry inside and render the sprayer useless. So, I used warm soapy water and cleaned each piece. HR Sprayer WashingBy the time I was done, the table was dry!
  12. Once the piece was dry, I decided to add a stencil to the top with the same metallic paint I used for the knobs. HR Sprayer Project Martha Stewart Metallic Paint
  13. The piece is done and back in its spot. HR Sprayer AfterTook an hour, tops to do the entire thing. I can’t wait til the weather warms up so I can start using it outside- so many pieces to paint- this is going to be fun! Many thanks to the HomeRight Company, who make all sorts of great products for the DIY enthusiast, and to the Fab Furniture Flipping Contest for providing the tools I needed to make this project a reality! Hope you are having a great day everyone. xoxo Susan

Saltwash Blues

Have you heard of Saltwash paint additive?

Saltwash BannerNo? Well, I hadn’t either until I was introduced to this product for this month’s Fab Furniture Flippin’ Contest. Amazing stuff made with real sea salt that creates a worn, rustic look on any piece! You mix it with any paint type and color, smoosh it on literally anything that accepts paint (wood, metal, plastic, you name it, it sticks). Then you paint an overcoat, allow to dry, sand it and stand back and admire your truly transformed piece! In this case, an old wooden trunk that had seen (much) better days,

Old Trunk Paintedtransformed into this gorgeous sea worthy trunk in various shades of blues.

Finished Trunk Staged LOGOHere is the how-to:

Find an old piece of furniture that needs a bit of TLC to bring it back to life. In this case, an old trunk that had cracks and dents. I had already started a transformation by painting it silver, but I wasn’t in love with it. Once I received the Saltwash, it was an easy decision to use it for this project. I Coach (yes, Coach got into the act with the project : ) painted the trunk with several shades of blue, covering all of the metal and wood and canvas surfaces.

Painted Trunk TopMix the paint with the Saltwash until is is the consistency of cake frosting.

Saltwash Mixture FrostingTaped off the wood slats because I wanted them to appear dry brushed but not textured.

Painted TrunkDabbed on the Saltwash Blue Mixture any where I wanted to have the textured surface, then allowed to dry. The trick is to dab it on thickly and heavily. The beauty of it is that is does hide any cracks or imperfections!

Dabbing Thick Paint on TrunkPainted on a lighter coat of blue over the textured finish and allowed to dry. Already looks pretty awesome right?!

Overpainting Trunk TopcoatSanded down everything, including the wood and metal trim (which allowed the original silver finish to show through)

Saltwash Trunk Sanding off Top LayerFinished with a spray coat of matte acrylic. Here is the finished trunk in beautiful shades of Saltwash Blues. (but you can use any color you wish- the Saltwash has no color in it!)

Finished Trunk Staged LOGOFor more outstanding transformations by this month’s sponsors, click the links below:

http://www.thirtyeighthstreet.com/2016/06/saltwash-coastal-inspirations-fab.html

http://www.58waterstreet.com/2016/06/fab-furniture-flippin-contest-saltwash.html

And if you might be interested in joining the Fab Furniture Flippin’ Contest, click this:

Fab Furniture Flippin Contest Poster

Have a great week leading up to the 4th! I will be out of blogging range, but will be back with more flipping fun projects when I return.

xoxoSusan
Compensation Banner 500


Flippin’ Fab Pure & Original Paint USA

Fab Furniture Flippin ContestThis month, I am participating in the #Fab Furniture Flippin’ Contest, an event featuring some of the best furniture flippers in blog-land. This contest is the brainchild of the bloggers from Evey’s Creations and Anastasia Vintage, both of whom love design, DIY and bringing new life to old pieces. Evey was even on one of my favorite DIY shows- Flea Market Flip! I had read about the contest a few months back, and since I am a devoted furniture flipper, I was eager to get started, so I submitted my application.  Of course, that was before the broken foot incident, which temporarily put me on the sidelines, but I am finally primed and ready to participate in this month’s contest. Which is this: each month, a theme is chosen, and different companies sponsor the contest, providing either supplies or prizes to the flippers (that’s me!). We are allowed to choose any item to work on using the products supplied, and we have approximately 3 weeks from start to finish to paint, stain, decoupage, sand, wax and finish our chosen pieces before photographing them for submissions for judging. Once the judging is completed, a winner is announced, and its on to next month’s flippin’ contest! It was my good fortune to be selected as a contestant this month, because I have now had the opportunity to sample an extraordinary paint from Pure & Original Paint USA,

Pure & Original Paint Boxeswhich was created in the Netherlands and is now distributed in the US through Luxury Dutch Importers, LLC. This paint...well, the only word to describe it is luscious…the colors are simply soft and natural.

Pure & Original Paint Spring PaletteIt has a creamy and smooth texture, brushes on like a dream (even with a not-very-new-brush)

Pure & Original Paint USAand get this, does not need any finish. Even though it has a matte appearance, there is no waxing or varnishing or polyurethaning needed, because, unlike other chalk paints, it does not leave a chalky residue mark when you touch or scratch it. It actually dries to a rock hard finish that can be used both indoors and out…amazing. And the brush cleaned up easily with just water. So, before I started working on my contest piece, I decided to give the paint a test run on a simple brown console table. I cleaned it, did not sand or prime it, just painted with two coats of Nautique Pure & Original Paint

Pure & Original Paint Nautiquethis beautiful green/blue color that caught my eye when I was choosing my 2 cans of free paint provided by Pure & Original for the contest- there are 140 to choose from!  The finish is a lovely smooth matte, but I decided to sand it just to see what would happen. Instead of just sanding off entirely, the paint had already cured and adhered to the wood finish, so the sanding exposed the now “stained” wood grain for a stunning effect.

Pure & Original Wood Grain Closeup BlueThe more I sanded, the prettier it looked and the smoother it was to the touch. And still no final coat needed. Wow. So now I am off to prepare my actual contest piece, with the addition of a few more colors. I will keep you posted as the work progresses. In the meantime, if you are interested in reading more about Pure & Natural Paint USA, click the pic below:

Inspired By ColorAnd, if you are interested in sampling this fabulous paint, you can do so by using this link- : https://www.pureoriginalpaint.com/usa/?ref=118  (I love this paint so much, I’m now an affiliate for Pure and Original Paint USA) A special thanks to the FFFC Team at the Fab Furniture Flippin’ Contest for allowing me to participate- this is going to be so much fun! Have a great weekend everyone! If you’re looking for me, I’ll be in the painting workshop : ) Susan 

Vintage American Heart Sign

Awhile back, I received this large wooden wall-hanging of an elephant painted on some slats.

Vintage Americana Heart BeforeIt was free, and free is good, but the graphic was just a bit too brown and black for me. Don’t get me wrong, I LOVE elephants, but it just seemed a little colorless and blah to me. I have had it hanging around in the workshop for quite some time, literally painting over it a dozen times with all sorts of blues and grays, awaiting some inspiration to hit me.

Vintage Americana Heart Dry Brushed BackgroundGenerally, I find that when all else fails, go with the American Flag with its bold colors and simple but striking graphics. So, stars and stripes it is! But, it was essentially a square, and of course, our flag is a rectangle, so I had to come up with a shape…a star? the map of the US? a rectangle? a heart : ) So I left the background as it was…dry-brushed with multiple shades of grays and blues and added the heart shaped design.

Vintage Americana Heart Red White and BlueThe easiest way to create a symmetrical heart of any size? Take a piece of paper (in this case, a newspaper because of the size I needed), fold it in 1/2, then draw out your shape on one side. Cut along the edge of the folded paper, and then when you open it up, voila!  A perfectly proportioned heart!

Vintage Americana Heart Newspaper PatternOnce I traced the heart shape onto the wood with some chalk, it was simply a matter of taping off the 13 red and white stripes…

Vintage Americana Heart Patternwhich was not as easy as you would have imagined…while leaving one block for the dark blue star field.

Vintage Americana Heart TemplateOnce the stars and stripes were completed, I stenciled in the stars…quite badly as it turns out.

Vintage Americana Heart Stripes and Star FieldBecause of the curves of the heart shape and the spaces between the slats, it was impossible to fit all 50 stars into the field in rows, as they are on the real flag. So I painted over the first go and tried it again.  I taped off the edges and winged it…just stamping them wherever there was an open space…not symmetrical, not perfect by any means.

Vintage Americana Heart StarsThere are a few states hanging off the edge…hello, Alaska and Hawaii! And there are a few states missing representation…then again, aren’t there a few states that are threatening to secede from the union if a certain candidate wins this year’s presidential election? But you get the general idea, right? Then I added the graphics above and below via my reverse chalking method.

Vintage Americana Heart Chalking PatternThat was the easiest part of the entire piece! Once I was reasonably happy with that, I sanded the whole thing down to give it a distressed look,

Vintage Americana Heart Sanding Stars Distressingthen finished with a coating of Krylon spray matte varnish

Krylon Matte Finish

(of course, that was a few days ago, when it was 60 outside, so I could spray it, as opposed to this morning’s temps, which are hovering in the 20’s). This graphic could easily be applied to a wood palette- another great project idea! Vintage Americana Heart LogoHave a totally terrific Tuesday, everyone (even if you’re buried in snow…) Susan