Hail to the Whale!

Coach and I, well, we just love whales. I am not certain how it all began, but I can say that one of our very first “all day” dates took place in lovely Mystic Connecticut. In Mystic Seaport, it is all things nautical, and I suspect perhaps that day spent touring the Charles W. Morgan (the last wooden whale ship in the world!)

Charles W. Morgan

the Seaport Museum and the Mystic Aquarium, all the while basking in the glow of young love, might have sparked the beginning of a life-long passion for those majestic denizens of the deep. So, I paint a lot of whales…on trunks and planks and tables, pretty much any flat surface.

Whale Porch Table

After all, who can resist a gentle, giant creature with a hint of a smile-especially when decorated with the American flag? Recently, Coach came upon a stack of old cabinet doors (well, it might not have been recently, it’s just what has surfaced in the barn most recently.)

Hail to the Whale Before Cupboard Door

They were simply painted creamy white, or so we thought. Until he started to sand the edges and behold! This amazing teal blue emerged.

Hail to the Whale Black Background

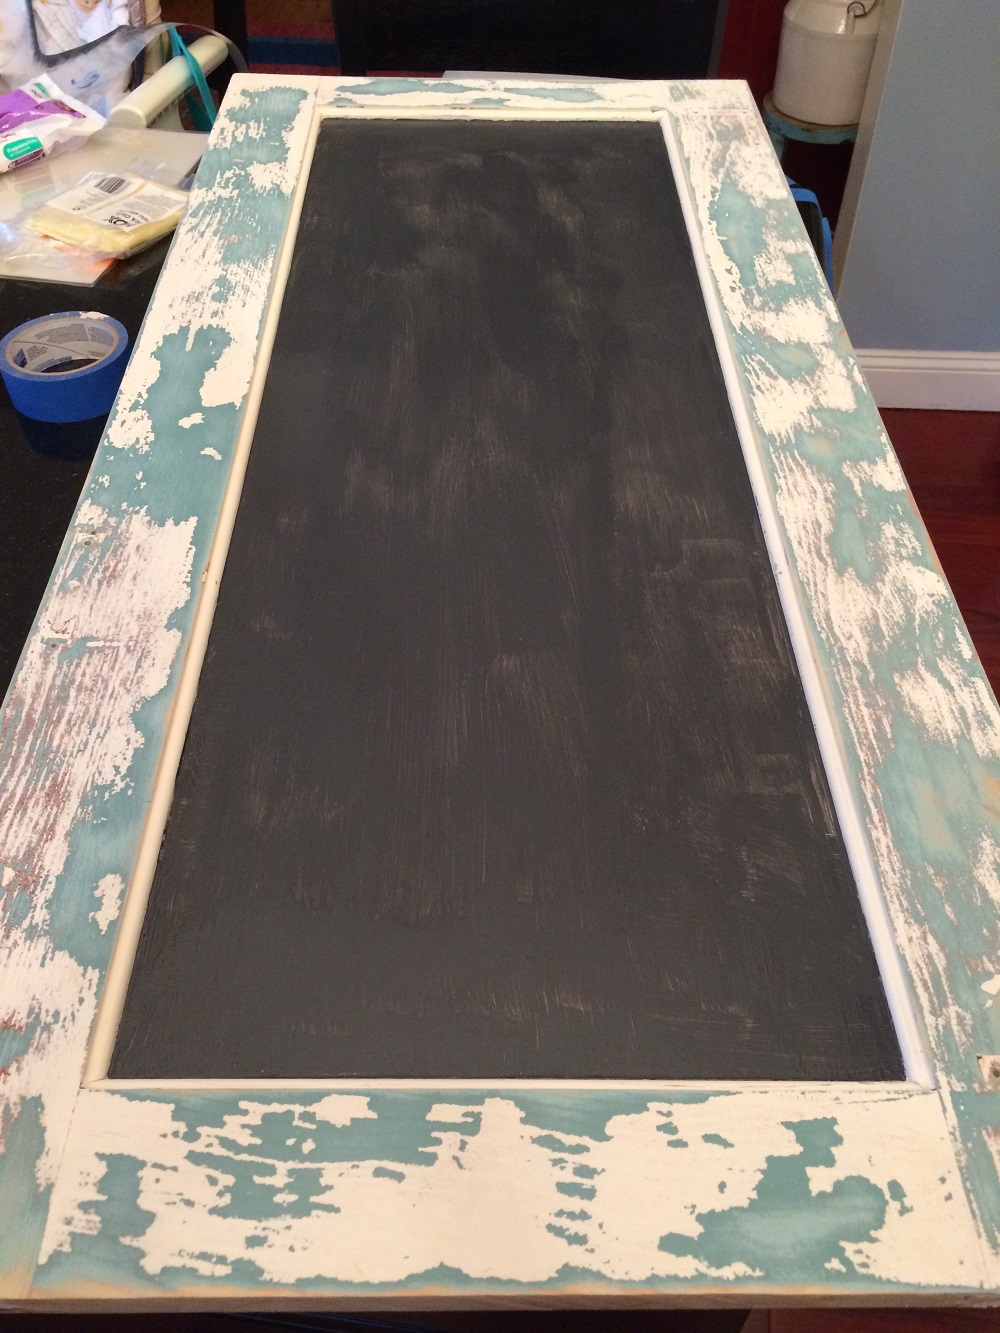
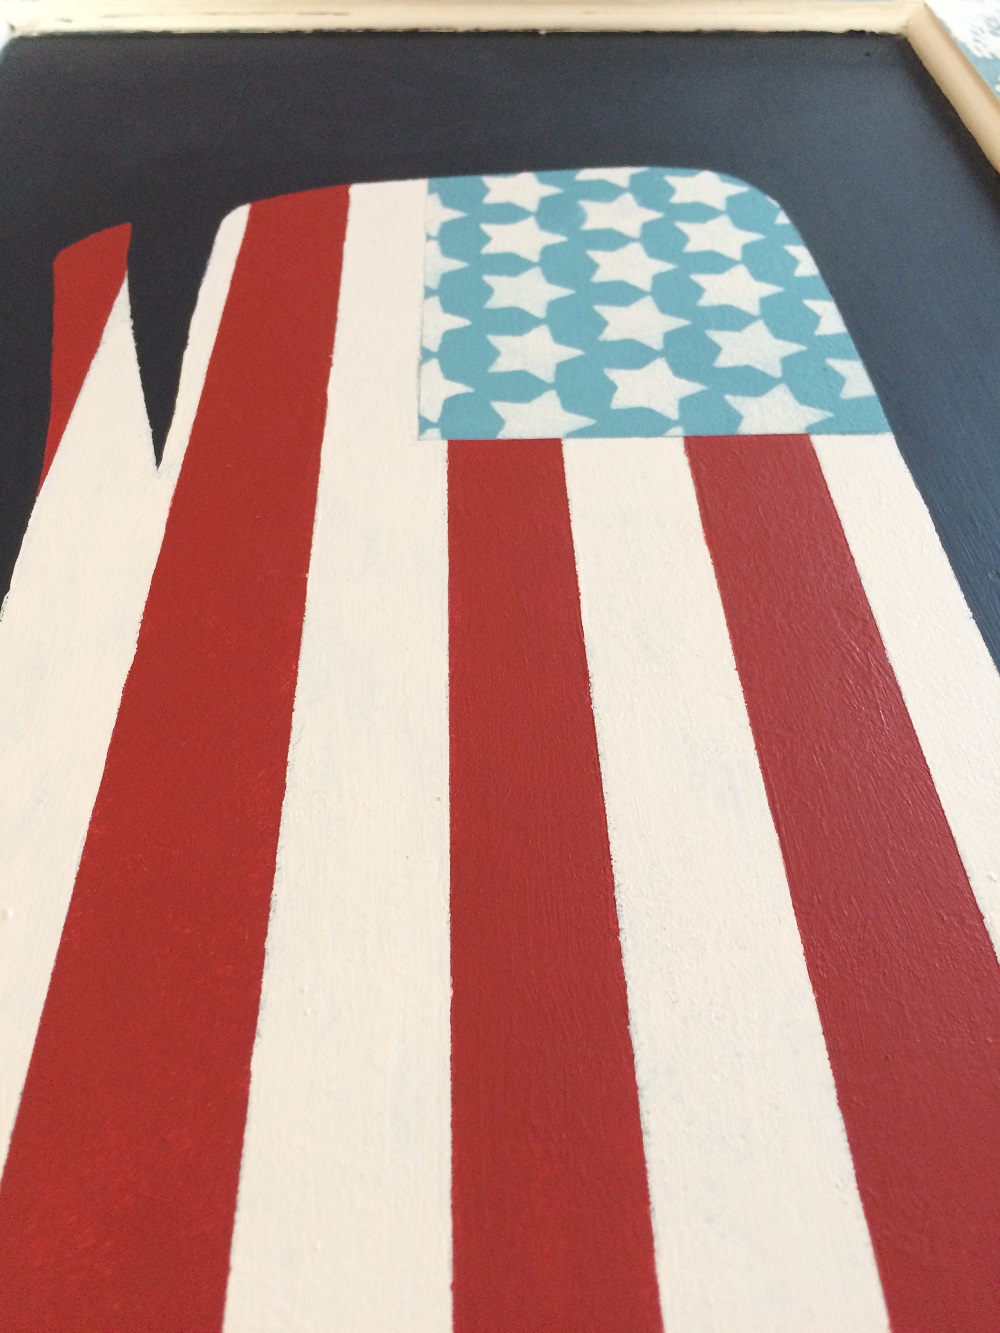
Sometimes you have in your mind what color scheme to use on a piece, sometimes the piece dictates the palette. In this case, there was cream and teal and a country red color…perfect for an American Flag Whale! I went with a black background for greater impact and contrast to the flag whale itself. For the flag colors, I mixed paints until I came up with the exact shades of teals and reds that matched the existing colors on the frame. I have, in my workshop, perhaps 50 or so of those little Behr sample paint pots

Behr Sample Pots

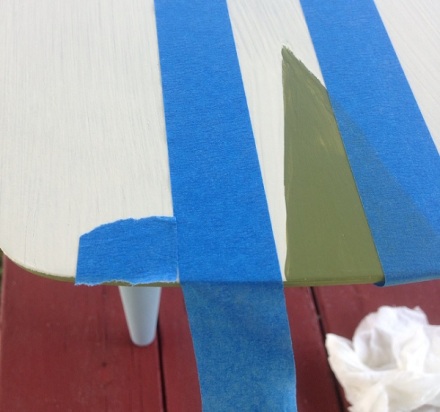
that you get at Home Depot for a couple of bucks…in a multitude of colors. These are my go-to samples when I am mixing paints-economical and plentiful…and if I mix a color I really love, I just use the color match app to have them mix whatever amount I need! Once I painted the background, it was a pretty simple process-I used a whale stencil


Whale Stencil

for the overall pattern in cream, then taped off the stripes, and added the red.

Hail to the Whale Taped Stripes

Now, I know there aren’t 13 stripes- he was just too narrow and it looked too tight, so I went with a more interpretive look.

Hail to the Whale Star Field

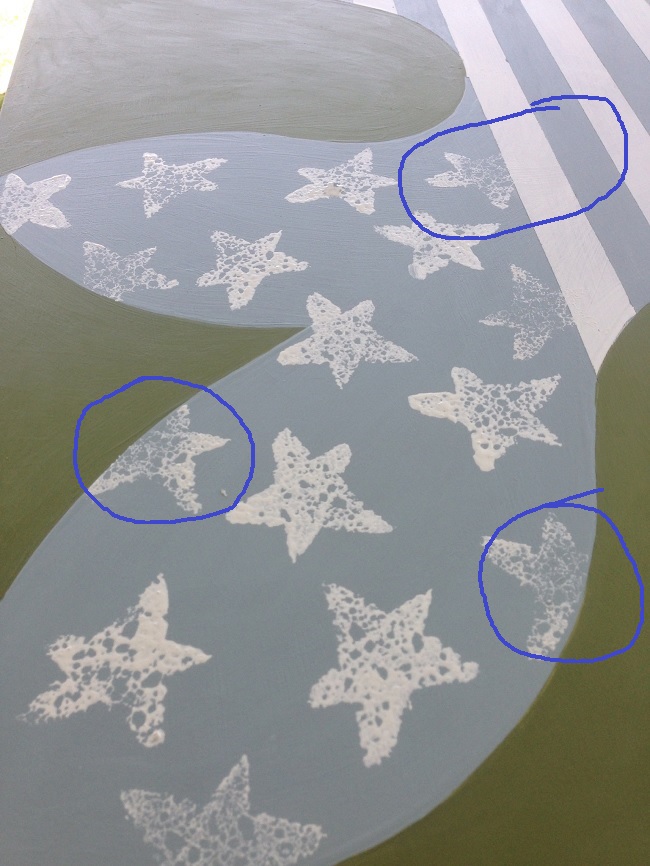
After that, I added the star field using a stencil I cut out with my Cricut Air machine.

Cricut Gold

Do you have one of these?? If not, you need to hustle over to your favorite craft store and buy one, like now! If you do crafts, or scrapbooking, or make signs or stencils or just about anything where you need to apply graphics, this is your go-to machine. See this little square of stars?

Star Stencil

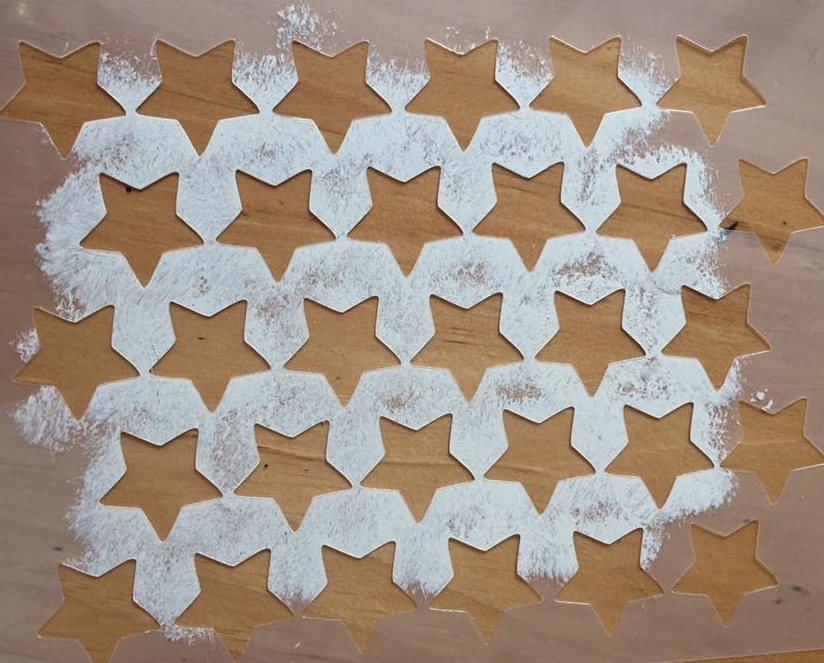
By hand, that would have taken me hours to cut…and then a few more in the ER getting stitched up from the X-acto knife thumb slice… With the Cricut, it took maybe ten minutes to design and cut the stencil. Simply incredible!

Once the whale had dried, I added the matching stars in the four corners. Upon close inspection, you can see where I allowed the faint outline of the original hardware to remain.

Hail to the Whale Hinge Detail

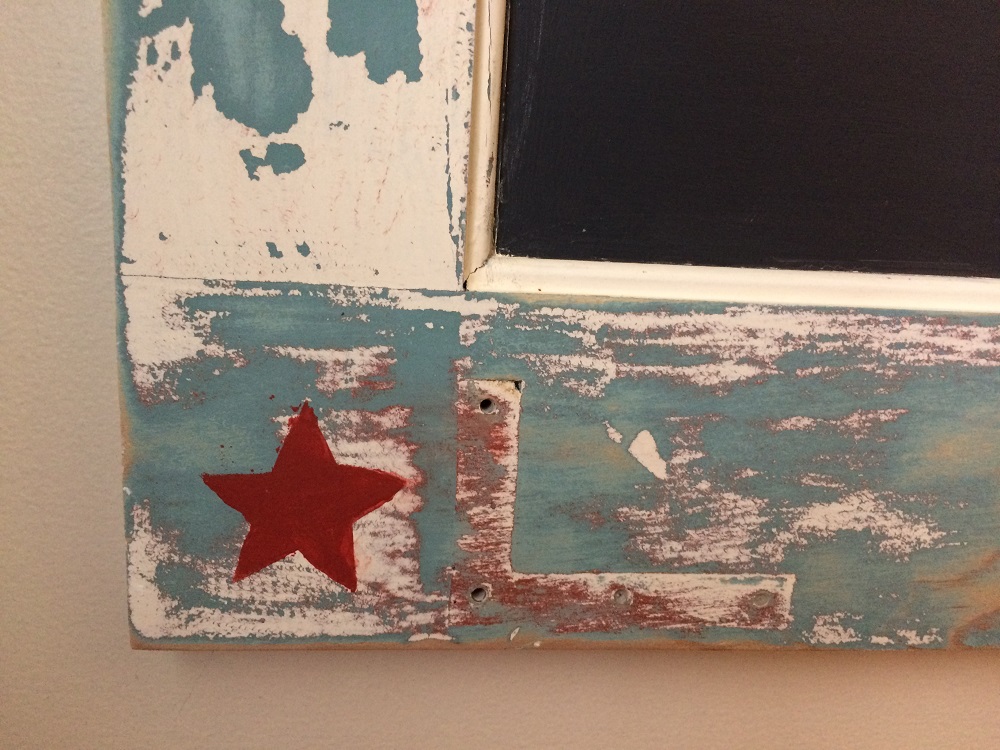
I think it gives the piece character to leave the blemishes there for everyone to see. After that, it was simply a matter of a topcoat…and I went with my go-to favorite: Flat Out Flat by General Finishes. **As a side-note, when you paint on this topcoat, it initially appears milky white,

Hail to the Whale FOF Wet Finish

which kind of freaked me out the first time I tried it. But, once it dried to a clear, softly glowing finish, I was sold. So, the whale is now finished and ready for his new home.

Hail to the Whale Finished Logo

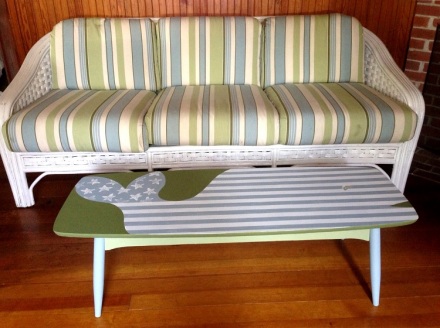
This is the wall grouping that greets visitors at my back door, but alas, he’s not staying put.

Hail to the Whale Wall Grouping Logo 1

He’s migrating north to the Barn at Todd Farm where he’ll have a whale of a time with some other pieces I have recently completed. Have a “whale-y”great Wednesday, everyone! Susan xoxo


A Global Intervention

It’s Wanderlust Wednesday, and as much as I would like to be jetting to some fab location on the globe, this week I have to settle for repurposing a couple of globes instead. My shop in this weekend’s Vintage Thymes Market is all about back to school, and I have so many maps and globes, it’s a bit ridiculous. So a couple of them got a little makeover. A plain Jane, run-of-the-mill globe is now a chalkboard- thanks to some Benjamin Moore Chalkboard paint.Unpainted Globe

Super easy to do: literally take a globe (we found all of ours at yard and estate sales for just a couple of bucks), paint on a coat of chalkboard paint to cover. Wait a day. Add a second coat.

Globe Chalkboard Painted 2 coats

Wait a couple of days. Now you want to “size” the surface so when you write on it, you can change it easily by wiping with a damp cloth.

Chalking the Globe

You literally take the side of the chalk and paint the entire surface until it looks like an inverted snow globe…then wipe it with a damp rag.

Chalked Globe

The finished globe-guess this is what earth looks like at night when viewed from Mars. Kinda cool, right?

Chalk Globe Completed

The other great find was a standing, light-up globe-awesome! The base was an old, scratched and scraped cherry wood.

Stand Globe in Car

So I hit it will some steel wool and Liquid Sander. A little goes a long way. I think I’ve had this can since 1999!

Klean Strip Liquid Sander It cleans and preps the surface and creates a solid bond for the paint to adhere. I use this when I don’t want to use a white primer or chalk paint. The paint is Behr’s Enduring. I used two coats and then, to finish, I mixed some Annie Sloan Soft Wax with a bit of Behr Stealth Jet (my newest color obsession-it’s dark charcoal with a hint of chocolate)

Soft Wax and Paint Mix

and painted that into the crevices and molding edges to highlight the details.

Brushing On Wax

Wiped most of it away,

Rubbing Off Wax

allowed to dry, then finished the whole thing with a light coat of wax.

Stand Globe Painted

The results are out of this world!

Stand Globe Lit

Both will be available this weekend at the market, so if you happen to be wandering about on the south shore, stop by and say hello! I will be there on Friday, and would love to meet you all! Happy wandering…Susan

A Whale of a Weekend!

Over the 4th of July weekend, I traveled to Cape Cod to spend the holiday with a good friend at her family’s beach-side cottage in Falmouth. Is there anything more quintessentially Cape Cod than magnificent blooming hydrangeas against grey cedar shingles? Beautiful!!

Whale Table Flag

We ate too much, drank margaritas, chatted for hours, watched the neighborhood fireworks and delighted in the joy of her two adorable tow-headed grandsons. The cottage is circa 1930’s, with dark beadboard walls and ceiling in the living room,

Whale Table Bead Board Walls

a vintage kitchy kitchen and many of the original furnishings still in place. Since she is slowly attempting to freshen and lighten the decor, her most recent flea market find was a white rattan living room set with green and blue striped cushions-so comfy and pretty!

Whale Cushion Colors

But the dark brown, pressed-board, veneered-top coffee table had seen many better days,

Whale Table Before

so the choice was to toss it and get something new or refurbish it-nothing that a little paint, tape and time can’t fix! Since she has often admired my whale table,

This Old House Whale Table

our original plan was to cut the top of this table into the proper shape and then paint it. But the base was too wide, which didn’t leave  a lot of room for cutting definition. The next choice was to define the background with a contrasting color and then paint the whale-perfect! The red, white and blue of my whale table would not have cut it in her beachy blues room, so we chose the Behr sample pots

Whale Behr Paints

that most closely matched the stripes in the cushion fabric.

Whale Side View

(Funny story, when we went to the mixing counter to order our colors, the clerk said “Why is everyone calling these paint pots? They are jars!” I guess we can thank the British invasion for that one-so thanks, Annie Sloan!)

Here’s the how-to:

1. Get a table that fits a whale shape well. This one is oblong in shape so it was a natural fit with a curved middle and rounded edges. But since most coffee tables are rectangular, they lend themselves to the whale shape well. Prime it. I usually use Glidden Gripper

Glidden Gripper

for its awesome priming ability to stick to pretty much anything.

2. Decide on a pattern

Whale Chalk Outline

and then draw a whale on the primed table top surface.

Whale Pattern Pencil

It you don’t have any drawing skills, the next best thing is to find the shape online and then print it. My skills are primitive, at best, but they get the job done.

Whale pattern

Whales are pretty simple though. They are kind of just a big old long blob with a mouth and a tail.

3. Paint the background color. In this case, we used the darker green to give it a good definition. That also wrapped around the edge of the table. Then we painted the skirt and the legs the other contrasting colors of Mother Nature, Grape Vine and Blue Fox.

Whale Table Color Palette

4. Painted the background color of the whale. In this case, it was a Behr plain white.

Whale Painting White Coat

Now you can really see the shape taking shape against the darker green background.

Whale White Undercoat

5. Tape off the stripes. I originally measured true center, then started a line across using the table edge as a guide. However, I soon realized that since the table is oblong, it gracefully slopes down as it nears the edges. We could have followed those lines and created a curved effect, but we were going with pin-striped preppy whale so we just started with the center lines, then pulled the tape taut across.

Whale Taped Stripes

A quick tip: instead of measuring each individual stripe row spacing, we just placed a small piece of tape, then started the next row-quick and easy!

Whale Tape Spacers

6. Painted the blue lines and tail. Make sure that when you are painting along the tape, you use light coats and strokes so it doesn’t bleed underneath the tape lines! Two light coats are better than one heavy coat. This paint takes so little time to dry, especially in the hot Cape Cod sunshine, that it was only a matter of minutes between coats.

7. Pull the tape and step back and admire the cute preppy whale emerging.

Whale Blue Tail

8. Decorate the tail. We wanted to make him look a little more fresh and beachy, so we used a starfish shape cut from an old sponge.

Whale Sponge Starfish

With the white paint, we began sponging the stars on his tail in a random pleasing pattern. This is your chance to use your creativity! Don’t want stars? Use circles or spirals! Anything you can think of you can cut out of a sponge or potato or find a stencil or stamp at your local craft store.

Whale Tail with Stars

Tip: try to stamp a couple along the edges with a partial pattern so the overall effect is more even and not cramped into the defined space.

Whale Tail with Star Edges Defined

The sponge effect is lighter and makes for more realistic starfish.

Whale Completed

9. Add an eye. This is a personal choice, but since whales have eyes and we wanted to add a touch of the soft green to the top, this half-moon shape worked beautifully.

Whale Table with Eye

10. Stand back and admire. The table is back in place in front of the new sofa, and it instantly added a bright, whimsical touch to the living room.

Whale table complete

At that point, it was time for me to head back home (to avoid the notorious Cape bridge traffic). So she’ll be finishing her whale with a touch of glazing and a couple of coats of polyurethane. Need to protect our project from the battle beasts that were once played with by her sons, and now by her grandsons.

Whale Battle Beasts

So thanks for a whale of a weekend, Mary! See you very soon. I’ll bring the sandpaper…and the margaritas. Susan

PS: Check out my links on the Thirty HandMade Days Pity Party and on My Repurposed Life!

Mirror, Mirror on the Wall…

…I found a mirror for my new front hall!!! With the Hall of Shame project still ongoing, I have been searching for artwork, occasional tables and other assorted items to fill the space once it is completed. (and, yes, it is still a work in progress- but good things come to those who wait, right?) Along with my usual trips to HomeGoods and the various local antique and junque shops I frequent, I do make an occasional stop at my local Salvation Army Store. With a large furniture showroom in the back, you never know what you might find- like my fabulous new $10.00 mirror!

It’s a horrible brown circa 1970’s faux wood grain, but it’s the perfect size and the top detail is exquisite-it actually mirrors the curved shapes of the soon-to-be-hung damask wallpaper. You would almost think that was intentional, right?

Time to hit it with a coat of Kilz to cover that faux wood paint and the faint odor of mildew/smoke that often accompanies a cast-off piece of furniture, origins unknown. Looks better already! So I grabbed my Ipad and started searching on Pinterest and some of my favorite blogs for color inspiration.

Thinking bold and bright

or soft and dreamy

daring (not sure what happens when your toe hits those mirrors!)

or darling

Mirrors can open up your space (Ah,Versailles…)

Reflect your true face

And welcome you into a warm, homey space (hopefully mine : )

And then I saw this Jonathan Adler mirror and this entryway with pieces from Oomph! and that was it-color chosen.

Tangerine Tango is the Pantone Color of the Year, and what goes better with the Smoke Blue I’ve chosen for the walls than its complementary color, orange? So I chose this yummy shade called Mesa Sunrise from Behr. Now, Benjamin Moore is my go-to paint for just about everything, but Behr sells these little custom mixed sample pots for $2.95, with just enough paint in them for a small project. Here is a sneak preview of the Mesa Sunrise Mirror that will soon be welcoming you into my new front hall. And if Pantone comes out with the newest “color of the year” I can always change it! Total investment for this project: $12.95 + tax.

Mesa Sunrise Mirror in the making

Enjoy your Friday- and just remember to make each day a reflection of your best you! Susan

%d bloggers like this: