Setting the Mood

Although I adore Pinterest, and have spent many a cold winter afternoon “pinning” photos of amazing interiors,  I find that the best way to design my own cohesive space is with a “mood board” or presentation board.

Mood Board Vintage Parlor

Although photographs and Ipad apps are great for overall visual, nothing comes close to actually feeling the fabric textures and metallic finishes and seeing the colors with your own eyes. A large foam core board is the perfect backdrop for taping and glueing bits of photos, fabrics and trims. Board Mid Century Modern

First, of course, you need measurements and a room layout- this Online Room Planner from Urban Barn is fantastic! You plug in your room dimensions, then add in your pieces of furniture and accessories, lighting, structural points and just like that- you have a printable plan!

Urban Barn The Make Room Plans

If you are starting with a clean slate, then you will need to begin with an inspiration- whether its a paint chip, a fabric swatch or photograph of a piece of furniture. In this case, its a gold antique velvet settee that will become the focal point of a victorian parlor.

Mood Board Velvet Settee

That will become your “jumping off” point from which you can then design the rest of the space. For wall and trim colors, I head to my local bigbox hardware store, where they literally have thousands of paint chips to choose from. As you can see, I have accumulated quite a pile of chips- but I never toss them once a project is done- they could just be the very color I need for my next board!

Mood Board Paint Chips

There I can create a palette that is going to work in the room- and those are free for the taking! One of my favorite tasks is choosing fabrics-walking through my local Joann’s or Zimmans is for most people, I assume, akin to walking into a Godiva chocolatier-yummy!!

Board Zimmans Showroom

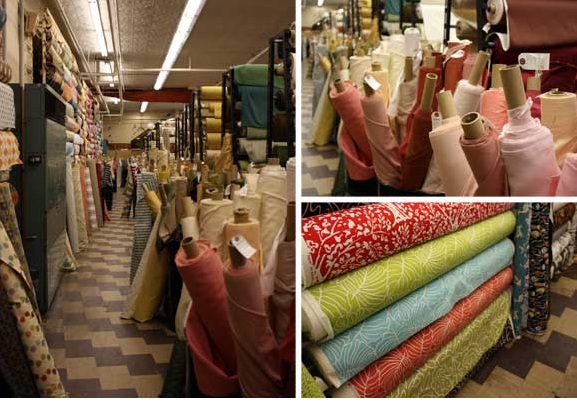
I could spend hours (and sometimes I do) wandering the aisles, poking through the clearance section, searching for the perfect look and feel of the fabulous fabrics I will be using to create drapes or bedcoverings or toss pillows. And they will happily provide you with swatches of your chosen fabrics that you can take home and add to your board, prior to purchasing an entire bolt. Once you have your pieces, you literally just start glueing in place, and it will soon become clear if everything will work in harmony,

Mood Board Pretty in Pink

or if you will need to edit, either by addition or subtraction. It’s fun, it’s so functional, and it will help you clearly define your new space before you put it in place! Hope your mood is a good one today-after all, it’s almost the weekend! Susan

What’s Old Is New in Newburyport

It’s Wanderlust Wednesday, and this week we are off to Newburyport, Massachusetts! This charming historic seaport town north of Boston that was settled in 1634, Newburyport Brown Square

boasts some of the grandest 17th century colonial homes of seafaring entrepreneurs who owned and worked in the shipyards. Lining the main streets and back roads, many of these stately homes feature widow’s walks, structures on the roof where the women could watch for the return of their loved ones on sailing vessels that had been out to sea for months, sometimes years.

Newburyport Dalton House

Rich in history, dating back to the slave trades prior to the Revolutionary War, this city is charming in stature, and provides residents and tourists alike with plenty of fabulous dining and shopping options. The hub of the waterfront shopping district is Merchant Square and State Street,

Newburyport Market Square

where shoppers are tempted with an array of offered goods, ranging from gourmet eats at Stonewall Kitchen to gourmet doggie treats @ Just Dogs Gourmet! Some of my favorite shops, including Flukes and Finds and Friends, a co-op shop where vendors always greet you with a smile (and possibly a witch’s hat and a cup of brew, if you happen to visit during Halloween : )

Such a fun place to shop, warm and welcoming, full of hidden gems around every corner.

Newburyport Flukes and Finds

Both Ivy Lane and Vintage Chic Boutique offer a bit of everything old that’s new again-from vintage broaches to refurbished furnishings, many of which may have come from those historic homes.  I first stumbled upon the Vintage Chic Boutique

Newburyport Vintage Chic Boutique

last spring at the Vintage Bazaar @ Pettingill Farm. Although there were many vendors selling re-painted furniture featuring chalk paint finishes (presently quite the rage for the DIY fan), their pieces were outstanding in their choice of color and finishes.  Their refurbished vintage pieces were done in rich, muted tones with a gorgeous waxy patina finish, my first introduction to Annie Sloan paints and waxes. I have since tried it myself (see Coffee, Tea or Free for details) and have to say I love the finish!

At the fall fair, I discovered the newly-opened Ivy Lane, a shop with a similar design sense: taking something old and making it new and beautiful again.

Newburyport Ivy Lane

The owners, along with their in-house interior designer Holly Gagne (who drives a fabulous tricked-out vintage aqua VW to showcase her wares) Newburyport Holly Gagne VW create a warm and inviting shop featuring antiques, collectibles and upcycled furniture using eco-friendly CeCe Caldwell paints and finishes. Newburyport CeCe Caldwell Paints

I could go on for another ten blog posts, but there are just so many great shops and restaurants in Newburyport-way too many to mention here. But definitely worth the trip to spend a day strolling cobblestone streets, dining at one of the many pubs and shopping for your new favorite collectible. Have a wonderful Wednesday, everyone! Susan

Living in a Vacuum…

..less home. Over the years, I have purchased more than a dozen vacuum cleaners of various shapes and sizes, spending hundreds of $$$$.

Vacuum Graveyard

I do all my research, check the consumer surveys, read all the real consumer online reviews. So when I purchase said vacuums, I am hoping they will work as advertised. Pretty simple, actually. Suck up dirt, get rid of the dog fur, deep clean the few area rugs we have in our home as well as the stairs. Alas, I have yet to find a vacuum that can do it all. And some can’t do much of anything! These are our (I use that term with some amusement, as Coach does not have enough of a vacuum use track record to weigh in on this particular subject. Awhile ago, I sent him to the vacuum repair shop to retrieve the Bissell that had malfunctioned almost immediately after I had purchased it. The voicemail he left? “Hi, I am at the vacuum store and they are trying to give me a maroon vacuum cleaner. Is our vacuum maroon? I thought it was blue.” Just saying…) current units we have at Casa Mathison.  Presently we have FOUR vacuums stuffed in our closets, two hand-helds, two uprights. (not counting the shop vac in the basement- which is fine- at the moment).

Number 1: A Black and Decker Cyclonic Dustbuster.

Vacuum Dustbuster

Apparently cyclonic means that there is a bit of a tornado going on inside, so as the bits are retrieved off the floor, they swirl around away from the filter so it doesn’t get clogged or slow down. Makes sense. Great for picking up small bits in the kitchen, like when the dog knocks all the unwanted food out of her bowl, or when I drop oatmeal on the floor while making cookies. But not flour. It won’t pick up flour. And clearly not for vacuuming an entire house, especially carpeting!

Number 2: Shark hand held vacuum with the beater bar.

Vacuum Shark

This one is for the stairs, where the dog fur collects in the corners and risers. The main part works fine for a short time, but the hose attachment gets clogged up with the fur while I am trying to do the corners, and there is no way to detach it to clear it out, except to use a knitting needle-yikes! Once it’s clogged, it’s done.

Number 3: Eureka! I found it! Or at least I thought I had found a great little machine for doing the floors with this Eureka stick vacuum.

Vacuum Eureka

I am not sure what the “four-in-one” is, as it pretty much just stands up and picks up small bits on the floors. No beater bar. Not enough suction to clean a carpet. Can’t do stairs, whether you keep the handle long or short. And then there is this bad boy, Number 4: the Bissell PRO-LITE with 12 amps of power! (This is where Tim Allen is supposed to make that “more power, ar, ar ar nosie”)

Vacuum Bissell

Did my research, purchased it for the best price, assembled it. Best vacuum I ever had. Not too noisy, lots of suction. Then the switch broke and needed repair. And then pieces started falling off of it! It seemed like every time I took it out of the closet, more parts fell off the bottom- the entire base is now being held on with one bolt. Then the suction lessened, so it doesn’t really clean the rugs deeply any more. Tough with the dog, and the winter sand and salt presently making its way into the house.Vacuum BissellSo here I am, once again searching again for the one vacuum that will do it all-floors, stairs, area rugs, dog fur. This time I would like a cannister vac-but one with some serious power to get the rugs clean and do the stairs! Any suggestions would be greatly appreciated. I just don’t want to purchase yet another unit that will quickly kick the bucket and join the growing heap of parts in the vacuum graveyard. Here’s hoping your Sunday doesn’t suck-or maybe hoping it does-literally!!  Susan

The Year of Fun!!

January 01, 2013New Year’s, to me, is always a time to cleanse the palette, wipe the slate clean, start anew. A few moments of reflection of years’ past is typically followed by a resolve (like millions of other repentants) to 1.eat better 2.exercise more, blah, blah, blah. Well, this year is different! I am personally declaring 2013 to be The Year of Fun!! If there is an opportunity to learn, create, travel, design, teach, cook, dine, soar,Alaskan Bi-Plane on Country Design Home

entertain or be entertained, count me in! Time for a fresh start and a new perspective, time for some fun! (disclaimer: this does not include any activities where I am strapped to a harness and soaring above the clouds- I do like to keep my feet firmly planted on our planet. Oh, and also, not kayaking, not a huge fan, although a little water rafting in Alaska might fit the bill nicely : )    Alaska Water Rafting

And so it begins by clearing out the dining room cupboard. Out went all of the colorful Christmas holiday plates and decorations.

Christmas Dishes in Hutch     Snowman PlatterNikko Christmas Dishes

In their place? White. Loads of white. Cupboard with white pottery

Plates, stacks of bowls, crocks and tureens-all white-that I have collected over the years.

Cupboard with white bowls

The color white makes everything clearer, cleaner and purer. White becomes the perfect backdrop for the millions of other beautiful colors in our spectrum and makes them pop. There are so many shades of white, so you can mix and match them to create a fabulously layered look.

White can be classically elegant:

or elegantly classic

White mirrored armoire

Photo via My Shabby Streamside Studio

White can be whimsical

Photo via Better Homes and Gardens

fanciful

White flower paper installation

Photo via ComeUpToMyRoom.com

funky & fun

white vintage vignette

Photo via Biskops Garden Blogspot

tastefully simple

White mirrored vanity

Photo via Citified.blogspot.com

or simply extraordinary

White room from Capri Palace Hotel, Anacapri - Italy

Photo via Fabrizia Frezza Architecture Interiors

So if you are looking for a way to start fresh and new for 2013, forget those resolutions that only last a day or two and get your exercise by grabbing a can of white paint and giving your space a whole new look!! Happy Fun Year everyone!!! Susan 

“Rockin’ Around the Christmas Tree…”

“…at the Christmas Party Hop!”  (What exactly is a party hop, anyway??) Yesterday I decided to make a cake for a an amazing person whose birthday happens to fall three days before Christmas. I imagine that it’s not always fun having your birthday so close to the biggest holiday of the year- your special day may totally get forgotten in all the hustle and bustle of the season. So I pulled all these ingredients out, and turned this:

Cake Ingredients

Into this Winter Wonderland Cake:                Christmas Tree Cake

It is a pretty simple cake, although it looks like  you spent hours and hours creating it! Here’s how:

1. Bake a cake in a bundt pan. Cake Bundt Pan

Here is a great recipe for turning a box mix into a pound cake with the additions of butter, water and pudding mix!

Cake Mix Recipe

Cool the cake, and invert in onto your serving plate.

2. Frosting: you certainly can use the kind in the tubs, I did for this, but I added some more confectioner’s sugar, cream and vanilla to boost the flavor. Then I added the green food coloring, but I saved a little of the white for the top layer of drizzle. Fill a pastry bag with the colored frosting.

3. Make your trees from ice cream cones. Take a “star” tip in a pastry bag and fill it with whatever color frosting you want the trees to be- green is good, pink or purple is fine too! Holding the cones at the tip, and starting at the bottom, pipe rows of stars, pulling them out a little so they look shaggy.  Cake Frosting Trees

As you go along, every fourth or fifth row, turn the cone sideways and sprinkle with decorations-cute, huh?

Cake Trees

When you get just to the top, put the cone down on wax paper and then add the frosting tip of the tree.  Frost your forest, then allow to dry.

Cake Frosting Forest

4. Take whatever colored frosting you have remaining, and put it in a microwave-safe bowl and begin to melt it. I use the high setting and check it every 15 seconds until it is a runny consistency. Don’t burn it!!!!

Cake Drizzle

5. Now using a spoon or fork, drizzle the icing back and forth over the cake until it is covered. It sets quickly so you have to work fast. Then take the white icing and melt it the same way.  Doing one section at at time, drizzle the white icing onto the cake, sprinkle some coconut, place a tree into place and push gently to secure it. Repeat with remaining icing and trees until you have a wonderland!

6. Final step: take confectioner’s sugar and a little sifter and sprinkle all over the entire cake to give the illusion of snow fall…pretty!! Now serve it to the very special birthday girl : ) and sing a little “Happy Birthday Party Hop”     Cake Sprinkling Sugar   Hope you have a sugary sweet Sunday everyone!! Two days until Santa arrives!! Susan


A Sweet Swap

Wednesday was our second annual cookie swap at my work place-sweet!!! When I proposed the idea last year, it initially was greeted with some trepidation (why would I swap my cookies, and how do I decide what kind to bring?). But it was such a success that this year my co-workers were quite enthusiastic about rolling up their sleeves and rolling out some dough!

Cookies Gingerbread men

Knowing you will be going home with two dozen+ assorted home made delicious cookies is quite an incentive! I found this book, which I thought might have some great swapping recipes, along with tips for a fun and successful swap. Although we did skip the recipes for Juicy Sangria  and Fresh Lime Margaritas-tequila is rather frowned upon in the middle of a work day.

Cookie Swap Book

Then I turned to my holiday Pinterest board for recipes, and I found this one for cute reindeer pretzel cookies. Reindeer Pretzel Cookies on Country Design HomeWhich I did not follow exactly. So they came out like this.  Cookies Pretzels Not very pretty, very yummy, but sooo not pretty! They would be right at home in the land of misfit toys– am I right? For my other selection (we each brought in two dozen to swap), I went with a traditional sugar cookie, drizzled with icing and decorated with sprinkles.

Cookies Trees

My co-workers’ yummy cookies included: Chocolate Coconut Disasters (per the baker, but they were really awesome!)

Cookies Coconut Disasters

Peppermint Bark

 Cookies Peppermint Bark

Chocolate Dipped Macaroons

Chocolate Dipped Macaroons

Peanut Butter Rolo Cookies

Cookies Red and Green Rolos

I provided the trays, cello wrap, ribbon and the little gingerbread guys for gift tags.

Cookies Trays and Wrap

When we were finished, each participant walked away with a tray filled with variety of cookies to bring home-yum!

Cookie Trays

For more holiday recipes and ideas, please visit my Merry Happy Holly Days on Pinterest. If you have a favorite cookie recipe that you would like to share, send it to me and I will add it here!  And have a sweet, sweet Friday everyon! Susan

The Glidden Project-Complete!

Part two of the Glidden Project. A budget remodel using Glidden paints.

The Glidden Project-Complete!.

The Glidden Project-Complete!

Soooo, how did I do?!? If you remember the before pics, dark and dreary, not much light, kind of drab. But now… bright and cheerful, lighter and fresher-just in time for the holidays!! A few things I did for this makeover:

1. Repainted all the walls, including the tired blue fireplace wall, which immediately brightened up the entire room.

Completed Room

2. Transformed the bookcases/media wall. Fresh paint on back wall, repainted all the shelving from dark, stained brown to creamy white. I also painted the niche with the Steel Blue for a focal point- where the hand-carved whale now sits. Backlighting it with some LED lights gives an aquarium-like transformation-kind of cool, right?

Glidden Bookcase Whale Wall

3. Edited the shelves by removing most of Coach’s old books and keeping the ones that have some meaning (or the colors looked pretty : )

Bookshelves Edited

4. Had this old chair and ottoman re-upholstered in a light blue linen with creamy white trim.

Family Room Chair Before

Here is the brighter, fresher, newly transformed chair and ottoman! I have a great company in Lynn, just in case anyone needs a remodel…

Glidden Chair Redo

4. We kept the rugs the same, but change out some lampshades, added some colorful throw pillows, some soft fluffy blankets for those chilly winter evenings and re-arranged the pictures and mirrors.  This is Daisy’s chair. She would be really upset if we got rid of her chair, even if she really isn’t able to get up there to curl into a ball : )

Daisy's Chair

Wall Completed with Sofa

5. I also used the Steel Blue to re-paint the arched mirror so it would stand out against the Antique Beige background.

Arched Mirror Steel Blue

And then I decorated for the holidays, of course!

Decorated Fireplace and Tree

Arched Mirror Steel Blue Decorated

I would like to again thank the folks at Glidden for their paint, and their patience in allowing me the time to make this happen and write about it in my own words. I hope this story inspires you to try something new, break away from the known and do a little experimenting of your own!  Susan

A Lousy Im”Press”ion

So, it appears as if you all received an email from Country Design Home yesterday that held no content, just a link to a post that was password protected. Apologies for that! Apparently, if you privately publish a post, Word Press (my blog hosting site) still sends out an email with the link to all of your followers, even if they cannot view it! I am not sure what the concept is there, but I will tell you that the blog post in question is now live, and I would love for you to read it- it is part 1 of 2 posts! Here is the link: https://countrydesignhome.com/2012/12/18/thegliddenproject/ This is a project I have been working hard on for the past couple of months, and would love any comments or feedback! Again, I apologize for the snafu…and I hope you enjoy the blog! Susan

The Glidden Project

Glidden Autumn Paint ChipBack in October, I spied this insert from Glidden Paints inside the Halloween issue of Country Living Magazine The brilliant autumn-inspired colors in the ad caught my eye, as did their interactive Country Living October 2012website, so I blogged about it. Well, the good people at Glidden saw my blog (yay!) and asked if I would be interested in doing a room makeover using their paint brand. They would send me the paints of my choice, I would paint it myself and then write about the experience. Now, those of you who read my blog know that I am a one-paint kind of decorista. Over the years I have tried just about every paint brand, only to keep returning to my personal favorite. But, since I had been contemplating a facelift for our family room anyway, it seemed like the perfect time to sieze an amazing opportunity to try something new and write a blog for the whole world to see (well, maybe not the whole world, but at least my blogging world).

Here’s the story: The last time we re-painted the family room, I had decided to add an accent color to the fireplace wall.

Glidden Before Mantel

At the time, it worked to enhance the fireplace and mantel that were viewable from the kitchen, which was the same color. However, last fall we converted our adjacent deck to a screened-in porch, which we LOVE, but any natural light we had streaming into the picture window wasGlidden porch

greatly diminished, making the room darker and less appealing. Along with that, I had changed the sofa slipcover from this light toile print

Glidden Blue Toile

to a brick red solid, creating a cavernous feel.

Glidden Brick Red Sofa

 Of course, that was not my intent. The original blue slipcover that came with the sofa we bought back in 2005 was too flowery for this more “countrified” space, and the red slipcover I purchased online looked a lot brighter on my computer screen than in person. Bright, cheerful color is my thing…dark and gloomy, not so much. And several of the decorating elements in the room- like this hand-carved whale-also creamy white, just faded into the walls, which were the same color as the trim. Glidden Whale

Time for a change. The new colors I chose were Antique Beige Glidden Antique Beige

for the walls, because I needed a color just a shade or two darker than the trim but still bright and light, and this one has just a hint of pink, and Steel Blue for the accents to match the rugs and curtains that I was planning to keep. Glidden Steel Blue

I kept the trim, fireplace and bookcases the same creamy white semi-gloss. But before I could paint the wall, I had to do a wee bit of patching since I had made some pretty big screw holes while hanging a mirror awhile back.

IMG_5957

A hole this big cannot just be filled with putty, you actually need to use some of this mesh tape to bridge it, and give it something to grab onto.

Mesh Spackling Tape

Patching the Hole

Once the putty was dry and sanded, I used this Glidden Primer called Gripper . (I had given this a High Five For Friday awhile ago-see Primed for Success...)

Glidden Gripper CanIt has a school-glue consistency, covers everything and seals in stains and dark colors, yet it is water-based for easy cleanup.

Blue wall with Gripper Primer

I was able to paint all of these shelves that were stained and polyurethaned over 25 years ago-without even sanding them!

Shelving

IMG_5965

Amazing stuff.  Next up was two coats of the eggshell finish Antique Beige Glidden. Having stated above that I have been using the same paint brand for years, I have to tell you that I was very happily surprised by how great this paint is! I typically judge my paint by the several factors listed below; in each case, the Glidden paint passed with flying colors!

1.Drippiness: Minimal dripping and splattering, both from the brush and the rollers (foam and low nap), even from up high on the ladder.

2.Sagging: No sagging at all (that’s when you roll or brush the paint on, then look back a minute or two later and find that the paint is literally     sagging from the wall, which you then have to go and redo before it sets).

3.Ease of Use: The paint rolled and brushed on smoothly and quickly, covered beautifully, cleaned up easily with soap and water.

4.Overall Depth of Color. The color is deep and even and the eggshell finish has just enough glow so the light from the window is refracted- exactly what I needed to brighten up the room!

Coach walked in after I was done (yup, the interior painting is my thing, he sticks to the outdoors), and said “wow, this looks really amazing!”, which, if you know coach, is a lot for him to say… Sooo, this is the before:

Glidden Blue Wall Before

Bookcases Dark

But you will have to come back tomorrow for the after : ) Happy last minute shopping everyone!!! Susan