Weather-Proofing Your Porch!

This is a PSA for those of you who live in cooler climes…like we do here in the Northeast…and wish to “shrink-wrap” your screened-in porch before the winter hits. This most definitely will NOT be helpful for those of you in the Buffalo NY area-it’s a little too late for that! Anyway, this is a post from a couple of years ago when I was preparing to serve our Thanksgiving dinner outside. Yup, that happened. I figured if the Pilgrims could eat outside, then why not us??

The First Thanksgiving Dinner

But, even with a heater it was still a bit chilly, so we are back inside this year. So, without further ado-I give you…the shrink-wrapped porch!

“Last year Coach and I converted our deck into a screened-in porch, which was simply awesome. No more buggy nights, or rainy afternoons when we couldn’t use the deck for anything other than furniture storage! Since we had decorated it with quite a few pieces of antique wicker, I decided to “shrink-wrap” it to prevent any winter weather from ruining our newest addition. We used thin plastic sheeting and some lathing strips and tacked it up all the way around. Functional, not very pretty and it wasn’t very transparent, it flapped in the wind (which drove me crazy!) and the plastic kept ripping away from the lathing. Uggh. So this year I decided to get a more permanent wrap, something we could re-use each season. I went online to purchase a custom porch weather-proofing system, only to find the prices @ $1500.00 and up, to be a bit exhorbitant. Sooo, this past weekend’s project was weather-proofing the porch, country design home style! With this how-to video on You Tube as my guide, we began the laborious task of wrapping it up! The supplies: 20 gauge clear vinyl (heavy enough to withstand the winds and rain, clear to let in the light) and 2″ white Duck Tape Dritz 7/16″ steel grommets 
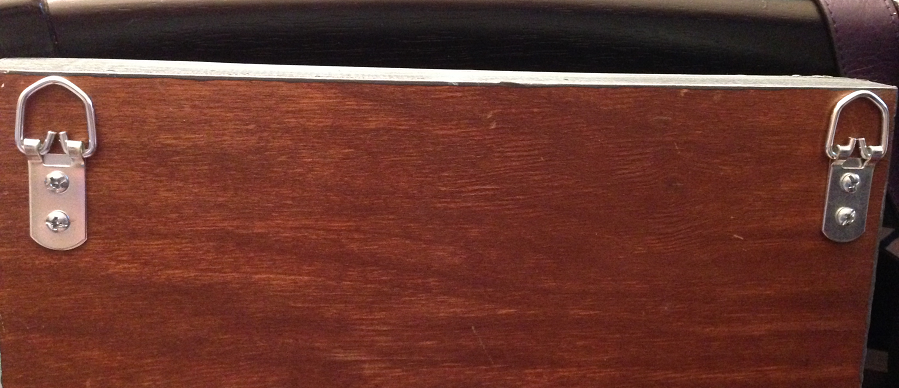
5/16″ screw-eye hooks.  I measured each section, determining the placement for the grommets. Cut the vinyl, then wrapped the edges with the tape on both sides for extra stability, overlapping in the corners where the grommets will be installed. Some sections had to be taped together, since the width of the vinyl is only 54″. That proved to be the most difficult part of this project, as the unrolled edges were a bit curled. You just have to smooth it as you go. 
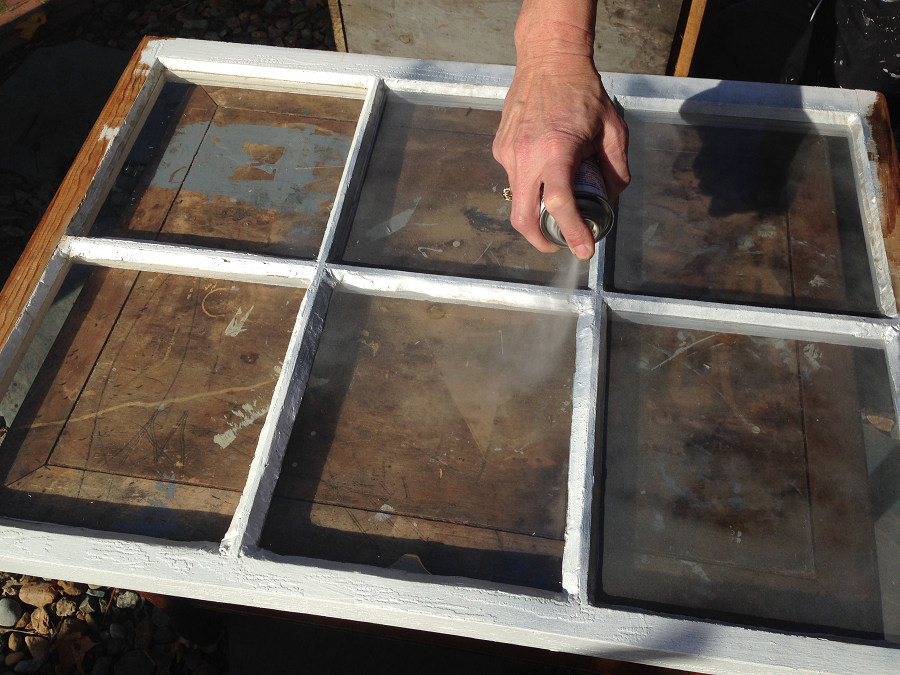
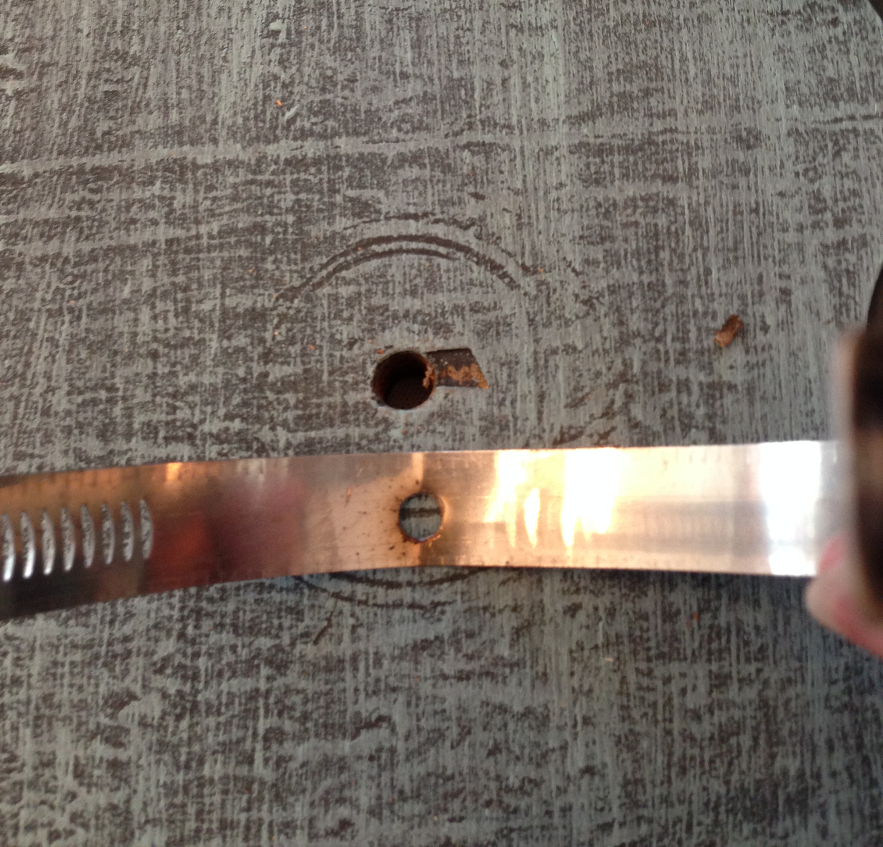
Mark the center holes for the grommets, cut out the circles and then hammer the grommet into place (this pounding away with a hammer activity is fun for anyone wanting to vent some anger or angst : ). Hanging the large panels requires 2 people to make it level and install the screw-eyes. The finished project : ) Hard, painstaking work, this easily took 20+ hours. The cost? All of the materials, with the exception of the screw-eyes ($5.19/50 @ Home Depot), were purchased at Joann’s using 60% coupons, of course! So the vinyl that normally would have been $7.99/yard became $3.20/yard and in total we will probably use 25 yards-so $80 + tax. The grommets, screws and tape totalled approximately $70, so the grand total (aside from the band-aids, the Motrin and a trip to the nail salon to repair that damage) comes to $150+ tax- one tenth of what the online estimate was! It wasn’t easy, but it looks great, the sun shines through year round AND we don’t have to pack away all of our deck/patio furniture-it just stays in place! And now we will have another functional space for the holidays- as long as you wear your winter coat and mittens : ) And remember, always measure 3Xcut once!! Susan”

So there you have it, but just a couple of side notes for those of you who are interested in doing this project on your screened porch. Since the installation, a few of the grommets have come loose, and some of the tape as well, so that needs replacing. Also, this installation needs to be done on a fairly warm day. The vinyl is quite thick and in the cold it’s very difficult to work with to get it to lay smoothly to tape the edges, and then stretch it out to attach it. Otherwise, it was a great DIY project that I am very thankful we have installed now! Have a great weekend, everyone! Susan 

A Bridal Party @ Crate & Barrel

Did I mention somewhere that our daughter is getting married next summer? Plans are well underway, and I know that what seems so far away right now will be here and gone in an instant! To date, we have secured the venue, the band, the photographer, the florist, 2 wedding dresses (yes, 2, at least for now) and an international guest list which should make for a very exciting event!  Now that our daughter and her fiancé have started their online planning journey on weddingwire.com, they have begun receiving invites from various local vendors who wish to offer their services for the newlyweds-to-be. This past Sunday, I got the call-up to attend a Crate & Barrel Wedding Registry

Crate & Barrel Wedding Registryprivate party with my daughter, as her fiancé was traveling on business and was unable to attend. At 9am sharp, 2 hours before the store opened to the general public, the doors opened and we were greeted by some very knowledgeable folks-meet Bill, everyone-

Crate & Barrel Wedding Party Registrywho took us through the ins and outs of proper wedding registry protocols and the how-to’s of utilizing the registry app. Of course, since I was not registering…

although I wanted to…

I have grown pretty weary of my 25-year-old Corelle dinnerware-that stuff just won’t break…

I stood in the background to follow the bridal goings-on, but was repeatedly distracted by the festive holiday displays scattered throughout the entire store. So many gorgeous holiday decorations and potential DIY projects!! These twigs are actually something (not sure if they were real twigs or wire or what, but I’m certain the store would have frowned upon me unwrapping them to figure it out…) wrapped in birch-log look paper. Gotta get my hands on some birch paper!

Birch Log TwigsDid you know that birch logs are a thing this year? I have three and I feel as if I am in possession of some coveted treasure. Loving these sweet log cabin holiday pillows.

Craet & Barrel House PillowHow many of you have the luxury of using holiday throw pillows in place of your regular ones? I know I would love a whole bunch of them scattered around my house, but what would I do with them after the holidays?? I have enough troubles storing all of those dishes!

Crate & Barrel Holiday Pillows

When we ventured over to the cooking section, while Kate chatted with the All-Clad rep about the virtues of stainless steel vs. non-stick cookware, I spotted these yummy (faux) cupcakes

Crate & Barrel Cupcake Displayand these adorable red striped mixing bowls

Crate & Barrel Red Stripe Mixing Bowlsand these holiday aprons and towels-I’ll take one of each, please!

Crate & Barrel Holiday Towel DisplayIn the Tree Lot, there were Christmas tree candles and soaring pines and spindly sparkly trees,

Crate & Barrel White Wire Treeresplendent in glittery ornaments

Crate & Barrel Christmas Ornamentsand twinkling lights for the upcoming holidays.

Crate & Barrel Christmas TreesHoliday dinnerware displays.

Crate & Barrel Holiday Dinnerware DisplayI have a confession to make…I’m a plate addict. Is there such a thing as Dinnerware Anonymous? I already have 6 sets of dishes, but every time I see new festive ones, I want to add them to my collection! I know, I mentioned that set of old Corelle that just won’t break-which is why we use them every single day. All of the other sets are “The Good Dishes“-preserved for holidays and special occasions. But I digress..I’m supposed to be helping pick out stuff for the bride-to-be to show her groom! But she only chose a few things, because she was waiting for him to return to the store with her to choose their items together. Sigh…young love.

Loving this dinnerware in all shades of chalky pastels. Wouldn’t these look amazing displayed in a chalk-painted antique cupboard?? Hmmm…

Crate & Barrel Pastel DinnerwareThe two hours flew by, as I know the next 10 months will, and we turned in the registry “gun” and headed out, but not before purchasing a couple of items for me to use for the upcoming holidays. You didn’t think I was going to get out of there without at least one new plate, did you?? I hope your Thursday is an eventful one, everyone! Susan

**Pie Is Love**

I Love Pie.

Pie In The Sky Postcard Chocolate, blueberry, apple, pumpkin-if you bake it, I will eat it, but I’m not always crazy about cooking the filling and rolling out the dough. So, I am ever so grateful each year around this time, when I receive this postcard in the mail from a Boston-based food service called Community Servings. Comunity ServingsThis organization delivers nutritious meals to over 1500 homebound and critically ill patients daily. Their motto: Delivering Meals. Delivering Hope “As New England’s expert in home-delivered nutrition for the critically ill, Community Servings provides meals to the acutely ill, their families, and their caregivers. Our clients live in 18 cities and towns throughout Massachusetts and battle over 35 different types of illnesses, including HIV/AIDS, breast and other cancers, and kidney disease.”  The fund-raiser they sponsor each Thanksgiving is called Pie In The Sky, a way for the community to give to those in need and enjoy a tasty pie! Pie In the Sky Pumkpin Pie The History of Pie in the Sky  In 1993, members of the restaurant community — who lost many friends and colleagues to AIDS — conceptualized and launched Pie in the Sky. Knowing how food can improve someone’s emotional and physical well-being, Pie in the Sky was an ideal way for Boston’s chefs, caterers, and restaurateurs to support Community Servings’ clients. As our mission has expanded to serve people struggling with any life-threatening illness, our friends in the restaurant community have stood by us. Through their generosity, Pie in the Sky is now the World’s Greatest Bake Sale — raising 15% of Community Servings’ private fundraising revenue! We are deeply grateful for their ongoing support and encourage you to frequent their establishments. Sweet Potato Pie Pie In the Sky

It’s Your Turn To Buy A Pie!

Ordering is as easy as pie! You go on to their website and order a pie or pies that are baked by some of the best pie bakers in Boston. And let me tell you, these are hands-down some of the most amazing pies your taste buds will ever feast on!  You can buy a pie for yourself, for your neighbors, for your friends and especially for someone in need. You get a pie, and you get a pie and you get a pie-everybody gets a pie!! Or, if you really don’t like pie, (seriously!?!?) then you can make a donation here. The day before Thanksgiving, you go to a local “pickup” spot-they are scattered all over the greater Boston area-and pick up your freshly-baked pie to enjoy on Thanksgiving. You can even take it out of the box and pretend you slaved all day making the perfect flaky crust and rich, yummy fillings! But I don’t. Because I want to keep spreading the word about this amazing organization. BUT, here’s the catch. The deadline for ordering pies this year is the 19th-only two days away!!! So please click on the links and order your pies today. If you are so very thankful for the life that you have this Thanksgiving, then this is your chance to make this one holiday just a bit sweeter for someone in need. Pie In The Sky Pecan PieThanks, now go order a pie!! Susan

Through the Looking Glass Mirror-A DIY Project!

A few weeks ago, a customer came into the shop at the barn and purchased 6 of our old white, multi-paned windows for a wall installation. Once it was completed, she texted me this pic-which is awesomely creative and sooo Pinterest-worthy!

Window Wall InstallationShe took the windows and hung them on her dining room wall, framed by some old shutters, to create an interesting backdrop for her candles-she loves dining by candlelight- and the glass window panes reflect the light for some very romantic dining!! Loving that painted vintage buffet, BTW. Since Coach and I had recently sold our old gigantic dining room hutch, I now have a large blank wall in my dining room that is screaming for some attention. This seemed like the perfect solution, and since we have a bunch of old white windows hanging around,

White multi-paned windows for DIY

I thought it would be fun to experiment. But, I decided that I wanted at least one window to be a mirror, not clear panes of glass. Here’s where the fun started! Rather than going out and purchasing six mirrors to replace the window panes, I decided I would make my own with this can of Krylon Looking Glass Mirror Paint

Krylon Looking Glass  Mirror Paint

I cleaned the reverse side of the window  (pretty thoroughly, I thought) to make sure there was no dust or streaks.

White multi-paned window for DIY

Then I scraped the paint around the edges to clean it up.


Scraping window edges for paint prep

For this technique, you spray the reverse side of whatever object you want to transform into mirror so that the finished product has a glassy look. Taking it outside, (this stuff is a wee bit smelly, folks) I used the can of Krylon Looking Glass Mirror Paint and proceeded to spray the reverse side of the window. Following the instructions, I shook the can for 2 minutes, then held the can 8-10 inches away from the surface and lightly sprayed the first coat.

Spraying window with Krylon Looking Glass Mirror Paint

Then I waited a minute, shook the can for 10 seconds, then repeated, adding 5 layers of mirror paint in total. While each layer was drying, you could see the vapors evaporating into thin air, which was like a cool science experiment.

Mirror Paint Evaporating

As each layer was added, I could see that the window was becoming more opaque and less transparent. By the final coat, I could no longer see the trunk that the window frame was resting on.

Mirror Paint Evaporating

Then I waited for the magic to happen. After the drying period, I flipped it over and discovered that my window was now a mirror-yay! But not a crystal clear mirror, more like an old, dusty mirror, which is perfectly fine for the look I am trying to achieve with this wall installation.

DIY Window Mirror Reflection

But, why, you ask!? You followed the instructions perfectly! BUT,  I didn’t clean the glass properly! Behind the glass, you can see the streak marks that I left behind with my paper towels. Lesson learned. If you want a crystal clean mirror, you MUST start with a crystal clean glass surface! (When I first purchased this can of Krylon Looking Glass Mirror Paint, I started experimenting and sprayed this little candy dish, which came out beautifully mirrored. But I left it outside to dry and then it rained, so this is what happened.

Crackled Mirror Paint Apple Dish

Whoops. In both cases, total user error. But, I still love my mirrored window, and it is the first piece of my new dining room wall installation, coming soon! Have a great Thursday everyone and make it a reflection of the real you : ) Susan

PS: If you are in need of some awesome multi-paned white windows-we’ve got extra!

An Autumn Day on the Farm

Good morning! First I would like to say that I am soooo happy to be back and writing again! It has been a long month of technical voodoo that has plummeted me into the depths of blogging despair, only to be rescued by Matt from Pixel Junction.  He has been patiently answering my (numerous and voluminous) questions and repairing my word press mess, restoring and beautifying my blog. We are not quite there yet, but should be where I really want it to be shortly. In the meantime, there is no reason why I can’t start sharing with you again! Consider this my “soft opening” before the big grand opening. BUT, there is one thing I need from you, dear readers. In the process of moving my blog from wordpress.com to wordpress.org, my entire list of blog subscribers was lost in cyberspace. So that means all of you, even those of you who are reading this right now, only found me via another social media outlet. (or because you’re my family and friends and I begged you to please sign back up so I know at least someone is getting this!)

Yesterday was one of our final days of the season in the Barn at Todd Farm Flea Market.

Barn At Todd Farm PostcardIt has been a lot of fun, and we have met some really great people along the way! But I am looking forward to having the winter off (no more 4:30 am alarm on Sundays!!) FYI- the outdoor flea market season ends on November 30. However, the barn has an annex that is opening on that same day, and will remain open year round (they have heat!) In the meantime, you only have a few Sundays left to see the flea market in full Sunday operation. As we strolled around yesterday, I couldn’t help but notice how beautiful everything looked, not only in the contrast of the bright autumn leaves, but also against the gray November sky in the background. On any given Sunday, there is so much going on at the flea market with shoppers and vendors trading and selling and bargaining. Strolling around, sipping coffee early in the morning is the best time to catch a glimpse of the goods that vendors bring along to sell.

Antique Grates

Todd Farm Antique Vent Grates

Mr. Tin Snowman – cute little guy. But he was back in the truck because he lost his arm and needed some fixin’. Happy that he’s made of tin and not real snow!!

Tin SnowMan Outdoor Lawn Ornmanet

 Neon Dog Sign– On any given Sunday, the fields and barn are filled with shoppers who are on the end of a leash. Dogs of all shapes and sizes come to visit. They need this sign.

Todd Farm Neon Dog Sign

Vintage License Plates. If you had a chance to view my blog post about the giant USA map created by Aaron Foster & decided to give that a try, then this is the go-to place to get your plates!

Todd Farm Rusted License Vintage Plates

Rusted Finials. If you look closely, you can see the leaf sitting in the middle of the pile-almost undetectable because the finials have rusted to the color of fallen leaves.

Todd Farm Flea Market Rusted Finials

The Antique Wagon. This beauty sits outside the barn door, where we get to look at it all day long. You know when you see something all of the time, you stop SEEING it? I am not sure if it was the sunlight or just the contrast of the blue sky, but this wagon looked especially blue today. Can you imagine what role this wagon played when Todd Farm was a working dairy farm?

Todd Farm Antique WagonThe Wheel. Gorgeous rusted, no longer functional.

Antique Wagon Wheel

American Made. The old rusted plate is a testament to the way things used to be made. This one’s from Detroit.

Todd Farm American Made Steel PlateFinally, our Rusty Bedspring Marquee Sign now says “JOY”. Which is exactly what I am feeling right now as I am writing this blog post.

Joy Rusted Bedspring Marquee Sign

I’m happy to be back and I hope you’ll join my “blog club” again (there is a “subscribe” box on the right side. Just add your email and you are done. I promise, we NEVER use your emails for promotional purposes. Only to hear from me!)  Have a great Monday, everyone! Susan


Dye-ing for a Change!

Back in 2006, when my kids were still in college and blogging was the furthest thing from my mind, Coach and I decided we needed a new couch for our family room. After much deliberation and shopping at various furniture stores, we went with our then-college-age-daughter as a tie-breaker in tow and together we decided on this slip-covered, floral cotton sofa, which was (and still is) super comfy and sturdy with it’s foam and goose down cushions. After a while, as my tastes evolved and the room became more “rustic countrified”, the floral slipcover wasn’t working for me.

Dyed Sofa Before Floral PrintSomewhere along the way, I purchased a second slipcover in a brick red color at a discount (a mere $200!) but that became so drab and faded as well.

Dyed Sofa Red SlipcoverBack to the furniture store to have a new slipcover made, only to find that $700 price tag (that’s just for the cover, folks, NOT the sofa!) a bit too steep. At that point, I realized that my choices were to 1. Bite the bullet and have the new slipcover made or 2. Bite a bigger bullet and buy a new sofa, but Coach wasn’t buying either of those options. He suggested that I dye the red cover white (Oh, Coach…). So, I decided to try a third option: dyeing the floral sofa blue! What did I have to lose except a faded, floral slipcover? First, I washed the old slipcover in hot water and bleach to remove any stains and sizing in the fabric. You can see how they don’t quite match-over the years, the covers and cushions were washed a lot more than the main slipcover.

Dyed Sofa Slipcover Before Bleached PillowGrabbed a couple of bottles of Rit Dye in Denim Blue @ $2.67 each,

Dyed Sofa Rit Dye Denim Blueplus 2 cups of salt (I guess that helps the fabric accept the dye.)

Dyed Sofa Slipcover Salt AdditiveI threw all of the cushion and pillow covers in the first load, then the main cover in the second load. I was a little nervous when I opened the machine top and saw a sea of indigo blue-the room is dark enough-I was looking for light and bright. But once they came out of the dryer, they were exactly what I had hoped for: a soft, washed-denim blue with a hint of the floral design.

Dyed Sofa Slipcover Denim BlueSo I redressed the sofa which looked great. BUT, that meant I needed some new throw pillows… and some new lighter drapery panels for the window directly behind the sofa. And a new throw to hang on the back of the sofa. And to paint the side table next to the sofa because that was blue too. Oh, and a new lamp for the table next to the sofa. After all that change, I was so excited about the new look! (You’ll have to excuse the “after” pic. I dropped my phone on the concrete floor while painting some wooden pumpkins this past weekend and am waiting for the replacement to arrive. In the meantime, the photos I’m taking are a bit off kilter and color : (

Dyed Sofa After EditedThen Coach came home and didn’t even notice. And then our daughter (the one who helped us choose the original sofa so many years ago) didn’t notice either. That’s OK- I notice, and the change makes the old sofa look fresh and new(ish), and for $6 (plus a trip to HomeGoods for all the new accessories), that’s a good deal! Have a terrific Thursday, everyone- make one change for the better today-even if no one notices-you’ll be glad you did! Susan

Cheap Crackled Halloween Mason Jar

I love to crackle stuff. What does that mean? You take new stuff and make it look like the paint has been on it forever and is cracking and flaking off. Sort of a faux old look. Typically I use different brands of crackle medium available at my local crafts store, depending on the price and my coupon stash. To see a before and after on a piece of furniture I redid for our family room, check this coffee table out.

Antiqued Crackled TableSo, the other morning I wanted to crackle a mason jar or two for Halloween, but when I went to grab the crackle medium, I didn’t have any left! Apparently I have been crackling up a lot, so the bottle(s) were empty : (

I had seen many “pins” on Pinterest about using regular glue to get the same effect as the more expensive crackle medium. In fact, I had I previously attempted said technique, but it was a fail. Painted on the glue, allowed to dry, painted on the paint and waited. And waited. And nothing happened. (Normally I would have pics of this, but I deleted the fail photos. No sense writing about nothing.) But, I’m nothing if not persistant in my awesome DIY attempts, so I tried for round two. Before I did, I rechecked the glue instructions and noted my one fatal flaw: I allowed the glue to dry completely (what you would normally do with the crackle medium), which was so wrong! You only wait for it to get tacky (about 15-20 minutes), then paint over it! So here is the new successful DIY crackle with dollar store glue tutorial.

Orange Crackled Mason Jar Fall Scene

1. Take a jar, a brush and a bottle of cheap school glue.

Crackled Mason Jar Dollar Store School Glue2. Paint the entire surface with the glue, wherever you would like the crackle to appear.

Mason Jar Painted in Glue

3. Allow to get tacky (not like that’s really cheap and gaudy, just sticky), but NOT DRY. This takes about 15-20 minutes depending on how thick you painted the glue on. The thicker the glue, the larger the cracks.

Mason Jar Painted Orange Streaks4. Paint the top coat whatever color you would like. I happened to use some orange chalk paint I mixed up for some other projects. But you don’t need to use chalk paint. Make sure when you are painting that you only go over each section once and in one direction. Trying to go back over a section you already painted results in messy clumps of glue and paint. Which also looks old, but not necessarily good.

Mason Jar Coated Orange Paint over Glue5. While you watch the paint dry, you check out the other mason jars that you had already painted and applied a watered-down matte glaze to and notice that those are involuntarily crackling as well!! Hmmm. Gonna experiment more on that later.

Candy Corn Mason Jar Crackled Finish6. Go to bed and wake up in the morning to run to the basement to check out the dried jar. (Kind of like Christmas morning when you are so excited to see what it under the tree. Except you have to go to the yucky basement. And there’s no tree.) BUT, there is a crackled jar!!

Orange Crackled Mason Jar Dried7. Decorate jar with a bit of raffia (also from the dollar store) and place it on your window shelf. Light the candle, but be careful, don’t want to set that raffia on fire and ruin your freshly crackled jar!

Lit Mason Jar Crackled HalloweenSo, there you have it. Crackling with cheap school glue really DOES work-the total cost? The mason jar- well you know about the mason jars, we have dozens. The raffia rope and glue, $1 each but I only used a tiny bit so we will say 20 cents. Hope your Thursday is all its cracked up to be! Susan

Vintage Mason Jar Wall Sconce -DIY

Mason Jar Wall Sconce Logo I’ve been working on lots of projects, many of which I have simply forgotten to photograph until they were completed! But this one is fun, very inexpensive and pretty simple, so it’s time for a DIY on “How To Transform An Old Broken Drawer Front Into A Hanging Mason Jar Wall Sconce.” You know, HTTAOBDFIAHMJWS.

Mason Jar Wall Sconce SuppliesCoach and I have been collecting and cleaning and selling all kinds of vintage mason jars at the barn, but I really love the way these decorative sconces look, so one may actually end up on a wall in our home-imagine that! I started with a couple of drawer fronts from an old buffet, which create perfectly framed wood panels. Well. One was perfectly framed but the other had two side pieces missing. No matter, art is subjective, right? Each had a nicely-shaped center medallion with the hole already drilled for the bracket that I needed to attach (the hole was originally intended for the drawer knob or pull, but no need for that!).

Mason Jar Wall Sconce Pre-Drilled HoleI painted them with Annie Sloan Chalk Paint in Graphite, then dry-brushed the medallion and the frame edge with some blue concoction I mixed for some contrast. Next up, the mason jar brackets, which are actually adjustable hose clamps

Adjustable Hose Clamp

that are found in the plumbing section at your local hardware store (mine being Home Depot, of course). They are adjustable, come in lots of sizes, with a screw mechanism in the front that you simply loosen and tighten with a flat head screwdriver. I have attached mine at the natural neck of the jar, but you could clamp it in the middle as well. Just make sure its nice and tight!

Mason Jar Wall Sconce Adjustable ScrewTo secure the bracket to the frame, I drilled a hole in the middle of the band opposite the screw mechanism because I wanted that to be visible in the front. The metal band is pretty thin, so a regular drill bit worked fine. EXCEPT-make sure you wear gloves when doing this because 1.the edges can be sharp, especially where you drilled and 2.the metal gets mega-hot from the friction of the drill bit (my singed fingertips are your DIY tip for this week)

Mason Jar Wall Sconce Lining Up Bracket HolesOnce it (I) cooled down, I lined up the holes of the band and the board and secured with a nut and bolt.

Mason Jar Wall Sconce Screwed In BracketMake sure you don’t use a bolt that is too long or it will stick out the back when you hang it on the wall. Attached two hangers-these are 50# ones-which is a bit of overkill-unless you are planning on filling your mason jar with lead.

Mason Jar Wall Sconce D-Ring BracketsBut better safe than a broken antique mason jar! The total cost of this project? $1.20, give or take a dime or two.

Wood frame: Free

Mason Jar: 10 cents (we buy those by the case at yard and estate sales)

Adjustable Clamp & bolt: 10 cents ( we get those at yard sales as well)

Hanging D-Rings: 50 cents

Paint: use just a fraction of the total can, so we will say 50 cents

I filled this one with some autumn stuff I had on hand, but you could use candles or candies or whatever works for your seasonal decor. Out goes the sand and starfish, in goes the berries and leaves. Despite the fact that the stores-and my email inbox-are filled with autumn-inspired decor I, personally have resisted the fall/autumn/pumpkin/Halloween decorating until now. I just cannot believe it is October 2!!! So next time you see an old broken dresser on the side of the road, take a look at the drawers and see if you can repurpose them in another way and follow the three r’s-recycle, refurbish, relove. Have an “I can’t believe it’s October already” Thursday everyone! Susan

Excentrique Design at Old Stone Farm

The very first time I visited and blogged about the Vintage Bazaar at Pettengill Farm (it’s this weekend, folks!) I featured a company named Excentrique in my blog post. Pretty sure this hot pink vintage table scape caught my eye : )

Excentrique Pink ChairsSince that post, over two years ago, Excentrique has moved from the fields of Pettengill Farm to their permanent home in this impressive two-story barn at Old Stone Farm in West Newbury, Mass.

Eccentrique Barn ExteriorAlthough the barn is a new build, it was designed with yesteryear in mind. Solid granite steps lead up to the massive wooden sliding doors that welcome you into the barn where you will be overwhelmed by the sheer beauty of the architecture and the decor as well.

Eccentrique Vintage Crystal ChandelierThe barn shop is owned and operated by Brenda Lucci Bradley, shown here with her assistant Sam, who is presently studying design in Florence, Italy!

Eccentrique Brenda And SamThe barn is decorated with a combination of antiques and vintage finds,

Eccentrique Vintage Map Vignettealong with refurbished mid-century modern pieces paired with eclectic decorative accessories.

Eccentrique Needlepoint Chair and PillowIn the upstairs loft I discovered these amazing orange crocodile chenille side chairs,

Eccentrique Orange Retro Chairpaired with a mid century table and vintage lamps. The perfect spot to kick back, relax and have an afternoon chat.

Eccentrique Vintage Upstairs VignetteThere are several hand-crafted and painted fireplace mantels, styled for each season with candles and glassware, lanterns and vintage glassware.

Eccentrique Fireplace MantelScattered throughout the barn are colorfully co-ordinated corners that allow you to imagine how the pieces would appear in your own home. The mixed blues are striking.

Eccentrique Vintage BluesLoving this vintage look aqua fridge with the country-style vintage aprons.

Eccentrique Big Chill Vintage FridgeBrenda not only sells at her shop, she is also an accomplished interior designer. Presently working on an historic Vermont country inn, Brenda shared her mood boards with me and explained her overall design concept of the spaces she is transforming, one room at a time. Through her design company, Journey By Design, Brenda offers full service design consultations, offering her expert services from overall design concept and project management to the complete styling of your project.

Eccentique Vermont Design BoardsExcentrique is open by appointment or for special weekend events that highlight each season.

Excentrique AutumnThe next open barn is scheduled for Oct 4 & 5. Or, you can contact Brenda to set up an appointment to stop by and shop. She’ll be happy to show you around!

Eccentrique Happy MannequinBut lucky you! She will also be setting up shop at the Vintage Bazaar at Pettengill Farm this weekend! Make sure you stop in and say hello, and tell her Sue from Country Design Home sent you. Have a great weekend everyone-see you at the Bazaar! Susan


Polish It Up-Tuesday’s DIY Tip

Since you all think I am a slacker when it comes to completing my mom’s kitchen project, I just want to share with you one of the other projects I had been working on simultaneously. In the adjacent dining room area, I painted the walls the same color as the kitchen and freshened up the old hutch. We debated about whether to paint it or not, but since the wood is still quite lovely and a honey golden brown, we decided to keep it stained. The problem? It was faded from being next to the sliding glass doors that lead to her deck and scratched from years of daily use. This time, I turned to Old English Furniture Polish with Scratch Cover.

Dining Room Hutch Old English Stain BottleThis is an oil with stain in it, so it hides the scratches while it polishes and rejuvenates the surface, bringing back its original glow and shine. Very simple, just put some on a rag (use gloves folks, this stuff stains!) then wipe it over the surface.

Dining Room Hutch Old English ScratchesFor the really deep scratches

Dining Room Hutch Scratched surfaceI actually just poured a bit right into the area, let it sit for a moment and then wiped it away. This is a door before:

Dining Room Hutch Door Beforeand this is the same door after (these photos are NOT retouched in any way)

Dining Room Hutch Old English AfterUnfortunately, I never took a before photo of the entire hutch. BUT, this is the hutch today:

Dining Room Hutch AfterDeep, rich, glowing color and depth of shine. Super easy and quick. No buffing necessary. Just wipe on

Dining Room Hutch Wiping On Old Englishand then wipe off.

Dining Room Hutch Buffing DoorDone. And no, I was not compensated in any way for pitching this product. I have been using it for years and think its awesome. I thought you should know about it too. Simple as that. That’s my DIY Thrifty tip for Tuesday. And it just goes to show ya-sometimes you don’t need to start from scratch…just cover them up! Susan