Cleaning Copper Caper

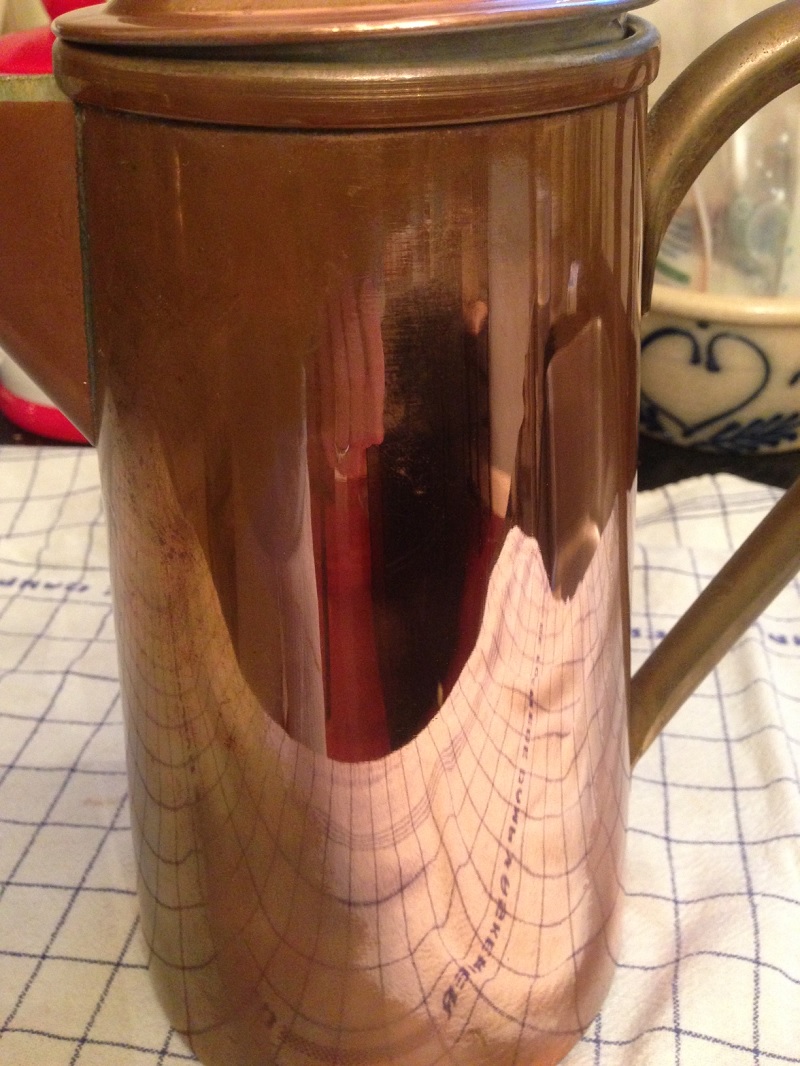
This past weekend, I scored this beautiful copper coffee pot at an estate sale.

Copper Coffee Pot Before

It even had the cute little card inside, but that did not have any cleaning instructions inside.

Copper Pot Portugal

So once I brought it into the house, I decided to give it a quick wash just to remove the surface dust. Then I thought I might try to polish it up just a bit. Then I decided I liked the polished finish, so I kept cleaning. So first, I tried my trusty Cape Cod Metal Polish, which typically does the job with little effort, and a pleasant scent too.

Copper Cleaner Can

It was working, but that required a lot of elbow grease. So, I pulled out my Mr. Clean Dry Eraser Sponge.

Copper Mr. Clean Magic Eraser

That also worked, but I was still using a lot of elbow grease. And I am all about getting stuff done quickly and not using up all of my energy so that I can’t go tile the front hall or build a table top. So now I had dull coffee pot with shiny spots. My mom suggested salt and lemon juice-nope. So I went online to see if anyone else had come up with a non-elbow-grease solution to clean tarnished copper. Some guy on You Tube had created a magical formula from everyday kitchen items: salt, flour and white vinegar. So because everything you see on the internet is true, and I liked the idea of not using chemicals anyway, I decided to try it. Here is the recipe: Place 1 tsp salt and 3 tsp flour in a small bowl, then slowly add enough white vinegar to make a creamy paste. Looks good enough to eat, right?

Copper Salt and Flour

At first I added too much vinegar and it was watery, so I added another dose of the flour and salt. Bingo! Nice smooth paste, ready to make my copper pot shiny and new. The video said to pat it on the item with a rag-I used a moist sponge, but you get the idea, you want to coat the surface.

Copper Solution Sponged

Then allow it to sit for thirty minutes.

Copper Timer

Then rinse. No rubbing or buffing required!

Copper Rinse

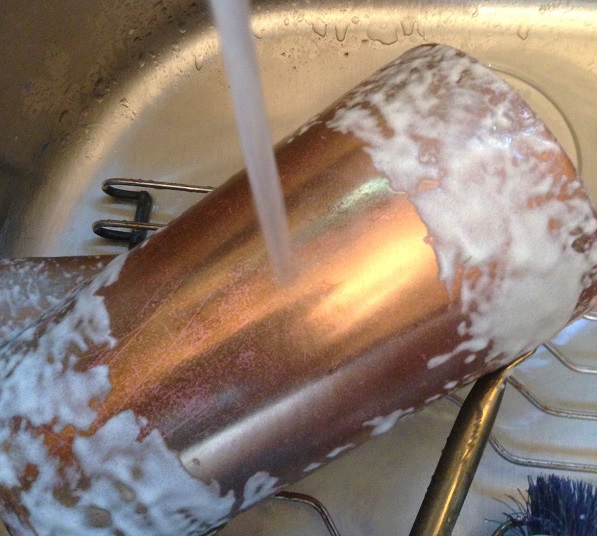
In the video, his copper-clad saucepan came alive with pretty copper color-away old tarnish! In my kitchen sink, this technique was a big FAIL. No difference after I had rinsed, then rubbed, then rinsed again. Hmmm. So now I have a beautiful copper coffee pot that is shiny and bright in the middle of each side, but tarnished all around the bottom and tops.

Copper Pot Half Shined

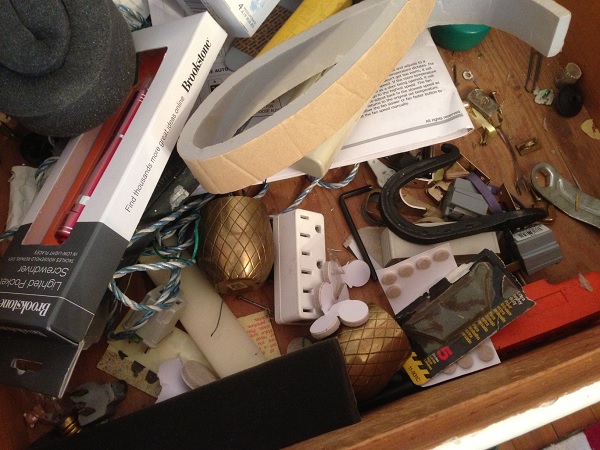
So, thus far, this is the collection of stuff I have tried.

Copper cleaners

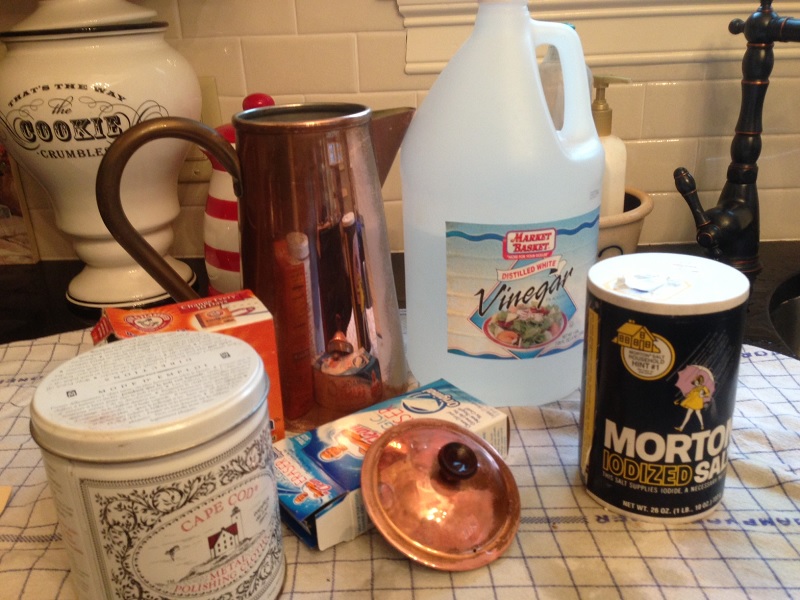
Anyone else have any bright ideas? Susan

Greater Boston Food Bank

Saturday was Volunteer Day with The Next 26 at the Greater Boston Food Bank. If you have never been to this gigantic 117,000 square foot warehouse on South Bay Ave in Boston, you will be astonished (as we were) by the overwhelming size and scope of this incredible organization.

Greater Boston Food Bank Shelves

Entering into the main lobby, I noticed this symbol on the wall,

Greater Boston Food Bank X Symbol

which is there to pay tribute to Kip Kiernan, a social activist whose grandmother fed the hungry during the Great Depression. After eating, upon leaving her grandmother’s  home, the people would mark an X by the entrance to let others know that it was a safe house. Kip was the founder behind many of Boston’s great service organizations, including Rosie’s Place, Boston Healthcare for the Homeless and Boston’s Emergency Shelter Commission. To read more about this incredible woman, click here:

Kip Tiernan

Once entering the distribution center, you are facing vast shelves stocked with food and supplies, two stories high, stretching as far as the eye can see.

Greater Boston Food Bank Warehouse Shelves

41 million pounds annually are distributed to eastern Massachusetts families and children. Folks, the statistics are staggering. 8% of the population in eastern Massachusetts are hungry- one of every four are children.  This food bank provides meals for 475,000 on a daily basis, just for eastern Massachusetts!! There goal is to provide one solid meal per day per person, distributed through the various hunger-relief agencies scattered throughout the commonwealth.

Greater Boston Food Bank Stats

Our job, for this day, was to sort frozen foods that had been donated by various grocery chains and stores. We were to open the boxes, sort them, then have them weighed (each was to be between 34-37 pounds), seal them up and move on to the next box. (Oops, Coach, you’re just a bit over on that one!)

Greater Boston Food Bank Coach Weighs In

We had been forewarned that we would be lifting 30# boxes repeatedly, and they weren’t kidding. Two long tables were set up, and forklifts started bringing over palettes stacked with the boxes filled with a variety of assorted frozen offerings-everything from gizzards to prime rib were available to sort.

Greater Boston Food Bank Sorting

We opened the boxes, sorted the foods into new boxes labeled Poultry, Beef, Processed (sausages, etc), Misc (frozen meals), Pork and finally, garbage (these were products with ripped packaging, browned or frost bitten meat, etc. The general rule of thumb was “If you wouldn’t want to eat it, then no one else should-toss it! We filled two gigantic crates with those throwaways!)

Greater Boston Food Bank Discards

Initially, during our orientation, our supervisor made a comment that we didn’t have quite the number of volunteers he had expected, so we would get done whatever we could, but we would stop working at noon sharp. But what he underestimated was the grit and determination of this hardy crew of workers, some with groups, (like our 14 Next 26 participants!)

Greater Boston Food Bank Next 26 Team

others just kind-hearted individuals willing to give up a Saturday to work for the greater good. We grabbed our work gloves, (these make quite a fashion statement, no?)

Greater Boston Food Bank Fashion

and cracked open the first boxes at 9:25 am, cranked up the music and began the sorting process. The supervisor kept mentioning we should take a break, because it was hot, and we were working so hard, but we were so determined to finish our shift, that just wasn’t happening! At 10:30, He finally shut us down for 15 minutes to grab a cold water (thanks for providing that GBFB!) and take a breather in the air conditioned break room. Quickly back in the warehouse, the time just flew by, and suddenly, at 11:42 AM, there were no more boxes to sort! We had, our little band of 41 volunteers, sorted and repacked 20,195 pounds of frozen foods!!! Which, I am so proud to say, translates to these stats:

Number of meals made possible:12,423

NET pounds of food salvaged: 16,156

Total pounds sorted per volunteer: 492

NET Meals made possible per volunteer: 303

Our leader, Ann, was so grateful for the amount of work we had done in such a short time.

Greater Boston Food Bank Ann

We were so grateful for the opportunity to give back just a little. Knowing that what we had accomplished in so little time was going to touch so many lives was a bit overwhelming and so very gratifying. If you are interested in volunteering at the food bank, click here for info.:

Greater Boston Food Bank Sign

Even if you can’t do the grunt work, there are plenty of other ways to help too! For all of the Greater Boston Opportunities available, including donating food, money or partnering, click here:

GBFB Donate

A special thanks to the amazing folks at Greater Boston Food Bank, who strive to feed so many people that otherwise would go hungry. And also thanks to our team leaders, Chris Mathison

Greater Boston Food Bank Chris Mathison

and Nicholas Leydon, the co-founders of The Next 26, who organized this volunteer effort.  The Next 26 is a non-profit that was founded to bring Boston together in the aftermath of the Marathon bombings, raising awareness and funds for the One Fund Boston. Their goal? To raise $100,000 in 26 volunteer and fun-filled events in the months leading up to the 2014 Boston Marathon, in hopes of raising money and awareness of the great city we call home. With Event #3 under our belts, it’s on to event #4 at Fenway Park! For more information, or to join in the movement, click here:

Next 26 1

Have a great Sunday, everyone. It’s a birthday and anniversary celebration day (34 years today for me and Coach-amazing!!) for us! Stay cool and strive to do one thing today to give back! Susan 

A Whale of a Weekend!

Over the 4th of July weekend, I traveled to Cape Cod to spend the holiday with a good friend at her family’s beach-side cottage in Falmouth. Is there anything more quintessentially Cape Cod than magnificent blooming hydrangeas against grey cedar shingles? Beautiful!!

Whale Table Flag

We ate too much, drank margaritas, chatted for hours, watched the neighborhood fireworks and delighted in the joy of her two adorable tow-headed grandsons. The cottage is circa 1930’s, with dark beadboard walls and ceiling in the living room,

Whale Table Bead Board Walls

a vintage kitchy kitchen and many of the original furnishings still in place. Since she is slowly attempting to freshen and lighten the decor, her most recent flea market find was a white rattan living room set with green and blue striped cushions-so comfy and pretty!

Whale Cushion Colors

But the dark brown, pressed-board, veneered-top coffee table had seen many better days,

Whale Table Before

so the choice was to toss it and get something new or refurbish it-nothing that a little paint, tape and time can’t fix! Since she has often admired my whale table,

This Old House Whale Table

our original plan was to cut the top of this table into the proper shape and then paint it. But the base was too wide, which didn’t leave  a lot of room for cutting definition. The next choice was to define the background with a contrasting color and then paint the whale-perfect! The red, white and blue of my whale table would not have cut it in her beachy blues room, so we chose the Behr sample pots

Whale Behr Paints

that most closely matched the stripes in the cushion fabric.

Whale Side View

(Funny story, when we went to the mixing counter to order our colors, the clerk said “Why is everyone calling these paint pots? They are jars!” I guess we can thank the British invasion for that one-so thanks, Annie Sloan!)

Here’s the how-to:

1. Get a table that fits a whale shape well. This one is oblong in shape so it was a natural fit with a curved middle and rounded edges. But since most coffee tables are rectangular, they lend themselves to the whale shape well. Prime it. I usually use Glidden Gripper

Glidden Gripper

for its awesome priming ability to stick to pretty much anything.

2. Decide on a pattern

Whale Chalk Outline

and then draw a whale on the primed table top surface.

Whale Pattern Pencil

It you don’t have any drawing skills, the next best thing is to find the shape online and then print it. My skills are primitive, at best, but they get the job done.

Whale pattern

Whales are pretty simple though. They are kind of just a big old long blob with a mouth and a tail.

3. Paint the background color. In this case, we used the darker green to give it a good definition. That also wrapped around the edge of the table. Then we painted the skirt and the legs the other contrasting colors of Mother Nature, Grape Vine and Blue Fox.

Whale Table Color Palette

4. Painted the background color of the whale. In this case, it was a Behr plain white.

Whale Painting White Coat

Now you can really see the shape taking shape against the darker green background.

Whale White Undercoat

5. Tape off the stripes. I originally measured true center, then started a line across using the table edge as a guide. However, I soon realized that since the table is oblong, it gracefully slopes down as it nears the edges. We could have followed those lines and created a curved effect, but we were going with pin-striped preppy whale so we just started with the center lines, then pulled the tape taut across.

Whale Taped Stripes

A quick tip: instead of measuring each individual stripe row spacing, we just placed a small piece of tape, then started the next row-quick and easy!

Whale Tape Spacers

6. Painted the blue lines and tail. Make sure that when you are painting along the tape, you use light coats and strokes so it doesn’t bleed underneath the tape lines! Two light coats are better than one heavy coat. This paint takes so little time to dry, especially in the hot Cape Cod sunshine, that it was only a matter of minutes between coats.

7. Pull the tape and step back and admire the cute preppy whale emerging.

Whale Blue Tail

8. Decorate the tail. We wanted to make him look a little more fresh and beachy, so we used a starfish shape cut from an old sponge.

Whale Sponge Starfish

With the white paint, we began sponging the stars on his tail in a random pleasing pattern. This is your chance to use your creativity! Don’t want stars? Use circles or spirals! Anything you can think of you can cut out of a sponge or potato or find a stencil or stamp at your local craft store.

Whale Tail with Stars

Tip: try to stamp a couple along the edges with a partial pattern so the overall effect is more even and not cramped into the defined space.

Whale Tail with Star Edges Defined

The sponge effect is lighter and makes for more realistic starfish.

Whale Completed

9. Add an eye. This is a personal choice, but since whales have eyes and we wanted to add a touch of the soft green to the top, this half-moon shape worked beautifully.

Whale Table with Eye

10. Stand back and admire. The table is back in place in front of the new sofa, and it instantly added a bright, whimsical touch to the living room.

Whale table complete

At that point, it was time for me to head back home (to avoid the notorious Cape bridge traffic). So she’ll be finishing her whale with a touch of glazing and a couple of coats of polyurethane. Need to protect our project from the battle beasts that were once played with by her sons, and now by her grandsons.

Whale Battle Beasts

So thanks for a whale of a weekend, Mary! See you very soon. I’ll bring the sandpaper…and the margaritas. Susan

PS: Check out my links on the Thirty HandMade Days Pity Party and on My Repurposed Life!

Yikes! We Ain’t in Kansas!

Yesterday afternoon, as I was relaxing after a long weekend of driving up and down the east coast and making airport runs and painting and sanding and prying up ceramic tiles…whew! I decided to take a break and watch some old movies on my DVR. Just as I am getting settled, my cell phone makes this unbelievable screeching noise- something like an old dying crow- so I grab it and this is what I see!

Tornado warning

(Well, its not this one exactly, I was so freaked out I forgot to take a screen shot of it) Seriously?! Living just north of Boston, the closest I have even come to a Twister was in the movie theatre watching that cow go flying by!

Tornado Cow

But I did have a dear friend who lived in Kansas, and she told me all about the TV alerts and sirens and basement drills with the kids.

tornado noaa

So, having seen the devastating destruction they can cause, I have to say, I was just a tad nervous. So I texted my daughter in Boston to let her know, just in case, since she was in Suffolk county, so she wouldn’t have received the text warning. This was her response:

Tornado Warning Phone

thanks for that, sweetie…clearly not too concerned. So I had to decide between continuing to watch the unfolding news on the TV, which by the way, with those brightly colored graphics and super-excited weathermen reporting the impending doom, is a bit unnerving…)

Tornado Map

or retreating to safety until the warning was lifted. First option, the downstairs bath, in the center of the house with no windows and surrounded by interior walls and doors. The one room where we would often find our dog when a thunderstorm was pounding overhead-she was a smart pooch! It is in demo state since I am doing a little renovation, so I was tempted to grab a paintbrush and start adding my topcoat as I waiting out the storm.

Tornado Bathroom

But imagining a tornado hitting my 1800’s home, I didn’t think that little bath would stand a chance. Down to the basement I went, where many, many  projects await in my workshop. Did I paint? Nope. My stream of consciousness went something like this: “Well, if it hits this old house, I don’t stand a chance anyway. No sense working on projects that may get ruined. Wait, maybe it will just hit the barn.

Barn Exterior

That would be the easy way of getting rid of all the junk and books Coach has collected and I’ll be rid of those blasted kayaks!

kayak pair

Well, maybe if it didn’t hit the barn, I could hire a bulldozer and have it knocked down and then tell Coach that the tornado hit it (he’s out of town right now…). So I called my family on the north shore to make sure they were safe and secure, hung around the basement til 4:30, then headed back up to the daylight. Everything intact, disaster averted. Thanks for the warning, NWS, but I just have one question? Where did you get my number?!?! Have an un-twisted Tuesday everyone!! Susan

Up S***’S Creek…

…with not one, not two, but three paddles! When Coach brought a pile of old wooden paddles home last year (5 in all), I was pretty ticked off, because at the time, we just didn’t have any place to store them and I had no use for them. These are not the type of paddles you would use for kayaking, and since that is the watery mode of transportation we are sporting these days,

Kayaking- The Launch

it just didn’t make much sense to have a collection of wooden paddles. (For the record, these are paddles, not oars, as I kept calling them until Coach corrected me enough times.) Paddles Before

So they sat in the barn over the winter until 1. I sold a couple of them to Pat from Perfectly You, A Decorating Service for her awesome nautical hallway project

Perfectly You Hallway Paddles

and 2. I discovered this decorative box at, where else, HomeGoods,

Paddle Book Box

which became my inspiration for this month’s nautical theme at the Vintage Thymes Market. With three paddles remaining, I decided to paint and distress them to look the ones pictured above. Except those are oars, so I am taking some artistic license here. Do you know the difference?! I made the necessary repairs to the handles, sanded them down, taped off the lines and stripes,

Paddle 3 Taped

painted in the red and white and blue,

Paddle Red Stripe Taped

added the number 3 (found the one I wanted online and printed it out on a piece of paper. Cut it out, traced it on and painted it in. Easy!! You know you don’t have to paint perfectly when you are planning on sanding and distressing a piece, right?

Paddle Painting 3

I re-sanded the painted sections for that worn-out, been used to row across the ocean and back kind of look,

Paddle Sanding

then added a coat of Annie Sloan Soft Wax,

Paddle Annie Sloan Soft Wax

which restored the original luster of the exposed, unpainted wooden areas.

Paddle Waxed

Lovely. So I brought them, and the box to market, and only the #3 sold! So now there are two paddles remaining, which are presently hanging proudly in our summer porch.

Vintage Porch Paddles

The good news is that they are all painted and shiny and pretty. The bad news is that there is one short and one long-in case you have a lop-sided canoe. Which, thankfully, I do not. Hope you don’t spend your entire day paddling upstream!! Susan

Flipping Over The Elephant’s Trunk- Part 1

Elephants Trunk RoosterThis past weekend Coach and I took a spur-of-the-moment, leisurely, sunny weekend drive to Connecticut to check out the Elephant’s Trunk Flea Market. Recently featured on several episodes of HGTV’s Flea Market Flip, this Sunday-only outdoor market appears to be good competition for our local Todd’s Farm Antiques Market, so we were anxious to check it out. Along the way, we made several stops in some pretty little rural towns for arts-in-the-park, yard and tag sales and picker shops. Despite a few mishaps (if you stopped at a yard sale, and there was a woman giving a back massage to a large, hairy, shirtless man in the middle of all of the stuff- what do you think they were really selling?!)

Bear Essentials Massage

we made it in just over three hours. Since we had decided to stay overnight, rather than drive, shop and drive all in one day, I had reserved a room at what I thought-according to TripAdvisor-was a nice inn-4 stars!! Ranked #1 of the hotels in the town nearest the flea market (granted, there are only three in the town, and one of the others is right next to the railroad tracks…) And these were some of the comments about the place.

Inn Review One

So, I thought it would be fine for a one night stay, or would it?!

Rocky River

And, the rate was only $89! Unless we used the Jacuzzi, in which case it was $125. Hmmmm. We arrived to a completely deserted, graveled and weedy parking lot, facing a long line of doors, many wide open so we could see in. Well, it wasn’t quite this bad…

Bates Motel

We entered what appeared to be the main office building, through the sliding glass doors to a small lobby- nicely decorated- that reeked of stale curry. Now, I don’t have much of a sense of smell due to an unfortunate incident involving the plug end of a retractable vacuum cleaner cord (unlike poor Marcia Brady here, at least I wasn’t going to the big dance with a new date : )

Marcia Brady via FanPop

but there are two distinct cooking smells that send me running-one is liver and onions

Liver and Onions

and the other is curry. Blecchhh.

Curry

The woman at the front desk was very nice, and we did check out the available room, which appeared to be clean and would have been fine- had it not been for that completely empty lot and that horrible curry smell. I just couldn’t get it out of my mind, or my nose! So we explained that we would not be staying, and she was very pleasant and wished us well. No problem there, but now we needed to find another place to stay. Other than the aforementioned inn on the railroad tracks, the only other place in town was booked solid. So we drove to nearby Danbury, and had our choice of chain hotels. Crowne Plaza, 10th floor please : )

Crowne Plaza

Sounds great being up so high, at least no one could be looking into your room from their car,  but just a word of caution. When you are riding up to the 10th floor, make sure you have your bag closed and ready to go. Otherwise, while you are attempting to get your bag together, your husband will leave and the elevator door will shut before you can depart, and you will be returned to the lobby. Then people with small children getting on the elevator may think it’s strange that you are standing there alone, holding your bag, convulsed in laughter. After the check-in, we found a local nearby joint called Rosy Tomorrow’s– huge burgers, cold draft beer and great fries in the caboose of an old train. But sadly, no mud pie : (

Rosy Tomorrows

Back to the hotel, hoping to get a good night’s sleep in preparation for our early arrival at the flea! Great, except for a few late-night (is 3:49 am still considered late night or is that early morning?) revelers returning to their rooms from the weddings being held on the premises. Coach and I still managed to arise early and we headed off to the fantastic flea market. Here’s a sneak peak,

 Flea John Wayne

but the rest of the story is for another day. Hope y’all caught a glimpse of the spectacular rainbow tonight.

Rainbow

Go Bruins!!! Susan

The Next 26

It’s Friday-so it’s High Five time! This week’s honor goes to The Next 26 of Boston.

The Next 26

The Organization: The Next 26 is a movement of people participating in 26 social, sporting, and service events to make Boston stronger and more united by Marathon 2014.

Ballgame Boston Strong Photo

The Mission:
To honor the heroes and victims of the 2013 Boston Marathon by building a vibrant community dedicated to serving our neighbors, celebrating our city, and strengthening our ties to each other.

Ballgame Heroes

The plan: The organizers will be hosting 26 events over the next 11 months, ending just before the 2014 Boston Marathon, with all proceeds donated to the One Fund Boston.

Boston Strong Logo

The kick-off event took place last night at the Mass Ave Tavern. It was a chance to meet and greet the founders, Chris Mathison and Nicholas Leydon. Cold beer, yummy apps, Next 26 t-shirts and lots of old friends coming together to support a worthy cause.

The Next 26 Mass Ave Tavern

The next event happens Sunday, June 23rd at the Lansdowne Pub. This is an all-day music event featuring live bands! $20 cover-all proceeds go directly to the One Fund.

The Next 26 Lansdowne Pub

The goal: To raise $100,000.00 of donated funds for the One Fund Boston, by Marathon Monday, 2014!

The One Fund

If you are interested in learning more, contributing some cash or just joining in the fun, click on the link to their website www.thenext26.org, their Facebook page or send a tweet to @thenext26. I will post blog updates as the events are scheduled, and you can check on the fund by clicking on the link on my blog.

So folks, remember to Raise a Glass. Raise Your Heart Rate. Raise Some Money. (for a great and worthy cause) Have a great-hopefully dry-weekend everyone!! Susan

Bench Dressing

Not to be confused with ranch dressing,

Bench Ranch Dressing

which has much more white than this restyled country bench does! So the bench is finally done and done. From the painting poll that I took on a recent blog post, the colors that won were distressed aqua/blue/gray/mint.

Behr Paint Palette

I have to admit, I tried the mint and it didn’t really work with my nautical vision, so I stuck with the blues and grays. Before I committed to the final colors, I wanted to find the co-ordinating fabrics I was planning to use for the cushions and pillows. Made a trip to my local Joann’s and-go figure-I fell in love with these lobsters.

Bench Fabrics

(Folks that know me realize that this is rather puzzling, as I think that the best part of any lobster is the melted butter : ). Fanciful fellows, bright reds on a background of dark teal. Perfect! Had some difficulty choosing the cushion fabric, but then discovered 1.this gorgeous aqua and navy block fabric that looked to me like nautical flags

Bench HGTV Fabric

2. and then discovered that, of course, it’s from HGTV-sold! So starting with the old worn bench,

Bench Pediment Detail

I added a layer of Annie Sloan French Linen, mixed with water to give it a washed look.

Bench Annie Sloan French Linen

Then I added on layers of Behr’s Gulf Wind Blue, Peaceful Night, Battleship Gray and Gray Morning

Bench Annie Sloan Gray Wash

by dry-brushing to allow the lower layers of paints to be more transparent and add another dimension to the finished product. To enhance the spiral detail at the bottom, I added a touch of dark blue.

Bench Painted

Time to dress the bench! We all know that any delicious salad is just a bunch of veggies in a bowl until you add the spice and flavor with the dressing. Same holds true with decorating-it’s the finishing touches that define the piece. I love layering mis-matched co-ordinating pillows to achieve a casual, comfortable effect. So I started with the HGTV Home nautical flag cushion.

Bench Cushion

Added a large middle pillow-soft and sinkable for maximum comfort, created with two cotton kitchen towels from HomeGoods).

Bench Towel Cushion

The sailboat pillow came next-again, created with an embroidered kitchen towel (also thank you HomeGoods!) that I added the “SAIL” to.

Bench Sail Pillow

The next pillow was lobsters and sailboats with star buttons, both of those from Joann’s Fabrics.

Bench Three Pillows

When I stepped back to admire the bench, utilizing the squint test, I realized it needed one red item in the center. One more nautical towel, surrounded by the flag fabic, completed the vignette.

Bench Completed

The finally finished, decorated bench is now sitting proudly in the perfect spot on my country styled summer porch that is now patiently awaiting spring. Which cannot come soon enough! Susan


Chicken Wire Memory Frame

Today I am sharing a simple D.I.M. (Do It Myself) project that’s fun and quick and pretty simple, assuming you have the right tools and stuff. I saw something similar to this at HomeGoods awhile back and thought, gee, I have some chicken wire and an old frame, I can make that!

Chicken Wire Memory Frame Blue

So I did. Here’s the how-to:

1. Ask Coach if he knows where that old frame and the chicken wire is. He disappears into the barn, and a few minutes later he emerges with both in hand.

Frame and Chicken Wire

2. Fix the frame- it was a little old and dinged and faded, so I glued the edges and added a touch of Minwax to brighten it up.

memo board minwax

I painted the inside edge, first with a coat of off-white, then I dry-brushed it with Gulf Winds.

Dry Brush on Frame

Dry-brushing technique is what it sounds like: take a small amount of paint on the brush, then wipe most of it off onto paper.

Dry Brush Technique

You lightly brush the surface with the remaining paint, which gives you a soft, aged look.

Chicken Wire attached to frame

I always keep a supply of wet wipes to clean up the many errant paint marks I make along the way. To get into really tight spaces, just wrap it around the end of a flat head screw driver-perfect edge!

Wipes on edge of frame

3. Cut the chicken wire-turns out that scissors work just fine. But not your good sewing scissors, unless you want to go with the raggedy look the next time you are cutting taffeta!

Cutting Chicken Wire

4. Attach the chicken wire to the back of the frame. This got tricky because I couldn’t figure out what would work. Tried my electric staple gun- those staples were too big. Then I tried thumb tacks. Well first I had to find some thumb tacks, which you would think would be a breeze considering I have a “thumb tacks” drawer in my little nail organizer. NOT. Anyone need a giant bolt?

Thumb Tack Drawer

So I went to the junk drawer- please tell me you all have a junk drawer that looks like this?!

Junk Drawer

Nope, none there, either. Finally found a few, along with an American flag pin-so that’s where that went!- in my desk drawer.

Tacks in Drawer

And so, after all that, I tried the tacks and guess what-big fail!

Chicken Wire with tack

I would push them into place, then as soon as I tugged on another corner, the wire would slide over and the tack would pop off! Next option, my trusty old Bostitch stapler, which worked great.

Stapler and Chicken Wire

5. Add the decorative lettering. I had a bag of old “fake” Scrabble letters hanging around (doesn’t everyone?), so I used those.

Scrabble Letters

You could put whatever you want, but no profanities please : ) Well, I suppose you could, but it probably wouldn’t sell very well. Then again, maybe it would. Something like The F***ing Egg Plate might work. (If you have no idea what I am referring to, click the link for a good laugh…) So, now you measure out the amount of twine you will require to fit all of the letters.

Measuring twine

Hot glue the letters to the twine and affix twine to the frame with the glue.

Scrabble Tiles Attached

6. Color the clothespins. I threw them in a little can with some watered down paint and stirred them around, then let them sit for awhile.

Paint wash for clothespins

Hung them to dry-the reverse clothespin effect.

Clothespins drying

You’re going to use the clothespins to affix the photos or whatever else you would like to display.

Memory Board Completed

7. Add a picture hanger to the back and you’re done! Cute, simple project. I like the fact that there is no backing, that way you can use it on whichever wall you would like to have as the background color (like the red shown here from my dining room, or the blue above from my hall).

Chicken Wire Memory Frame Red

8. So, I guess for this week’s High Five for Friday will go to chicken wire! It’s cheap, pliable, cuttable with scissors and adds a rustic, country charm to any project you might be considering. Happy weekend everyone! Susan