Sweet & Easy Sopapillas

Here is a recipe for a simple and sweet dessert-Sopapillas!

Sweet 'n Easy Sopapillas Framed

These are a traditional Mexican dessert typically made with dough, but we are skipping the rising dough part and using store-bought flour tortillas instead. Perfect for a quick sweet treat, dessert or brunch. They only take about 30 minutes from start to finish, and require just a few ingredients you would most likely have in your pantry. Here is the how-to-do-it:

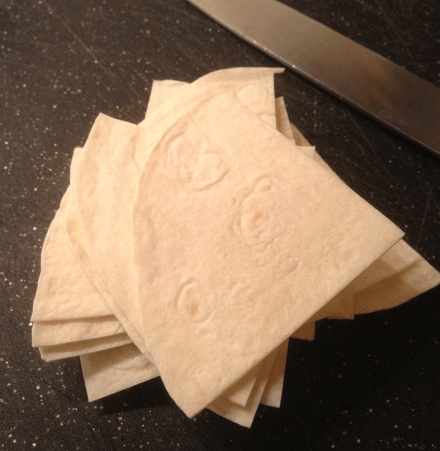
1.Ingredients you will need: Vegetable Oil, Honey, Sugar and Cinnamon, 6 inch Flour Tortillas.

Sopapilla Ingredients

2. Preheat oven to 400 degrees. Cut 6 inch flour tortillas into quarters. Set aside.

Sopapilla Tortilla Triangles

3. Heat oil in skillet on medium-high heat until at “water sizzling” temp. (This is when you drop a tiny bit of water into the hot oil and it bubbles and sizzles.)  Don’t overheat as you will burn the oil and the Sopapillas!

Sopapilla Oil in Pan

4. Drop the tortilla quarters into the hot pan, one at a time and not overlapping. Cook until lightly browned on the bottom. This only takes about 15 seconds so watch carefully!! Flip over and brown the other side. They will puff up in the middle too, similar to a piece of fried dough.

Sopapilla Golden Brown

5. Once golden brown, remove from heat with tongs (careful, this is hot stuff!)

Sopapilla Using Tongs

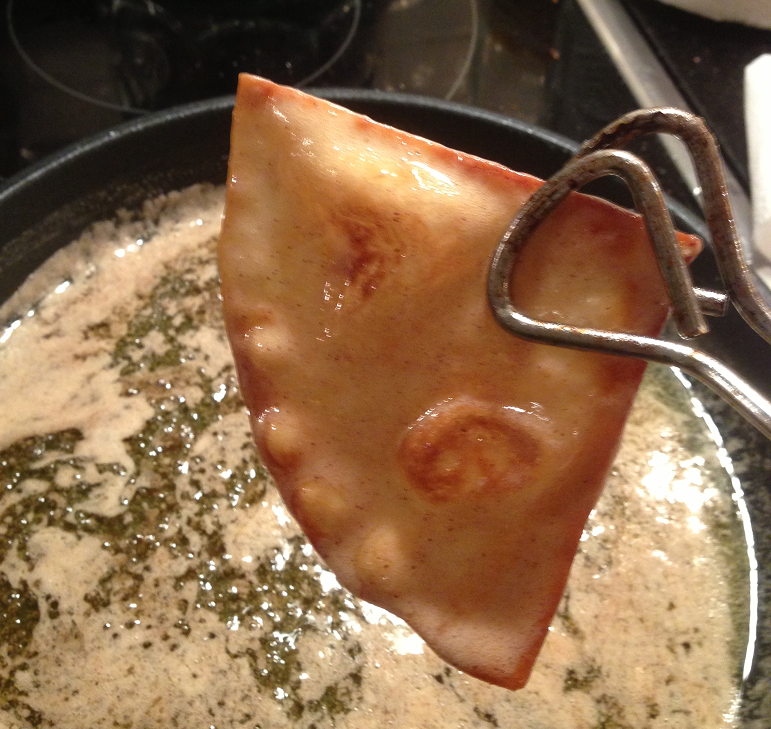
or slotted spatula and place on paper towel to drain.

Sopapilla Draining on Paper Towel

Once drained, place all of the chips into a large roasting pan.

Sopapilla In Roasting Pan

6. Once all of the tortillas are done and in the roasting pan, melt a stick of butter in a clean skillet.

Sopapilla Melting Butter for Topping

Add 1 TBLSP of honey and 2 tsp. cinnamon and sugar mix and stir just until melted and mixed. Do not overcook!

Sopapilla Butter & Honey Topping

7. Drizzle the honey butter mixture over the tortilla chips in the pan.

Sopapilla Drizzling Honey Mixture

Toss to coat thoroughly.

Tossing Sopapilla in Pan with Topping

Place in 400 degree oven for 10 minutes, tossing mid-way through, just until warmed and all the pieces are coated.

8. Remove from oven and sprinkle with additional sugar and cinnamon to desired taste.

Sopapilla Sugar and Cinnamon Topping

You can also sprinkle with a dusting of sifted confectioner’s sugar.

Sopapilla Sprinkled with Confectioners Sugar

9. Cool slightly and serve with drizzled honey or caramel sauce.

Sopapilla Drizzled with Caramel Sauce

Of course, serve them plain as well,  but I usually have a jar of Hot Fudge and Caramel Sauce in my fridge (in case of a sweet tooth emergency : )

Sopapillas with Hot fudge and Caramel Sauce

A quick, delish dessert for little $$ and time. Perfect for a light dessert. Hope you all had a sweet weekend… Susan

PS: I have a very sweet announcement to kick off the New Year! Check back 12/31 for details…

Jelly Jar Soy Candles

Nothing like a fun DIY project to get ready for the upcoming holidays! I had a box full of vintage jelly jars kicking around,

Jelly Jars Empty Stackso I decided to make some candles as stocking stuffers. This is really quite easy, as most of the products I used from Country Lane

Candle Making Kitcame with very explicit instructions on the packaging. I purchased the starter kit, plus all of the additional materials including the colorants

Country Lane Candle Colorant

the scent bottles (so many yummy flavors to choose from!!)Country Lane Candle Scentsand extra wicks

Waxed Wicksat AC Moore, but you can also buy in quantity from various candle makers through Etsy or Ebay as well. I figured I would give it a try on a smaller scale before I got into wholesale lots of wax and wicks. Here is the How-To-Do-It:

1. Wash the little jars or whatever you are planning on using. In my case, if the tops were really rusted, I spray painted them so you could see the embossed Jelly Jar writing.

Jelly Jar Pre-Washed2. Bring water to a boil in a pan large enough to hold the candle melting pot, but with only enough water to submerge the bottom of the pot!

Pot of Simmering WaterThe melting pot has a handle so it hangs onto the edge of the pan of boiling water. Once the water is boiling, reduce to simmer. Place pot filled with wax chips into the hot water, making sure you don’t splash any water into the melting pot!

Melting Wax3. Leave the pot in the simmering water until the wax melts completely. DO NOT ALLOW THE WAX TO BOIL!!! Soy wax melts very quickly on the lowest setting, so it only takes a couple of minutes to melt the entire bag.

Soy Wax Chips4. Get the little wicks and dip them into the melted wax, then adhere them centered in the bottom of the jar. Allow to cool completely!

Jelly Jar EmptyThat way when you go to pour the wax in, they will stay upright. Nothing worse than a crooked wick!

5. Add scent and colorant to the desired colors and scent levels. Obviously, the more you add, the darker the color and the stronger the scent. The melted wax appears darker than when it cools and sets, so color accordingly.

Adding colorant

6. Pour melted wax carefully into prepared jars, making sure you avoid the centered wick, so it won’t melt and warp. Allow to cool.

Pouring Wax7. To create some labels, I went to Staples and got these cute little Martha Stewart Brown Kraft Paper labels numbers 72428 and 72429. (If the packages look a little ink-stained to you, that is not your computer screen. They were in a bag with a jar of black grout and I was fumbling for my keys and dropped the bag in the driveway and…you can guess the rest.)

Martha Stewart Brown Kraft Paper Labels8. Go to Avery.com Design & Print Online, and plug in the label numbers in the search box.

Avery Design and Print

A template will pop up and you can design it however you would like your label to look. Remember, these are enlarged on the computer screen, so when you actually print them in sheets of 6, the print will be smaller!

Jelly Jar Label Reverse9. I have a pretty old printer, and it doesn’t take kindly to adjusting for different size cards and papers. So I simply taped my labels onto a sheet of standard copy paper in the proper position,

Labels Taped to paperthen printed them-perfectly placed and spaced!

Jelly Jar Candle Label

10. Add the printed labels to the jars and put the tops on. Cute! And they smell great too! If you have questions or are looking for additional information, go to Soap Expressions.com and they have lots of candle-making tutorials using their Country Lane product line.

CDH Jelly Jar Soy Candles

Have a fab Friday, everyone! Time to start preparing for Turkey Trot Thursday!! Susan

Yummy S’mores (without the campfire)

Since it’s soooo freakin’ hot around here, who wants to sit out around a roaring campfire roasting marshmallows to make s’mores?!? Count me out! And we all know how much I love camping anyway…

Smores Campfire

So, a few weeks back I discovered this website called Thirty Handmade Days on Pinterest-this week’s High Five For Friday. Loaded with all kinds of great DIY and cooking ideas from various sources, there is so much there to repin and enjoy! On this particular day, she was featuring the S’Mores Popcorn recipe from Your Home Based Mom.

Smores Your Home Based Mom Recipe

Your Home Based Mom S’Mores Popcorn

You won’t believe the photography on this website-all of the food offerings literally jump off the page- makes you want to go and try every darn recipe.

Smores Home Based Mom Pics 2

But the S’Mores Popcorn recipe caught my eye because I was looking to make something easy, sweet and plentiful for a wedding shower we were planning. See how yummy it looks in a nice big bowl next to the Ooey Gooey Life Changing Caramel Cupcakes?!

Smores Bowl of Popcorn

So we followed the microwave recipe she had posted for the caramel corn.  Sounded perfect- no oven to turn on. But, because we were on Cape Cod and it was pretty hot and steamy outside and in, the resultant corn was a bit soggy, especially once we added the chocolate and marshmallows. (it was devoured anyway…never let a sweet treat go uneaten…). So we made the second batch using my old tried and true oven recipe (the beauty of living in an air conditioned society). First, you pop two bags of popcorn. We used this Smart Balance low-cal popcorn, figuring that it wouldn’t be quite so decadent-ha! Then we drizzled it with caramel (recipe below) and melted chocolate…

Smores Smart Balance Popcorn

Caramel Popcorn Recipe

1/2 Cup Light Corn Syrup

2 Cups Lightly Packed Light Brown Sugar

1 Cup Margarine or Butter

1 tsp Salt

1/2 tsp Baking Soda

1 tsp Vanilla Extract

In medium saucepan, melt butter, then stir in brown sugar. Bring to boil over med/high heat. Continue to boil, stirring constantly, for five minutes. Remove from heat, stir in remaining ingredients. Allow to cool for 2-3 minutes. Pour over popped popcorn that’s spread evenly on ungreased cookie sheets. Bake @ 250 degrees for 30-45 minutes, stirring every 15 minutes to allow even coating of caramel and the popcorn is lightly browned. DO NOT OVERBAKE!! Pour the still warm popcorn onto cookie sheets lined with parchment paper.

Smores Golden Grahams

Sprinkle the mini-marshmallows and Golden Grahams evenly over the warm caramel corn. Watch out for the mini-minions-they’re hiding in the box!

Minions

Drizzle the melted chocolate all over-as much as you like-but with all things chocolate-more is better!

Smores Tray

I found this melting chocolate stuff at Hannafords and it was actually quite good. Melted easily and smoothly, poured well from the pan or drizzled with a spoon, tasted delish! We used 1/2 package for each batch we made.

Smores Candi Quik

So this recipe ended up making three sheet pans filled with the golden goodness!

Smores Popcorn Trays

Which we broke apart and placed in the large bowl (did you know that you can turn a covered glass domed cake dish into an elevated serving bowl? No? Me neither! You just simply flip the stand upside down

Caked Plated Domed

Bowl Inverted and the ball of the top goes into the hole-who knew!?  For the shower, we packaged some of the caramel corn into clear plastic bags

Smores Bags on Table

and tied pink and blue ribbons with a little tag I made from the Avery.com website. Super easy and cute little gift bags for guests to take home and munch on later.

Smores Tags

So I hope you have S’More fun this coming weekend. It’s Friday, and the hot weather is supposed to clear out soon!! In the meantime, keep your ovens off and stay cool, everyone! Susan 

Life-Changing Cupcakes!

This past weekend was another crazy whirlwind of activity featuring a trip to Cape Cod, a bridal shower and a birthday party-whew! We had planned the shower the prior weekend (in between coats of paint on the whale table) and had decided that cupcakes would be the featured dessert. So I found this amazing recipe on, where else, Pinterest from the blog Jan Can Cook (tons of great recipes! If you want to take a look, just click the link below : ) and we decided they would be perfect.

Cupcakes Jan Can Cook Blog

I mean, after all, who doesn’t love dark chocolate and caramel and buttercream and a pinch of sea salt?!? I followed her recipe (click the link above) with a couple of exceptions. For the cupcakes, I used Duncan Hines Dark Chocolate Fudge

Cupcakes Duncan Hines Mix

and I added a cup of Toll House mini semi-sweet bits

Cupcakes Nestles Morsels

into the batter before pouring it into the cupcake liners. For the caramel to put inside the cupcakes, I used good ol’ Hersheys ice cream topping-quicker and easier and oh, so gooey and yummy!

Cupcakes Hersheys Caramel Topping

Just warmed it up in the double boiler and then spooned it into the little cavities

Cupcakes Filling

we had scooped out of the centers.

Cupcakes Caramel Filled

(By the way, this bowl filled with little cone-shaped fudgy chocolate goodness are leftovers- and fabulous dipped in the warm caramel for a snack : )

Cupcakes Mini Bites

The Caramel Buttercream Frosting Recipe

1/2 cup granulated sugar

2 Tblsp water

1/2 cup heavy cream

1 1/2 tsp vanilla

3/4 (1.5 sticks) cup salted butter, room temperature

2 1/2 cups confectioners sugar

Stir together granulated sugar and water in small saucepan until clear. Heat in small saucepan over med-high heat and cook for 5-7 minutes without stirring until liquid turns a light amber color- do not overcook- it will burn!!! Remove from heat, allow to cool for a bit and then slowly beat in the cream and vanilla with a spoon.  In a mixing bowl, beat the softened butter until light and fluffy, about 3 minutes. Reduce speed and slowly add confectioners sugar until it is all incorporated and smooth. Turn off mixer and slowly drizzle in caramel mixture. Turn mixer to med-high and beat until light and fluffy, about 2-3 minutes. Cool until ready to frost cakes.

(Normally I would insert a photo here, but we were having so much fun I forgot to take it! So I am just going to show you some pretty garden flowers : )

Cupcake Flowers

The buttercream frosting mixture was pretty soft, as it was hot and we were down the Cape, so there is a lot of moisture in the air. Once I piped it onto the cupcakes, we put them in the fridge to firm up. You don’t even need a piping bag- you can just scoop the frosting with a spoon and plop it on top- the more the better! In the recipe it says to pour the chocolate ganache on the frosted cupcakes, but we just dipped them right into the bowl and allowed them to drip a bit, then inverted them.

The Ganache Recipe:

9 ounces bittersweet chocolate-chopped. I used the 10 ounce bag of Ghiradelli Square chips-perfect for melting.

Cupcakes Ghiradelli Chocolate Chips

1 cup heavy cream. 1 Tblsp Dark Rum (Optional)

Melt in a pan over low heat and beat with wooden spoon til smooth. Allow to cool slightly before glazing cupcakes.

For the final touch, we snipped some mini-marshmallows (snatched from the S’Mores Popcorn Mix- recipe soon!) into flower shapes and popped them on top of the ganache. Cute! (we tried to figure out how to cut them into starfish, as the shower had a beachy theme, but that wasn’t happening…)

Cupcake Closeup

So the shower was moving along, and the cupcakes were just sitting there lonely and forgotten, next to the lemon water. I mean, it was a wine-tasting- who’s drinking lemon water?!?

Cupcakes in Tower

So my friend grabbed the tower and some napkins and started passing them around. Suddenly, the room was filled with “oohs and aahhs” as each person took their first scrumptious bite. The hostess declared that she would choose me for her Cupcake Wars team, but the sommelier’s comment was the best when she exclaimed: “These are life-changing cupcakes!”  Now I’m not certain if that is the case, but they were a big hit! Don’t be afraid to try these, even if you are a novice baker. Perfectly simple recipe. Perfectly delicious. Have a sweet, sweet Monday everyone!! It’s especially sweet for me because I am on vacation…woo hoo!! Susan

Bench Voting Update!!

Woops! As the votes have been coming in, I realized that there is no way for me to track who is voting for what!! So if you do vote, please send me an email at countrydesignhome@gmail.com, post it on my Facebook Page, add a comment in the comments section at the bottom of the blog post or Tweet it to me here: https://twitter.com/countrypretty I am country pretty on Twitter.

Keep the votes coming!! Add your own ideas if you’d like : ) Susan

“Rockin’ Around the Christmas Tree…”

“…at the Christmas Party Hop!”  (What exactly is a party hop, anyway??) Yesterday I decided to make a cake for a an amazing person whose birthday happens to fall three days before Christmas. I imagine that it’s not always fun having your birthday so close to the biggest holiday of the year- your special day may totally get forgotten in all the hustle and bustle of the season. So I pulled all these ingredients out, and turned this:

Cake Ingredients

Into this Winter Wonderland Cake:                Christmas Tree Cake

It is a pretty simple cake, although it looks like  you spent hours and hours creating it! Here’s how:

1. Bake a cake in a bundt pan. Cake Bundt Pan

Here is a great recipe for turning a box mix into a pound cake with the additions of butter, water and pudding mix!

Cake Mix Recipe

Cool the cake, and invert in onto your serving plate.

2. Frosting: you certainly can use the kind in the tubs, I did for this, but I added some more confectioner’s sugar, cream and vanilla to boost the flavor. Then I added the green food coloring, but I saved a little of the white for the top layer of drizzle. Fill a pastry bag with the colored frosting.

3. Make your trees from ice cream cones. Take a “star” tip in a pastry bag and fill it with whatever color frosting you want the trees to be- green is good, pink or purple is fine too! Holding the cones at the tip, and starting at the bottom, pipe rows of stars, pulling them out a little so they look shaggy.  Cake Frosting Trees

As you go along, every fourth or fifth row, turn the cone sideways and sprinkle with decorations-cute, huh?

Cake Trees

When you get just to the top, put the cone down on wax paper and then add the frosting tip of the tree.  Frost your forest, then allow to dry.

Cake Frosting Forest

4. Take whatever colored frosting you have remaining, and put it in a microwave-safe bowl and begin to melt it. I use the high setting and check it every 15 seconds until it is a runny consistency. Don’t burn it!!!!

Cake Drizzle

5. Now using a spoon or fork, drizzle the icing back and forth over the cake until it is covered. It sets quickly so you have to work fast. Then take the white icing and melt it the same way.  Doing one section at at time, drizzle the white icing onto the cake, sprinkle some coconut, place a tree into place and push gently to secure it. Repeat with remaining icing and trees until you have a wonderland!

6. Final step: take confectioner’s sugar and a little sifter and sprinkle all over the entire cake to give the illusion of snow fall…pretty!! Now serve it to the very special birthday girl : ) and sing a little “Happy Birthday Party Hop”     Cake Sprinkling Sugar   Hope you have a sugary sweet Sunday everyone!! Two days until Santa arrives!! Susan


A Sweet Swap

Wednesday was our second annual cookie swap at my work place-sweet!!! When I proposed the idea last year, it initially was greeted with some trepidation (why would I swap my cookies, and how do I decide what kind to bring?). But it was such a success that this year my co-workers were quite enthusiastic about rolling up their sleeves and rolling out some dough!

Cookies Gingerbread men

Knowing you will be going home with two dozen+ assorted home made delicious cookies is quite an incentive! I found this book, which I thought might have some great swapping recipes, along with tips for a fun and successful swap. Although we did skip the recipes for Juicy Sangria  and Fresh Lime Margaritas-tequila is rather frowned upon in the middle of a work day.

Cookie Swap Book

Then I turned to my holiday Pinterest board for recipes, and I found this one for cute reindeer pretzel cookies. Reindeer Pretzel Cookies on Country Design HomeWhich I did not follow exactly. So they came out like this.  Cookies Pretzels Not very pretty, very yummy, but sooo not pretty! They would be right at home in the land of misfit toys– am I right? For my other selection (we each brought in two dozen to swap), I went with a traditional sugar cookie, drizzled with icing and decorated with sprinkles.

Cookies Trees

My co-workers’ yummy cookies included: Chocolate Coconut Disasters (per the baker, but they were really awesome!)

Cookies Coconut Disasters

Peppermint Bark

 Cookies Peppermint Bark

Chocolate Dipped Macaroons

Chocolate Dipped Macaroons

Peanut Butter Rolo Cookies

Cookies Red and Green Rolos

I provided the trays, cello wrap, ribbon and the little gingerbread guys for gift tags.

Cookies Trays and Wrap

When we were finished, each participant walked away with a tray filled with variety of cookies to bring home-yum!

Cookie Trays

For more holiday recipes and ideas, please visit my Merry Happy Holly Days on Pinterest. If you have a favorite cookie recipe that you would like to share, send it to me and I will add it here!  And have a sweet, sweet Friday everyon! Susan

So Very Thankful…

…that my holiday prep is over!! Sorry I haven’t been blogging much, it has been such a busy time around here and something had to give. Thanksgiving is absolutely my favorite holiday, and we love to entertain family and friends with a traditional turkey dinner with all the fixins! This year we had special guests from Ireland, New York and Oregon, so we tried to make it especially festive.

Since last year, my plan had been to host a primitive dinner in our re-furbished barn, but those hopes were dashed when we were rejected by HGTV. Sooo, necessity being the mother of invention, I decided to hold our annual feast on our newly vinyl-clad porch. After three long hard weekends of cutting and taping and grommeting, we had this:

So I hung thermal-lined drapes, added three tables and chairs for 22, twinkle lights and candles and then it looked like this:

Each table had its own centerpieces and decorations, using autumn leaves, burlap runners, rustic vases and candles to add a warm glow:

Once the candles were lit and the twinkle lights were glowing, it made for a pretty special (if not a bit chilly-could only use one portable heater as the others kept blowing a fuse!) outdoor dining room.

One of my young nieces walked in and said “Wow, awesome, it looks like a wedding!”

Mission accomplished. I would like to thank everyone who joined in to celebrate this special day, bringing wine and sides and pies and last-minute, hand-made place cards

and delicious hors d’oeuvres to make this dinner the best ever! Funny story about the hors d’oeuvres. My brother texted me to ask what time the party started. This was my unintended response (thank you, auto correct!)

Look for it on Ellen’s Clumsy Thumbsy : ) Hope you all had a lovely holiday as well.

On to wedding #6! Susan

Candy Corn Cookies

These yummy little shortbread cookies will be a hit at any Halloween party! I found this recipe on the pages of Coastal Living Magazine (one of the reasons I still love print magazines is finding little gems like this while perusing the glossy photographs of amazing spaces- online, I would have to be searching for this recipe…) Enjoy! 

Halloween Cookie Bites

Prep: 50 Minutes    Chill: 2 Hours    Bake 8-10 Minutes

Ingredients:

1 cup butter, softened

1 1/2 cups granulated sugar

1 large egg

2 teaspoons vanilla extract

3 cups all-purpose flour

1/4 teaspoon salt

1/2 butter flavored extract (or you could use almond)

1/2 teaspoon lemon zest (I used orange- delish!)

Yellow food coloring.  Red food coloring.

1. Beat butter and sugar together at medium speed with an electric mixer for 2 minutes. Beat in egg and extracts. In a separate bowl, combine flour, salt and lemon zest. Gradually stir into butter mixture until fully combined and forms a stiff dough.

2. Place dough onto cutting surface and divide into 3 equal parts. (about 1 1/4 cups each). Leave one plain, add yellow food coloring to the second and then yellow/red to the third to make bright orange.

3. Grease a 9 x 5 loaf pan, and then line it with plastic wrap, smoothing it out as well as you can. Starting with the plain colored dough, press into bottom of pan to make a smooth layer. Add the orange dough, then the yellow on the top. Cover and chill min 2 hours.

4. Turn dough out onto cutting board. Slice in 1/2 inch sections (like you would a pound cake) and with the slice laying flat on the board, cut it into 6 triangles that resemble candy corn pieces. Place on cookie sheet that has been lined with parchment paper or aluminum foil (shiny side down). The dont need to be very far apart, as they do not spread. Bake @ 350 degrees 8-9 minutes until set but not browned. Cool on wire racks.

Makes 10 dozen delicous cookie bites!!

My Desktop Cookbook

Can you believe it’s Friday already?!! The summer flew by, and we are well into fall and then (dread) winter. With the holidays fast approaching, my thoughts are already turning to yummy delicious recipes that I’ll be serving for dinners and parties. Over the years, I have accumulated stacks of cookbooks and printed recipes, some well-loved and worn, most of which now sit idly in my kitchen cupboard.

Although I still enjoy thumbing through hard copies for inspiration, when I need a favorite recipe at my fingertips, I turn to my Desktop Cookbook 

on my Ipad, this week’s High Five For Friday! Feature.

This FREE! app allows me to search for, save, share and print recipes, my own best-loved, and the millions more being added from every cooking source imaginable. Once you download or input a recipe, you save it into a category along with any additional information including the recipe’s origin, how many it feeds, the best wine pairing.

So, so many times I have stopped at the grocery to grab a couple of ingredients for a recipe, without, of course, a shopping list in hand. I just open the app on my phone, look up the recipe and go. Or, I bring a goodie to work (hello, cookie swap!) and everyone asks for the recipe. Just open up the online cookbook and print the requested recipe. A second High Five goes to the Chef Sleeve. The sleeve is a sheer plastic sheet that slides over my Ipad to keep my greasy fingers and messy splatters off the screen, while allowing full touch screen control. Cooking session ended, sleeve tossed, sparkling Ipad. Brilliant! Now, since I do have my cookbook open, I figured I would share one of my favorite fall recipes: Apple-icious Streusal Cake. This cake is so moist and absolutely delicious, is a perfect dessert with ice cream or a treat with my morning coffee. You can use any type of apples- how many bushels have you picked so far this fall?! Just make sure you peel ’em!

I guarantee this cake will become a family favorite! If you have any questions about the recipe, you know where to find me- in the kitchen, on my Ipad, gathering recipes for the holidays. Unless I am out shopping for shoes for the next fabulous wedding we are attending this weekend. Blog to follow.  Susan