From Sea to Rustic Sea

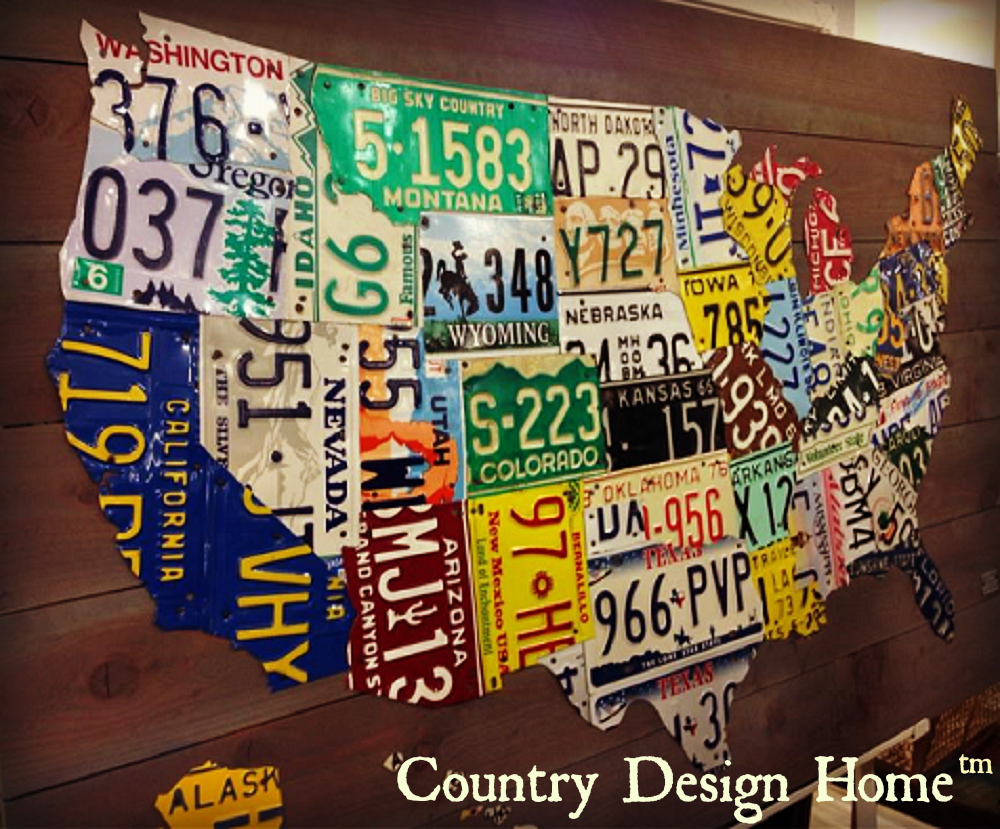
I recently spotted this amazing rustic wood and license plate USA map in my local HomeGoods store (lucky me, I actually have three local Home Goods stores!!)

USA Map HomeGoodsI took a pic and posted it to my Facebook page, where it has had 3800+ views!!

HomeGoods pic on Facebook

Clearly, this is a popular piece. What is it about this particular USA map that folks love so much?? There are all kinds of rustic USA map renditions out there, like this one available at Pottery Barn,

Pottery Barn USA Mapor this one from World Market (when are they coming to Boston, BTW?!?)

World market USA Plank Mapor in the Pinterest world-including this one I created myself.

Map and Sign on Wall SignedBut, the HomeGoods map is so colorful and unique and has so much detail-if you look closely you can see that every state is created from its own license plate!! Can you imagine the work and time that went into this project? Now, you ask, if you love it so much, why didn’t you just buy the damn thing? Truth be told, I don’t have a wall big enough to hang it on : (  But, I keep thinking about it and wondering if there is a way that I can reproduce it on a smaller scale. Which means I would need a miniature license plate from every state in the union. I guess I’d better start searching…ideas, anyone??

Cape Cod HydrangeasIn the meantime, have an inspired (and hopefully not too soggy, Independence Day!! Susan

Thrifty Kitchen Transformation-DIY Series-Wax On!

The final step of the kitchen cabinet transformation was the finish coat on the doors, drawers and boxes. To this point, we have painted 2 coats of primer, 2 coats of paint + I coat of tinted glaze to give the cabinets a slightly aged look.

Glazed Tinted White CabinetsBut they still required one last coat of protection-this is a kitchen, and kitchens get messy right? Don’t want some splashing spaghetti sauce messing up my hard work! First, I tried a satin polyurethane, but it was too shiny. I also have a can of absolute matte finish, but I knew that would be too flat. So I decided on a wax finish that would provide protection while adding just a touch of shine. In the past I have used paste waxes that you wipe or stipple brush on, then buff off. They do give a nice finish, but I don’t like the odor and the elbow grease necessary to get the job done. Having recently discovered a new Crème Wax from Americana, I knew this was the perfect solution!

http://decoart.com/chalkyfinish/finishesYou literally brush this odorless opaque, white creamy liquid on with a foam brush,

Foam brushing wax onto cabinets allow to dry (about 1/2 hour), then buff it. The more you buff, the brighter the shine. I purchased this product at Michaels Crafts (with a coupon, of course : ), but it is available online at HomeDepot.com as well. Now, this is Tuesday’s DIY Tip: I use my little mouse sander to buff my finishes (if auto detailers can do it, why can’t I??)

Using mouse sander to buff waxSimply remove the velcroed sandpaper, stick on a soft cloth or rag in its place and buff away!

Buffing Waxed Cabinets with Mouse SanderUse a soft flannel or fleece, not terrycloth, as the loops in the cloth will make it a rougher finish. Unless, of course, that is the look you are trying to achieve. The buffed finish is perfect-smooth and with a low satiny shine-the look we had imagined when we first decided to make over mom’s kitchen. The wax finish is essentially colorless, so it doesn’t tint the finish, but it did enhance the glazing color I had already applied. So, this part of the transformation is complete and we’ve gone from this:

Kitchen Cabinets with Vinyl Panelsto this:

Waxed and glazed white kitchen cabinetsIf you are just joining us now, you can check out my Pinterest page with all of the links starting at the beginning here. But we still have a long way to go! Up next, the hardware. Have and buffed and shiny Tuesday everyone! Susan

Yard/Barn Saturday Sale? Finally, yes!

Last week, I read a great blog post from Kelly of Eclectically Vintage, who wrote the do’s and don’ts of having a killer yard sale. Lots of great tips and pointers, including “Enlist Friends-the more hoarders the better!” and “Purge-be ruthless”. You can read the blog post in its entirety here:

Ecelctically Vintage Killer Yard SaleThis past weekend, I made sure we followed all the pointers as we prepped for our barn sale. As you know, I’ve been bugging Coach to clean out the junk which has now spilled out of the barn, into the yard, onto the porch and into my dining room…which is starting to drive me just a little bonkers.

Dining Room EphemeraBut, I am giving him a pass for now because we are starting an exciting new venture very shortly-for which we need mucho stuff-more about that soon!!! So, over the past couple of months, Coach has been hosting barn sales on intermittent Fridays and Sundays, with some good success, but I kept asking him why he didn’t want to do Saturdays, like all the other thousands of people in our town. Misery loves company, right? Lots of our friends kept saying they wanted to come, but couldn’t because they were working. (Of course, Coach, being a teacher, has a little more spare time to hang out and sell stuff.) He kept saying that it was because he wanted to sell on a day when no one else was, so there was less competition. Hmmm. This past weekend, it finally dawned on me that the real reason he didn’t want to open up shop on Saturdays was so that he could go pickin’ at the thousands of other yard sales to replenish the stuff he sold on Fridays! This past week, when he said he wanted to do another Friday yard sale, I told him I wasn’t going to help because it was dumb. But of course, I did. And he did OK, but the traffic just wasn’t there like it normally is. So, he begrudgingly decided to forgo his Saturday pickin’ and keep selling stuff for another day. FINALLY, I figured that would show him that Saturdays were definitely the way to go when you want to do some serious selling!! Signs in place all over the neighborhood, postings on Craigslist and Facebook (just to let all our friends who said they always wanted to come but couldn’t because they were working…) Up at the crack of dawn Saturday morning, we dragged everything back out into the driveway and waited for the hoards of shoppers.

Wooden Crates at Yard SaleAnd waited. Typically, when you post an 8 am start for a yard sale, the serious shoppers start showing up around 6:45-7am (which is what Coach would have been doing if he wasn’t sitting in our driveway awaiting the rush of pickers). And waited. By 8:15, when only ONE person had stopped, I began to notice that not only was there no yard sale traffic, there was actually no street traffic! We live on kind of a busy street, where usually only Sunday mornings are quiet. And waited. Where was everybody?!? Ah…the Saturday of the week of the 4th of July would be a great time to take a family vacation, am I right? Which means that the folks who are normally browsing through junk on a Saturday morning were actually sitting on a beach on the Cape or Maine, enjoying the gorgeous sunny weather and having their first BBQ of the summer.

Beach

Woops, didn’t count on that. Well, the good news is that we still managed to sell quite a bit of stuff, and I managed to get in about three hours of gardening to clear the path to the barn that was almost jungle-like. The bad news is that Coach went out on Sunday and found some sales and came home with more stuff. Just can’t win. So, if you’re in the market for a cute kid’s Red Sox table and chairs,

Red Sox Tableor a vintage robin’s-egg-blue-chalk-painted cabinet with a tin paneled door (painted by me, of course : )

Tin Paneled Painted Cabinetlet me know-they’re still available. And, if you’re one of the lucky ones to be sitting on a beach somewhere sipping a margarita, have a great vacation week! And no worries, we will be back in August with yet another yard sale-but most likely on a Friday… Have a sunny Monday, everyone! Susan 

Creative Glass Works At The Vintage Bazaar

For all of you vintage lovers out there (and by that I don’t mean old folks, I mean folks who love vintage stuff. But then, again, old folks-like me-can love vintage stuff too…) it’s the weekend we’ve been waiting for- The Vintage Bazaar at Pettengill Farm!

Vintage Bazaar LogoThis weekend, June 21st & 22rd, make the journey to Salisbury Mass to discover some of the finest country hand crafts, vintage furnishings and accessories, jewelry, clothing and a few DIY television personalities (Yup, that’s me and Cari Cucksey from HGTV’s Cash & Cari at the Country Living Fair a few weekends ago. Gosh, I hope she doesn’t think I am following her like a vintage fair groupie when she sees me again…)

Sue & Cari from RePurposeall in a bucolic setting on a real working farm complete with live country music, vintage trucks

Vintage Bazaar Truckand this chick. Love this chick.

Chicken @ Vintage BazaarEach time I have visited the Vintage Bazaar, I’ve discovered new and innovative merchandise, all from re-purposed, re-cycled and re-loved everyday household items. One of my favorites has always been this spectacular planter filled with gorgeous glass flowers created with vintage glassware and plates from Creative Glass Works Boston. 

Creative Glass Works Bouquet PMRecently, I had the pleasure of chatting with the owners Ann Marie and Robert and visiting their home-based workshop.

Creative Glass Works Anne Marie and Robert PMThis husband and wife team began creating these gorgeous pieces for a local Artisans Workshop Market over four years ago. Anne Marie, whose background was in IT before becoming a master glass flower-crafter, reports that she was searching for a way to use the extensive collection of glassware she had accumulated over the years. Her husband, Robert owns and operates a renovation and restoration construction company-so beauty met brawn and the rest is history!

The workshop is bursting with shelves and tables laden with sparkling glass in every color, style and shape.

Creative Glass Works Flowers Laid Out PMThere are vases and dishes and tall blown glass sculptures.

Creative Glass Works Blue Glass Stand PMand jars filled with colorful glass beads and baubles.

Creative Glass WorksFrom light-catching dangling pendants

Creative Glass Works Pendantsto larger than life blossoms.

Creative Glass Works Red FlowerEach is individually hand-crafted, with carefully choosen pieces that complement one another and that together, resemble the anatomy of a life-like flower. Along with the clear and colored glass, Anne Marie and Robert work with ceramics and pottery,

Creative Glass Works Teapots PMcreating whimsical, one-of-a-kind teapot lamps

Creative Glass Works Teapot Lamp PMwith fashionably vintage shades.

Creative Glass Works Lampshades PM

So, make sure you visit The Creative Glass Works Boston booth while you are at the Vintage Bazaar this weekend. And if you see Anne Marie or Robert, say hello and tell them that Sue from Country Design Home sent you : ) Have a (hopefully not too bizarre) Thursday, everyone-see you at the fair! Susan


Country Living Weekend-Day 2

As promised, I am sharing the remainder of the Country Living Fair with all of you. If you love living and shopping country, but didn’t have a chance to attend, at least I am giving you a tiny glimpse of what you missed this year! (and, there is still a chance to attend one in Georgia or Ohio in the coming months.) Of course, a country fair isn’t complete without a bright red tractor

Country Living Fair Ford Tractor

and a billy goat! This one was so funny-it kept standing up on its hind legs and peeking over the railings like a baby in a crib!

Country Living Fair GoatTo my delight, I discovered a couple of craftsmen from my neck of the woods, yay!

Sage Farm Antiques, in North Hampton, NH holds a “three day antiques and collectibles show with fresh stock monthly“. Unfortunately, the photo I took wasn’t useable, but rest assured the booth was stocked with totally vintage, reclaimed and repurposed goods. Going to be sure to check that one out soon!

Sage Farms Antiques LogoI had the pleasure of meeting Addie Peet  of APFloorclothDesign.com at last year’s Vintage Bazaar. Her expertly hand-crafted and vividly-colored floor cloths always catch my eye. How sweet are these waterproof doggie mats?

Addie Peet FloorClothsThis floorcloth design is brilliant! It is a runner that is painted to resemble a hopscotch game down to the very last details, including the cracking asphalt.

Hopscotch FloorCloth Addie Peet DesignsNo more chalk on the driveway to hose down! Unfortunately, she won’t be at the Vintage Bazaar next week, but she does sell on Etsy! you can check out her website here: apfloorclothdesign.com

I met the lovely and talented Jeanne van Etten of Nantucket Mermaid who has just opened a shop on the island of Nantucket.

Nantucket Mermaid Shop PhotoSuch sweet, intricately painted heart dishes

Hand Painted Hearts from Nanctuket Mermaidand adorable hand-crafted dolls. You can check out her blog here: Nantucket Mermaid.BlogSpot or visit her shop at 4 Fair St in Nantucket. And if you do, tell her Sue from Country Design Home sent you : )

Lavender Mermaid Doll from Nantucket MermaidI walked into the very large Earth Angel Studios booth and was instantly transported into a colorful, dreamlike fairyland. The owner, Jen O’Connor started this venture in 1996 and features the works of extremely talented female artists and crafters. A few samples:

Plush fanciful soft sculptures by Nicole Bowen

Plush Soft Sculptures by Nicole BowenFrom The Land of Enchantment by Debrina Pratt –The Starlight Ballet

Starlight Ballet from Debrina PrattFrench Paper Follies by Wendy Addison

Paper Follies by Wendy AddisonAnd from Valerie Weberpal of Harvest Moon-super cool cat box!

Cool Cat Fun Town Jody BattagliaYou just couldn’t stroll past the booth from Reclaimed State from Wappinger Falls, NY

Reclaimed Statewithout noticing the soft glowing copper and amazing workmanship used to build this completely hand-crafted trunk turned cooler!

Copper Trunk by Reclaimed State

Reclaimed State Copper Trunk Corner DetailLoved this school of unfinished wooden fish decoys from the St. Lawrence River Decoys so much that I bought a couple for my porch : ) Can’t wait to paint them!

School of Fish Decoys UnfinishedFolks were buzzing around the Homestead Collection like bees on a honeycomb! Filled with cleverly repurposed and recycled vintage items such as this chicken wire wall planter

Homestead Collectionand this potter’s bench complete with vintage porcelain sink.

HomeStead CollectionIf you love mason jar anything, then you would have loved the Sweet Tea Clothing Company. The entire booth was lit with strands of mason jar lighting, hanging from branches and overhead, creating an inviting ambiance.

Sweet Tea Clothing Co lightsCouldn’t resist this very sweet mounted mason jar wall flower vase filled with daisies. Who doesn’t love mason jars and daisies: )

Mason Jar Sconce by Sweet Tea Clothing CoFrom Vintage by Crystal we discovered these fanciful miniature dolls of all types, painstakingly hand-crafted of spun cotton.

Spun Cotton Dolls Vintage by Crystal With their tiny faces, they appeared almost lifelike with the detailed decorations!

Doll Vintage by CrystalSelina Vaughn Studios from LA will also be at the upcoming Vintage Bazaar, selling their vintage seed sack handbags.

Selina Vaughn Seed Sack Handbag These are gorgeous and just the perfect stylish accessory for a country girl : )

Selina Vaughn Seed Sack Handbag

I was so busy looking and taking pics that I didn’t have a chance to buy much, but I did purchase this beautiful little painting on a distressed wood box by Mary Gregory Studio, LTD. I don’t know why this pair of sheep spoke to me, but I just couldn’t walk away… and apparently neither could the mom sheep with the little one standing on her back…Mary Gregory ArtThe originals are hand-painted art, and the ones on display were giclee prints on wooden boxes. Not sure where I am going to hang it yet in my country-inspired home, but I will let ewe know!  And finally, when we were just plain tuckered out and so hot and tired, we were happy to have a seat at the main tent stage and enjoy a demonstration on casual outdoor entertaining by Denise from The Painted Home and Kelly from Eclectically Vintage.

Entertaining with The Painted Home and Eclectically Vintage

The two of them are hilarious together, and their presentation was a hoot, but with loads of great, simple outdoor decorating ideas! Kelly even posted the cupcake liner tea lights DIY on her blog : ) So that’s it for now-hope your enjoyed this little tour. And remember, the Vintage Bazaar is just around the corner, so get your walking shoes (and your shopping totes) ready!!! Susan


A Country Living Weekend!

Country Living Fair BannersThis past weekend, I had the great pleasure of attending the Country Living Fair in Rhinebeck, NY. So, where do I begin to describe the sights and sounds of this fabulous fair?!? Let’s start with Hometalk.com and Country Living Magazine who extended the invitation and provided the VIP blogger tickets for the three day event. Here’s me with all of my fellow bloggers-I met so many nice people!!

Hometalk Bloggers The VIP passes meant we were allowed early entrance before the massive crowds arrived (and let me tell you, there were MASSIVE crowds!)

Crowd Scene from Country Living Fairto do some shopping, one-on-one chatting with so many fellow bloggers and fantastic vendors and snapping photos for Tweeting and Instagram-ming. There is no possible way for me to share information about every single vendor or event on this blog post, but I will highlight some of my favs here, with more to come in the days ahead. The fair was held in The Dutchess County Fairgrounds (if you are from around the Boston area, think Topsfield Fair, only quadruple in size), where there are many barns and outbuildings that would typically house livestock, (there were a few little guys in the 4H tent…)

Donkey at Country Living Fairbut for this weekend were home to the hundreds of sellers of the finest country wares I have seen in quite some time: antiques, vintage wares, original artwork, amazing crafts and DIY’s from the simplest of everyday items. Every time I see these custom doll statues from CA Mataruso of Tin Hearts, they make me smile : ) Late for Work on a vintage thermos-brilliant!

Custom Thermos Doll by Tin HeartsThe array was dizzying and required several go-arounds to ensure that we didn’t miss anything! Because I have so many photos to share, I am just providing a sampling today, and will focus on several of the vendors in greater detail in the coming weeks. As you all know, I am drawn to COLOR, the brighter the better, mixed all together. Now, I can appreciate the dreamy whites and creams that are so popular today, but could I live in an all-white space? Heck, no!!  While strolling through the fair grounds, these particular vendors caught my eye:

Modern June-Cool Stuff For The Hip Housewife: offering a brilliant array of colorful vintage-look oilcloths and chalk-cloths

Modern June Cool Stuff Sign CDH

Oilcloth Clutch purses from Modern JuneSome of the nicest vintage original artwork at the fair from Terri Palmer Signs

Jersey Shore by Terri Palmer

HiHo Home Market was one of our favorite booths, chock full of vintage items and so colorfully decorated! Loved these vintage checked saucepans (now why didn’t I buy those?!?)

HiHo Home Market

From Sentimentally Me was a colorful collection of beautifully preserved vintage quilts, banners, books and memorabilia. The vendor was sharing hilarious stories about her moment of fame on Flea Market Flip at the Elephant’s Trunk Flea Market, where she normally sets up shop. So funny!

Sentimentally MeI was immediately drawn into the Olive Grace Studios booth because of the clever displays of vintage-inspired fabrics, pillows & quilts-so country pretty!

Olive Grace StudiosIn the showcase at Grandmother’s Buttons was this velvet case of brilliantly sparkling rings, each created from vintage buttons!

Grandmother's Buttons RingsOne of the very first booths we entered was that of Blue Bird Home Decor, where I was instantly taken by this beautifully painted country hutch (which was sold : (

Painted Cupboard by Blue Bird Home Decorand also of the lovingly rendered oil paintings of livestock by Shelly Broughton. Never thought I would think: “How sweet is this sheep?”

Cow Painting by Shelly Broughton

This willow porch swing from Around the Bend looked so inviting with the brightly colored pillows and cushions! Can you just imagine relaxing and sipping lemonade here on a beautiful summer day?

Willow Porch Swing from Around the BendAnd finally (at least for today!) we met up with Cari Cucksey from HGTV’s Cash & Cari, who was introducing her new line of Repurpose Paints, Stains and Finishes. Yummy colors, water-based and so easy to use! These will be available shortly on her website: RePurpose Shop.

RePurpose ShopCari was so sweet and incredibly gracious, standing in her space for hours and repeatedly explaining and demonstrating the how-to’s of her products, then posing for pictures with anyone who asked! Of course, I had to get in the act as well!

Sue & Cari from RePurposeSo, there you have it, today’s colorful commentary on the Country Living Fair. I have added links to all of the vendors above so you can click on them to read more and discover what else they have available. Check back soon for another episode of A Country Living Weekend! I hope you have a color-filled Tuesday, everyone! Susan


Creative Kitchen Makeover-DIY Series-The Prep

Recently, I was asked to sample and review a new paint primer called Kilz HIDE-ALL,

Kilz HIDE-ALL

which happens to be perfect timing for the kitchen makeover I have just begun! My mom, who lives in a townhome (that was once owned by my sister…long story) has been asking for a kitchen makeover for quite some time now. Although the budget does not allow for a full gut-job and remodel, we are using paints, glazes and some elbow grease to create that “French Country” look that she adores. The kitchen is circa 1980’s construction-grade with very dark oak cabinet doors and drawers and veneered plywood boxes. In the center of each door is a white vinyl panel that was glued into place, and the backsplash is alternating 4″ square ceramic tiles in black and white stripes that mirrors the white door panels.

Mom's Kitchen View 1The appliances are fairly new and white, so they are staying, and the floor is a sheet linoleum in a vintage black and white tile pattern, so that is most likely staying put as well. So, everyone knows that the key to a successful painting job is the prep work, which I personally despise, but it must be done! In this case, those white vinyl panels and the adhesive used to attach them had to be removed. I tried many, many de-glossing, de-gooing and de-sticking type products before I could get the edges ready for priming and painting.

Kitchen Cabinets with Vinyl Panels A messy job, but absolutely essential to ensure a good outcome!

Cabinet De-Greasing Fromula 409Once that was accomplished, it was time to try the new Kilz HIDE-ALL product.

Kilz HIDE-ALL PrimerThis is from their website:  “KILZ® HIDE-ALL™, a new primer sealer exclusively available at Lowe’s stores across the country. For home interior painting projects of all types—including covering dark colored walls, masking minor surface stains, smoothing out porous surfaces and more—the undercoat offers consumers excellent hide at an affordable price. KILZ HIDE-ALL helps prepare surfaces for painting by evening out porosity and creating a consistent canvas for adding the desired topcoat. With a multi-surface formula, KILZ HIDE-ALL can be used on drywall, cured plaster, woodwork, masonry, concrete block, brick and previously painted areas. The high-hiding, fast drying, latex primer sealer helps minimize issues caused by dark colors and minor surface stains to effectively transform bathrooms, kitchens, bedrooms and more.”

Did the primer live up to the hype? You betcha!! For only $26 and some change for a 2-gallon bucket, what I got was little to no prep work and no sanding-yay! Just a quick cleaning to remove any accumulated surface grease, dirt and dust-and that pesky glue.

Kilz HIDE-ALL PrimerThe odorless primer is a creamy white color with a slightly grayish hue. It has the consistency of a watered-down school glue. Very smooth, very little dripping, brushes on easily and cleanly without leaving brush stroke marks and creates a light, bright prepped surface. And a little goes a very long way! Since these cabinet doors have had a lot of wear, the surface finish in some areas was worn away, while other areas were still shiny. The primer covered all of that evenly so that you cannot see the difference. The directions indicate that the primed surface can be re-painted after one hour with oil or latex paint, but I didn’t attempt that, as I am doing this makeover in stages, which I will be sharing as I complete each one. Brushes easily cleaned up with soap and water.  Here is a before cabinet door

Kilz HIDE-ALL Cabinet Door Before

(note the taped #? Prior to removing the doors and drawers to paint them, remember to number them and make a map so you know where they go once you are finished):

Kitchen Cabinet MapHere is the primed cabinet door:

Kilz HIDE-ALL Primed DoorA perfectly smooth, matte surface awaiting the paint and glaze. But that will be in the next installment! I hope you are having a prime Tuesday, everyone!  Susan

Disclaimer: Although the product in this blog post was provided by the makers of Kilz HIDE-ALL, the opinions expressed are strictly my own and have not been edited or altered in any way. Susan

Mother’s Day Forever Bouquet

Several Mother’s Days ago, I received a small wooden painted sign from my children. It reads:

Forever My Mother SignThat day, it brought me to tears, and it sits on my windowsill, where it catches my eye and is a never-ending reminder of how blessed I am to have the most amazing children whom I love dearly. Every year it is increasingly difficult to come up with unique gift ideas for my mom; after all, how many HomeGoods gift cards can one woman use?! (Well, in my case, I can never have enough of those, but I supposed that’s just me : ). Inspired by a gorgeous wedding bouquet that was created by a co-worker using vintage brooches and pins, I decided to make a “Forever Bouquet”. This floral forever bouquet uses only silk flowers, crystal pins and beads and any other embellishments you wish to add. Nothing to water and something that will last forever.

Mothers Day Forever Bouquet Closeup

Here is the how-I-did-it: The supplies:

1. A glass vase or vessel. It can be transparent or not. You can actually use any style vase you would like, even a martini glass or mason jar! The options are only limited by your imagination!

2. Any crystal beads, barrettes, pins and buttons you wish to use to create your bouquet. It can be multi-colored or simple.

Mother's Day Bouquet Jewels3. Florists foam, green florists tape plus any embellishments: rhinestones, lace doily, beads and a hot glue gun.

Mother's Day Bouquet Supplies5. Faux flowers: again, any type. The base of my bouquet is one large white sparkly hydrangea, which I encircled  with roses and feathers and berries- all faux (faux sounds so much better than fake, am I right?!) I also used white, pink and green roses.

Simply take the vase and place the foam in the base and press down firmly.

Mothers Day Bouquet Vase with FLorist FoamI added a touch of bling by cutting a rope of rhinestones

Mothers Day Bouquet Rhinetone Cutterand hot-gluing it to the middle of the vase.

Mothers Day  Bouquet With Rhinestone Trim

To assemble the jewelry flowers, remove any backing (such as the barrette or the pin). Add a spot of hot glue to the middle of the underside of the flower.

Mother's Day Bouquet Glueing Stem to BasePress cut stem into glue and hold until secured. When I cut the wood stems, I actually make the end rather jagged to give it better gripping power.

Floral Stem CutWrap entire stem with florists tape. Repeat with as many sparkly blossoms you would like to use in your bouquet.

Mothers Day Bouquet Wrapping StemsNow is the fun part! Start building your bouquet, beginning with the lace doily at the bottom of the vase.

Mothers Day Bouquet Vintage Doily DetailThis creates a base, much like a wedding nosegay. Next up was the one large sparkly hydrangea, to which I added a drop of glue to the base before I stuck it into the foam.

Mothers Day Forever BouquetAdded the feathers around the base, gluing each at the base and pressing them into place.

Mothers Day Bouquet Feather DetailAfter that, I arranged the flowers. I am not a flower-arranging expert, so I am not going to instruct you in the proper techniques, only to say that you should make a “dome” effect of the bouquet. I wanted it to have a tightly-packed look, but you could certainly do a more woodsy, organic look as well.

Mothers Day Forever Bouquet Closeup

I used primarily white flowers to really show off the jeweled blooms, but then added one pink rose in the center for a spot of color. Once my shape was complete and flower-filled, I started adding the jewelry flowers, one at a time, until the entire piece was completed. The final touches were some green berries and eucalyptus stems. There you have it!

Mother's Day Forever Bouquet Vintage Vignette

A forever sign of love for your forever friend or mom to cherish. And, since I won’t be blogging on Sunday, I will just say Happy Mother’s Day to all of you!! And to my mom? Well, it goes without saying, Forever My Mother, For Always My Friend. XOXOX Susan


Cottage Fresh Country Cupboard

A few days ago I shared a project that I had been working on: transforming a country cupboard from this ugly, broken, junky piece to a cottage fresh country cupboard. This was the before:

Country Cupboard Unpainted

this was the during

Country Cupboard Painted

this is now.

White Country Cupboard Signed

A simple fresh white country cupboard that is filled with some of my cherished blue and white pieces, including this vintage set of Block China that I have kept stored away for over 30 years!

Block China Blue Strawberries

I have treasured this dinner set with the luscious blue strawberries for so long, but have never had an open cupboard to display them…and now I do! In this close-up pic you can also see the wainscoting wallpaper that I had installed and painted. It just gives a little extra depth to the otherwise plain back of the piece.

Blue & White Country Cupboard

You can read about the initial transformation process, including the prepping and installation of the wainscoting wallpaper here:

https://countrydesignhome.com/2014/04/10/wow-wainscoting-wallpaper/

Once I had finished painting the cupboard, I wanted to add just a bit of glazing to the detailed trim to enhance it. BUT, I did not want to change the overall look of the piece. It needed to remain bright white to contrast with the red walls of my dining room. This concoction of DecoArt Metallic Pearl White Paint + Behr Custom Color Sample (kind of a soft tan-but I’m not sure of the color because it was in the OOPs bin at HomeDepot for 50 cents!) + Martha Stewart Tintable Glaze Effects.

Martha Stewart Glaze, Americana Metallic Paint, Behr

I mixed it all together- lets say 6 parts glaze to two parts metallic paint to one part tan paint. Very scientific.

Martha Stewart Glazing Mixture

Then I painted it only on the areas where I wanted the trim to be defined- then wiped it off with a damp rag.

brushing on glazing mixture

Just a hint of color was left behind to enhance the deep trim work.

Country Cupboard Trim Glazed

Once it dried, I then mixed the Metallic Pearl White paint and the Tintable Glaze (about 50/50) and painted over all of the raised detail and trim areas. So what I have now is an elegant piece with a pearlescent glaze finish that captures the light and makes the detail pop.

Country Design Home White Glazed Trim

Perfect. It just goes to show you what a little TLC and elbow grease can do to transform any ugly duckling into a beautiful swan. And just in time-now I can clean up the dining room and get ready for Easter, whew!! Have a terrific Tuesday, everyone! Susan


An Easter Bunny Pattern For You!

I know Easter is just around the corner, and you are probably Easter-crafted out, but I couldn’t resist the chance to share my chunky wood bunny with all of you! Many, many years ago, a dear friend of mine made this wooden Easter Bunny for me.

Pink Wood Easter BunnyFor all these years, he has been the center of my Easter decor, whether on the table, on the mantel or sitting on the buffet surrounded by yummy desserts. When Coach brought him down from the barn loft this year, I noticed that his pink coat had become dirty, worn and scratched. Not good for a bunny who needs to look his best while roaming the world delivering Easter baskets! I decided he was in dire need of a facelift. And, since I was taking him apart anyway, I thought I would trace the pattern and share it with all of you!  He was cut out of 1 1/2″ planks-very heavy and sturdy. But you could certainly use any width you would like. Here are the patterns (you just need to right-click and download them, then resize them to your specs)

The body is  14 3/4″ high by 8″ wide. You will need to cut one.

Wood Easter Bunny Pattern   The ears are  7″ long by 3 1/4″ wide. You will need to cut two of those, one for each side.

Wood Pattern Easter Bunny Ear

The arms are  7 1/2″ long by 3″ wide. You will need to cut two of those, one for each side.

Wood Pattern Easter Bunny Arm

The legs are  10″ wide by 6″ high.  You will need to cut two of those.

Wood Easter Bunny Leg

Once you have cut the pieces, you will need to cut three 3/8″ dowel pieces into 2 1/2″ lengths (assuming you are using the 1 1/2″ width wood for the bunny), one each for the arms, the ears and the legs. Using the proper size drill bit (it needs to be snug, so don’t use a larger one or else the extremities will just flop around!), drill the three hole completely through the bunny’s body. Tap the dowel through so there is 1/2″ protruding from either side.

With the same 3/8″ drill bit, drill 1/2″ deep holes into the extremities in the indicated spots on the patterns (the big black dot). Make sure you drill one on each side to create mirror images. Otherwise you’ll have a holy bunny!

The fun part: paint the bunny! Go nuts and make him polka dot or plaid or just plain and simple. He’s your bunny to keep, so have a ball. You can even have your kids give him the finger paint treatment : )If you do decide to make one, please share your pics!!

Painted Wood BunnyNow just gently twist the extremities onto the dowel sections of the body: Ears on top, arms in the middle, legs on the bottom. Or, you can mix it up and go all Picasso on him- that’s fine too. The fit should be snug so they stay in place and he stays upright. If you have made the holes too large, you will need to glue the pieces in place or add a little putty. And there you have it- a bunny that is ready to join in all the Easter fun! And my little guy? Well, he’s being painted right now, and he’s not quite ready to show off. But I wanted to get this pattern to you, just in case you need some last minute Easter fun. Have a warm and wonderful Wednesday, everyone! (I know I will : ) Susan