High Five for Easy Holiday Decorating!

Loving Christmas carols this time of year. One of my favs is “I’m Dreaming of a White Christmas“…but I’m not really. Although I love a bit of white on the ground, the rest of it (shoveling, boots, cleaning off the car, dodging giant icicles hanging from the roof, etc) is not my cup of tea.

My Little Red Ice House

But, we live in New England, so we take what we get! So far, no snow to be seen-yay! So I wanted to make some decorations with a little fake snow to give the illusion of winter, without the hassle. So, this week’s High Five For Friday goes to Santa Snow in a can!! Makes everything merry and bright and cheerful and white : )Wreath Santa Snow & Glitter My latest D.I.M. project: needing a new holiday front door wreath, I found an old autumn wreath in the barn.


Wreath Autumn

It was a little beat up, and quite a few of the berries had little bites taken out of them. Hmmm…

Wreath Berries

I think one of our barn critters thought they were having themselves a feast! So I pulled out all of the autumn leaves, and sprayed an undercoat of white enamel paint. I always keep a few of these around- at 99 cents a can, you can’t go wrong!

Wreath White Quick Color


Wreath Painted

Then I hit it with my new favorite decorating tool- fake Santa Snow in a can!! This week’s High Five For Friday! LOVE. And some sprinkle glitter- it’s bling in a bottle. LOVE. So then the berries looked like this (well, it looks prettier in person- this kind of looks like a magnified science experiment…)Winter Berries on Country Design Home Added a cheery bow (thanks to my new bowmaking skills I learned on Pinterest : ) And we have a pretty new Christmas wreath!!

Wreath Winter White

Total investment: $2.99 for the Santa Snow, $4.99 for the glitter (but I had a 40% coupon, so do the math on that) $.99 for the paint. But I only  used a fraction of those supplies, so I have plenty left over to decorate more stuff! Ribbon: $1.50 for a 5 yard roll. The wreath was a free reclaimed castoff!  Total investment: $3.00 tops! (Disclaimer: just be warned that it is very possible that you are having soooo much fun spraying snow and tying bows that you forget to go to work on time. Just saying…)

My other High Five goes to this amazing Krinner Christmas Tree Standsation.

Krinner Tree Stand Box

Nicknamed the “marriage-saver” for a reason, this is the absolutely world’s best fresh tree stand!

Krinner Tree Stand

For many years, Coach and I have done the annual tree dance of anger using one of those old screw-in type stands. There was always lots of hammering and sawing and rope-tieing and occasional yelling and frustrated sighs…Tree Stand

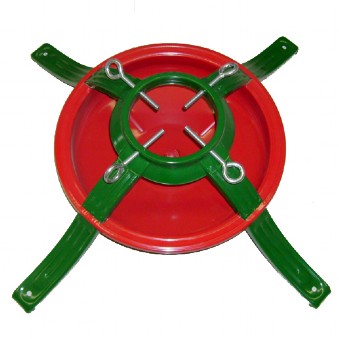
It would typically take a couple of hours for us to get the tree up in the stand, straightened and tightened, and then tethered to the wall. This year, putting the tree up took…1 minute!!! Straight and secure, no worries about toppling over. Simply amazing. To watch a YouTube how-to video, click here  (Note- this is NOT me and Coach!!!) We purchased ours last year at Orvis.com, but this year every major retailer has them, including Amazon.com. Best investment you will ever make, guaranteed!!! Now we just need to decorate it…anyone have an easy way to string lights?!10 Days til Christmas- make every minute count. Susan

Chalking It Up

I am still playing catch-up from our tropical weekend, and slowly but surely I am making the final push to get the house decorated for the holidays! For quite some time, I have been wanting a chalk board for the kitchen, not so much for notes and memos, but to add a bit of my own brand of humor to our environs. Not wanting to go out and purchase a chalkboard, and knowing that we have dozens of bins of holiday stuff that I could upcycle, I found this old tavern sign hanging around the basement. Cute, huh? Mistletoe Sign       Time for some simple D.I.M! (Do It Myself,  because if I don’t, who else will!? ) I really didn’t want to ruin the cute pic on the front, in the event that I would want to use it again. So I flipped it over to the back side, where there was a nice, clean, even surface to work with. You can pretty much transform anything into a chalkboard! Here’s how:

1. Clean, then sand the surface lightly to remove any dust or surface imperfections. Then, wipe it down with a tack cloth (you can pick these up at your local hardware store). The tack cloth is a little sticky, so it picks up all of the extra fine dust that your rag may not.

2. For the first coat, I used Martha Stewart Magnetic Paint, so the surface becomes a magnet board as well. If you don’t want that, then proceed to the next step.

Chalk Magnetic Paint Marthat Stewart

3. In between coats, lightly sand and wipe down with the tack cloth again. See what you missed with that damp rag!?

Chalk Tack Cloth

4. Paint on the chalkboard paint with a sponge brush to avoid lines.

Chalkboard Paint finish

Make sure you don’t leave any streaks or blobs of paint. Wait an hour, apply a second coat. Allow to dry for 24 hours.  Chalkboard Plaid Paint

5. Take a piece of chalk on its side and rub it all over the board- this “cures” the surface and allows you to write easily on your new board. Now write some funny, witty holiday greeting for all to see and enjoy!

Chalk curing

6. Hang it up. Decorate around it. Add a few candles. Done. So my niche in the kitchen went from this fall vignette:

Chalk board Fall Vignette

To this holiday greeting!

Chalk Finished Wall

Time to tackle the mantel! Susan 

Fruits Of My Labor

Have you ever found yourself perched on the top of a step-ladder on your front stairs, attempting to hang a decorative Apple Fan Board

Fruits of Labor Apple Fan

to enter a Holiday Front Door Decorating Contest in your town? And once you were at the very top, having the centerpiece pineapple fall off the fan board, hitting you in the head and nearly knocking you out, then having to chase it as it rolled down the sidewalk and into the street? No? So that’s just me. A little back story…

The first time Coach took me to Colonial Williamsburg, Virginia for the Christmas holidays, I immediately fell in love with all of the natural decorating elements that were used to adorn homes Fruits of Labor Apple Wreath

front doors

Citrus Wreath from Colonial Willamsburg Decorates for Christmas

Citrus Wreath from Colonial Willamsburg Decorates for Christmas

dining tables Fruits of Labor Table Setting

and front gates. Fruits of Labor Gate Wreath

No giant blow-up snowglobe lawn ornaments here! Fruits of Labor Snow Globe

Just fresh fruit, greens, pinecones, nuts and berries were used to create beautiful centerpieces and fresh garland door decorations. Since we live in an old colonial home that is perfect for this style of decor,

288

my thoughts turned to natural decor when our town announced its annual Holiday Front Door Decorating Contest a few years ago. This book, Colonial Willamsburg Decorates for Christmas“, has instructions on how to create your own fruit-laden garlands, wreaths and mantels. Perfect!

Colonial Williamsburg Book

Coach  I got out my jigsaw and cut out the half-moon shaped piece of plywood, hammering in the nails in rows where the fruit would be attached. (See illustration below)

Colonial Williamsburg Decorates for Chrismas Apple Fan Board

Colonial Williamsburg Decorates for Chrismas Apple Fan Board

Once that is done, simply staple some magnolia leaves (yeah, I know, we have plenty of those in the Northeast in winter!) to create a fan border. Impale the apples on to the nails in rows. Now here is the part I skipped…”Drive 3 tenpenny nails (that’s the size in colonial jargon- they are big) into the center of the frame in a triangle. Drive the fourpenny nail into the frame above the triangle. Twist a piece of #22 gauge floral wire around the nail. IT WILL BE USED TO SECURE THE PINEAPPLE TOP.”  No need for wire, I thought! That pineapple will stay on those nails just fine. Finished with my masterpiece and anxious to hang it for all to see and admire, I dragged out the ladder and hoisted the board over head. Now I am not certain as to the weight of this piece of art, but figuring a large plywood board with dozens of apples and a large pineapple, you’re talking 20lbs., easy. The rest, shall we say, is history. Fruits of Labor Pineapple on Street

I retrieved the rolling pineapple, stuck it back on the board after I had secured the board to the house. Perfect! Now I know you are wondering if I won the Holiday Front Door Decorating Contest, right? I think I came in second, but you really can’t hold me to that, since I had a bit of a head injury. Hope you enjoy the fruits of your decorating labor! Susan

Wandering Through Williamsburg

It’s Wanderlust Wednesday! This week, while we are wandering off to our next (and final!) wedding of 2012, I am sending you back in time to the 1700’s to Williamsburg, Virginia!

This past summer Coach and I went to the revolutionary epicenter of America, Colonial Williamsburg, Virginia, one of our favorite touristy-type spots. Anything you want to learn about colonial life in Revolutionary times, you will find it here in intricate detail,

where actors and performers portray colonial men and women working and living as they did in the 1700’s, in startlingly realistic fashion.

Stroll down the Duke of Gloucester Street, which appears as it did in the 1700’s, and you will find most shops and taverns lovingly restored and maintained through the efforts of the Colonial Williamsburg Foundation.

This is one of our favorite shops, owned by Mr. Prentis,

a purveyor of authentically fine colonial goods.

Since there is so much rustic architecture and beautiful hand-wrought brick and iron works, I decided to attempt to photograph the alphabet letters that spell Williamsburg. Not as easy as one might think! So use your imagination as I take you on the tour…

ig Makers Shop. These two lovely ladies patiently answered questions about where and when wigs were made and worn…by the colonial men!

ron Works were being created in the Blacksmith’s Shop, where despite the blazing heat and the roaring fires, the workers answered questions from the crowd.

Throughout Williamsburg you can see their handiwork, like this beautiful garden gate at the Governer’s Palace.

ivestock abound throughout Williamsburg, and can be found pulling carts and supplies.

When they weren’t working, they were resting behind post and rail fences, munching on lush green pastures.

ittle Lambs having their lunch-baaah!

nspired signs decorate the buildings, telling the story of the offerings inside. This mug of ale beckons the thirsty traveler into Chownings Tavern.

rchaeological dig sites spotted behind the buildings. Since Williamsburg has so much history buried beneath it’s pathways, dig sites are set up to unearth treasures from the 1700’s.

Many of the items for sale in the local shops, like this blue Delft jug

these salt and pepper vessels

and this politically-inspired teapot, are replicas of period pieces discovered under the ground. (you’ll have to ask Coach about the Stamp Act)

illinery Shop. These ladies spend their days stitching and creating hand-sewn dresses, skirts and accessories.

tomping the clay to created the thousands of bricks used annually to build and maintain the streets and pathways. Many of the characters that perform in the town are actually students at the College of William and Mary, whose campus sits adjacent to Williamsburg Proper.

irds for pie-baking. Four and twenty at least!!

nder the hot summer sun, women wore these colorful straw bonnets to keep cool and protected.

einactments are performed throughout the day, as soldiers and town folk tell the story of the days leading up to the American Revolution.

loves from the Milliner’s Shop, worn by the town’s gentrified elite.

So that was my walking tour, sharing some of my fav pics from Williamsburg. If you have an interest in American History, and you have the opportunity, Williamsburg Virginia is a must-see! Have a revolutionary day! Susan

So Very Thankful…

…that my holiday prep is over!! Sorry I haven’t been blogging much, it has been such a busy time around here and something had to give. Thanksgiving is absolutely my favorite holiday, and we love to entertain family and friends with a traditional turkey dinner with all the fixins! This year we had special guests from Ireland, New York and Oregon, so we tried to make it especially festive.

Since last year, my plan had been to host a primitive dinner in our re-furbished barn, but those hopes were dashed when we were rejected by HGTV. Sooo, necessity being the mother of invention, I decided to hold our annual feast on our newly vinyl-clad porch. After three long hard weekends of cutting and taping and grommeting, we had this:

So I hung thermal-lined drapes, added three tables and chairs for 22, twinkle lights and candles and then it looked like this:

Each table had its own centerpieces and decorations, using autumn leaves, burlap runners, rustic vases and candles to add a warm glow:

Once the candles were lit and the twinkle lights were glowing, it made for a pretty special (if not a bit chilly-could only use one portable heater as the others kept blowing a fuse!) outdoor dining room.

One of my young nieces walked in and said “Wow, awesome, it looks like a wedding!”

Mission accomplished. I would like to thank everyone who joined in to celebrate this special day, bringing wine and sides and pies and last-minute, hand-made place cards

and delicious hors d’oeuvres to make this dinner the best ever! Funny story about the hors d’oeuvres. My brother texted me to ask what time the party started. This was my unintended response (thank you, auto correct!)

Look for it on Ellen’s Clumsy Thumbsy : ) Hope you all had a lovely holiday as well.

On to wedding #6! Susan

Settling the Estate

Cleaning out my blog files and came across these pics taken this past summer at The Kaminski Estate Auction in Nahant, MA. The Devereaux Family Estate was once a stately white colonial surrounded by lush landscapes with views of the ocean.

Now reduced to a shadow of its former self,

with torn and moldy wallpapers,

crumbling ceilings

and ancient, broken-down kitchens and baths.

But oh, if you could only imagine what this place must have been in it’s prime-a real show stopper worthy of any decorator’s showhouse! This fabulous dining room with its wainscotted walls, crown moldings and glorious wood floors would have been the setting for many a fancy dinner party.

And the mahogany railings that spiraled up three floors were magnificent- just needing a little TLC (I guess they never heard of Glidden Gripper)

Inside the home was the tag sale with the entire contents being sold for a song. There were buyers swarming throughout the home, like red ants on a hill, scooping up boxes of vintage fabrics, mahogany furniture, antique dolls

and period lighting fixtures.

While outside, a large auction tent had been erected and was filled with Americana antiques,

unusual items like this bronze elephant

and this fortune tellers booth. Do you think one of the family members was in a traveling circus!? Also on display was an impressive collection of nautical works by important artists such as William Pierce Stubbs and Antonio Nicolo Gasparo, and a spectacular reproduction Jaguar!! A check of the website in the weeks following the auction revealed that this collection had garnered in excess of 100k!

These kinds of sales always make me wonder about the family who inhabited this space, and why it was allowed to crumble around them. We’ll never know. But my hope is that the new owners do not tear down what was once a treasured New England Home, but instead restore it to its’ former glory and pass it on to the next generation.  Moving forward… Susan

Wrapping It Up!

Last year Coach and I converted our deck into a screened-in porch, which was simply awesome. No more buggy nights, or rainy afternoons when we couldn’t use the deck for anything other than furniture storage!

Since we had decorated it with quite a few pieces of antique wicker, I decided to “shrink-wrap” it to prevent any winter weather from ruining our newest addition. We used thin plastic sheeting and some lathing strips and tacked it up all the way around. Functional, not very pretty and it wasn’t very transparent, it flapped in the wind (which drove me crazy!) and the plastic kept ripping away from the lathing. Uggh. So this year I decided to get a more permanent wrap, something we could re-use each season. I went online to purchase a custom porch weather-proofing system, only to find the prices @ $1500.00 and up, to be a bit exhorbitant. Sooo, this past weekend’s project was weather-proofing the porch, country design home style! With this how-to video on You Tube as my guide, we began the laborious task of wrapping it up!

The supplies: 20 gauge clear vinyl (heavy enough to withstand the winds and rain, clear to let in the light) and 2″ white Duck Tape

Dritz 7/16″ steel grommets

5/16″ screw-eye hooks. 

I measured each section, determining the placement for the grommets. Cut the vinyl, then wrapped the edges with the tape on both sides for extra stability, overlapping in the corners where the grommets will be installed.

Some sections had to be taped together, since the width of the vinyl is only 54″. That proved to be the most difficult part of this project, as the unrolled edges were a bit curled. You just have to smooth it as you go.

Mark the center holes for the grommets, cut out the circles and then hammer the grommet into place (this pounding away with a hammer activity is fun for anyone wanting to vent some anger or angst : ).

Hanging the large panels requires 2 people to make it level and install the screw-eyes.

The finished project : )

Hard, painstaking work, this easily took 20+ hours. The cost? All of the materials, with the exception of the screw-eyes ($5.19/50 @ Home Depot), were purchased at Joann’s using 60% coupons, of course! So the vinyl that normally would have been $7.99/yard became $3.20/yard and in total we will probably use 25 yards-so $80 + tax. The grommets, screws and tape totalled approximately $70, so the grand total (aside from the band-aids, the Motrin and a trip to the nail salon to repair that damage) comes to $150+ tax- one tenth of what the online estimate was! It wasn’t easy, but it looks great, the sun shines through year round AND we don’t have to pack away all of our deck/patio furniture-it just stays in place! And now we will have another functional space for the holidays- as long as you wear your winter coat and mittens : ) And remember, always measure 3Xcut once!! Susan

Primed for Success

OK, so back to the Hall of Shame Project…we are getting closer. Time to paint the balusters that have been covered with the drippings from the Minwax Antique Refinisher I used a while back to strip the railings. I don’t know about all of you, but I HATE prep work. The stripping, sanding, tack cloth wiping.. and the prospect of prepping all of those white poles was daunting. 

Then I remembered a product that my design instructor had mentioned: Gripper, By Glidden, this week’s High Five for Friday!

It is an interior/exterior primer, sealer, all-purpose stain killer and bonder for walls, woods, masonry, glass and previously painted metals. If you have a surface to prime, they’ve got it covered. And you don’t even have to sand!!! Just so long as it’s clean and dirt/oil free, you are good to go. OK, I am soooo in. Upon opening the can, I discovered that it is essentially odorless (although it does have all of those “harmful if inhaled warnings”), and the consistency of white school glue.

It glides on easily and smoothly, and leaves a nice, even coat. It even covered all of those brown drip marks on the first try!!

This is DIY magic in a can : ) So if any of you are attempting to complete a major renovation in the next week leading up to Thanksgiving (I know, who is dumb enough to do that?!?) then get to your local big box store and grab some Gripper! And while you’re at it, could you find me someone who will install carpeting in time for Turkey Day? TGIF everyone!! Susan

Wedding With A View

After a year in the making, and months of anticipation, this joyful wedding celebration of Jenn and Jeff was unlike any of the others we have attended in this “2012 year of the wedding”.

The ceremony was simple and heartfelt, taking place in the Charlotte Trolley Museum  and officiated by their good friend who was reportedly instrumental in their introduction.

The bride, Jenn, resplendant in a creamy white couture gown, alongside her handsome groom, Jeff

could have easily graced the cover of any glossy bridal mag. (photo via WeddingSnap.com)

After vows were exchanged in front of a hundred+ family and friends, we were off to the reception venue: “Roof With A View“. As we approached the historic old mill/converted office building, we were a little unsure about what to expect. But upon entering the office lobby, we were immediately greeted by servers with baskets of mini-muffins and glasses of red and white wine-and then escorted to the elevators to the rooftop venue. The name says it all. Roof With A View. A renovated industrial space with glossy wood floors surrounded by floor-to-ceiling glass

and an outdoor balcony with spectacular views overlooking the city and the Carolina Panthers Football Stadium. AMAZING.

The decor, simply autumn-inspired, with creamy linen tablecloths and various centerpieces that included shafts of wheat, pumpkins and gourds and ruby red cranberries was a colorful contrast to the white walls and ceiling of the venue. 

After the introductions and the official first dance as husband and wife, the party was on! Every wedding menu its own special style, this one being elegantly rustic, with a never-ending delicious variety of passed hors d’oeuvres (this was the Tomato Bisque Shooter : )

A scrumptious meal of beef tenderloin, salmon, shrimp and grits, mac ‘n cheese and lobster bisque was served, followed by a yummy dessert table. These little canning jars, tucked inside an antique frame trays, were filled with apple and cherry cobbler. Delish!

In lieu of a traditional wedding cake, a sweet tower of cupcake bites drizzled in chocolate and caramel.

And of course, the bride’s favorite gummy bears (that, as it turns out, are quite delicious soaked in a bath of vodka : )

As the evening wore on and the sun began to set, the venue glowed with thousands of twinkle lights reflected in the glass, and the cityscape turned shades of blues and pinks.

From outside, you could see the dance floor was hopping!  

A few special touches: the photo booth by Fun Mugs – so much fun to be dressed up and silly with all of these props!

A little high-tech wedding share: WeddingSnap.com, where guests were able to text or download their pics from their smartphones. As the night progressed, the pics were posted for all to see and enjoy-brilliant! (Although, I do have to say that the quality of the photos trended downward as the evening wore on. Perhaps something to do with the fabulous top shelf open bar?!?)

A table featuring framed family photos- a loving touch.

This was the city view at nightfall.

A special thanks to our hosts, Kathie and Rich, who invited us to share in this most special occasion and hosted quite a party!

And congrats to Jenn and Jeff, the new bride and groom! Our wishes for a lifetime of great love and great adventure from your own roof with a view. Susan (& Coach)

Southern Hospitality

Sorry I have missed a few posts this past week! Over the weekend, Coach and I joined many of our closest friends at a destination wedding in Charlotte, North Carolina. What a whirlwind weekend, packed full of partying and fun, as we were treated to not only a spectacular wedding, but also a lovely rehearsal dinner, hosted by the parents of the groom. I have so many photos! Too many for one post, so today I will share the rehearsal dinner, which took place in the Charlotte Trolley Museum.

Upon entering, we were greeted by an authentic antique yellow trolley

a throwback to an era when streetcars were the people movers through the Queen City named after Charlotte of Mecklenburg-Strelitz

featuring aged leather seats, wooden flooring…

and a vintage conductor’s cap and coat hanging at the ready. “All aboard!”

The decor was autumn- themed, featuring these gorgeous centerpieces

glass vessels filled with flowers, berries and leaves, adding touches of brilliant fall colors.

The dinner? Southern fried chicken, BBQ pork, hush puppies and amazing mac and cheese- all scrumptious southern comfort food. For dessert, luscious pecan bars and these adorable sunflower cupcakes with an M&M ladybug- so cute!

As favors for the guests, these little surprise packages filled with a favorite treat of the bride’s: gummy bears : ) This dinner was such an unexpected treat, oozing that southern hospitality we northerners hear so much about! If this was any indication of the wedding bash to come, we were certainly in for another fab evening! But for that, you’all will have to come back tomorrow : ) Have a great Monday! Susan